Vehicle FAQ
1. Lot Sale 2. Re-Run 3. Roll Over 4. Stock In 5. Batch Re-Run 6. Check In 7. Edit Vehicle 8. Vehicle Search 9. No Sale 10. Replace Buyer 11. Replace Seller 12. IF Accept 13. IF Sale 14. Pre-registration 15. Arb and Arb Accept 16. Vehicle Invoice_Orders Statement_Vehicle Statement 17. Pickup, hold, and Delete Pending 18. Remove Order 19. Vehicle Settle (Buy Settle and Sell Settle Orders) 20. Refund Settlement
- Lot Sale Order
- Re Run Order
- Roll Over Order
- Stock In Order
- Batch Re Run Order
- Check In Order
- Edit Vehicle
- Vehicle Search
- No Sale
- Replace Buyer
- Replace Seller
- If Accept
- IF Sale
- Pre-registration
- Arb and Arb Accept
- Buyer Invoice-Vehicle Statement-Order Statement
- Edit, Hold and Delete Pickup
- Remove Order
- Vehicle Settle (Buy Settle and Sell Settle Orders)
- Refund Settlement
Lot Sale Order
The Lot Sale is used to Sell Vehicles that are not on the Block. The order may be launched from two places:
Lot Sales may be performed on vehicles that are:
- Checked In (CI)
- Roll over (RO)
- No Show (SH)
- No Sale (NS)
- If Down (ID)
- Turn Down (TD)
Dealer Profile
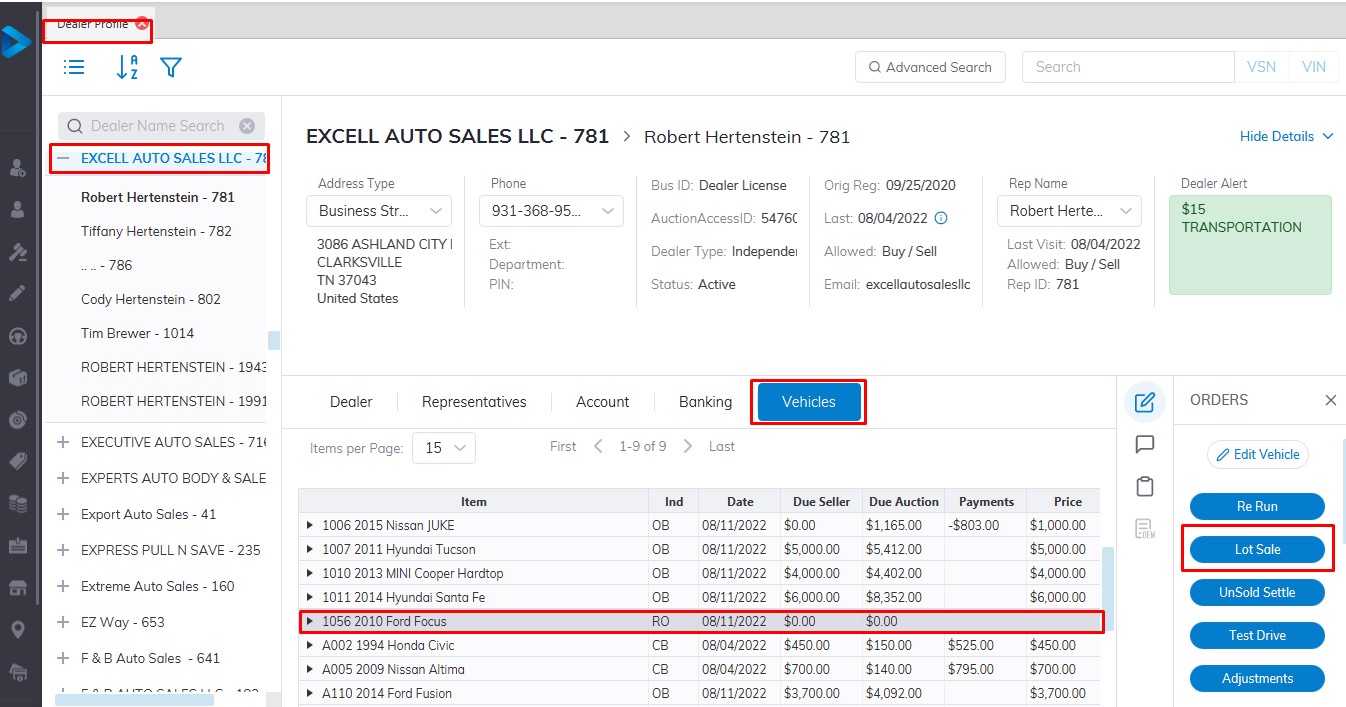
Select
- The Dealer
- Then select the Vehicle Tab.
- Select the vehicle you wish to Sell.
- Select the Lot Sale order button.
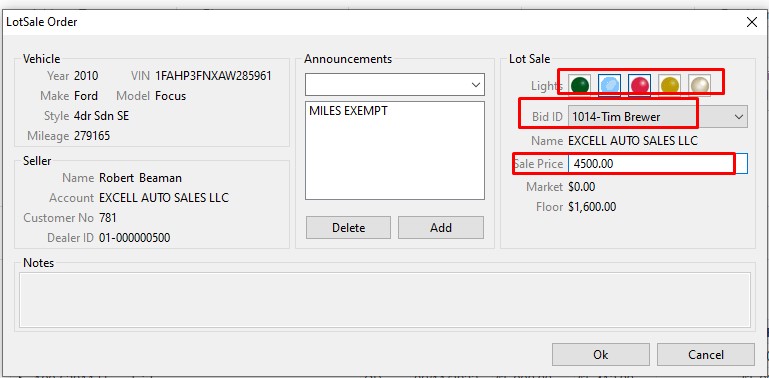
- Input Bid ID or select from the drop-down listing and Price.
- Click 'OK' to Complete the Sale
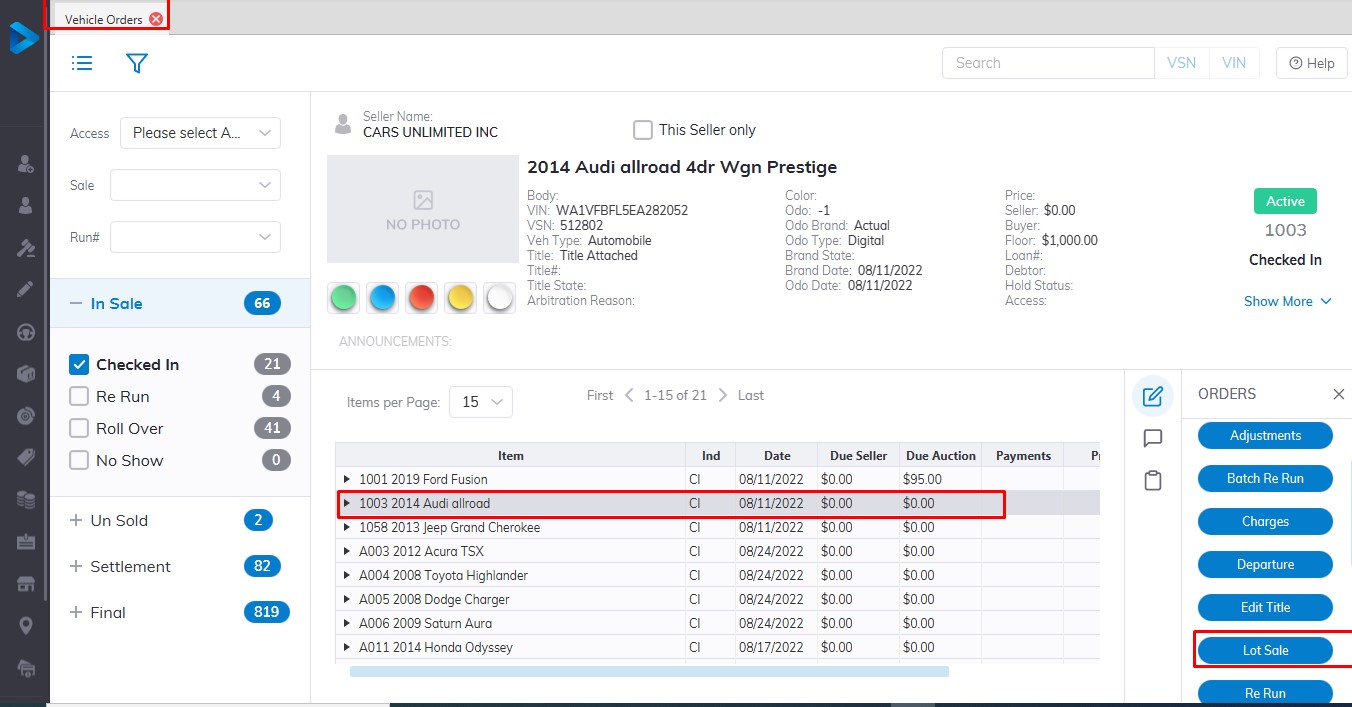
Select the Vehicle Order profile from the main menu
- Then select the Vehicle you wish to be sold from the vehicle orders application
- Select the Lot Sale order button
- Input Bid ID or select from the drop-down listing and Price
- Click 'OK' to Complete the Sale.
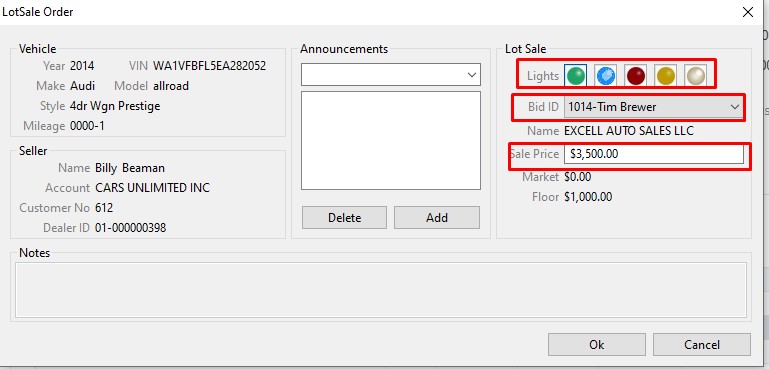
Note: Lot Sales do not automatically print an invoice, you must print one manually from the Reports menu.
Re Run Order
The Re Run order changes the Run Number of a vehicle (not the Sale Date).
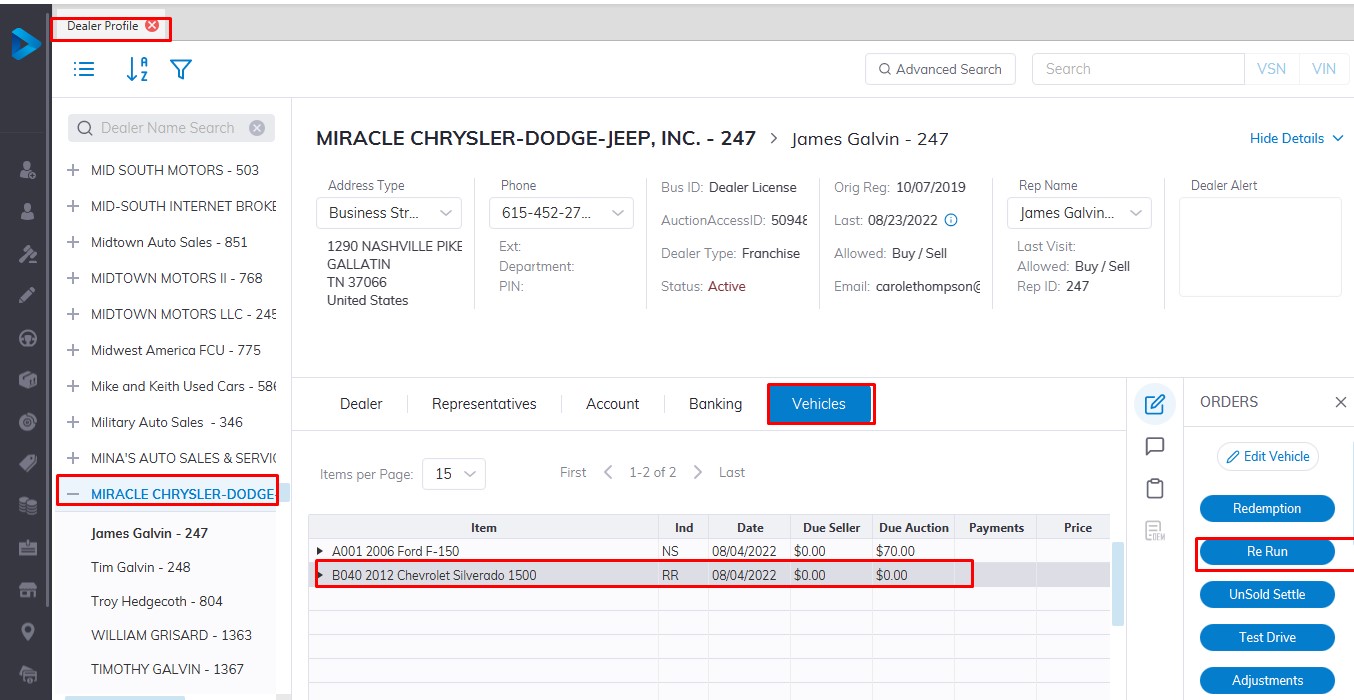
from the Dealer Profile select
- The Dealer
- select the vehicle tab
- Select the vehicle you wish to re run in the grid.
- Then select the Re Run order button
- Click 'OK' to launch the form
Input
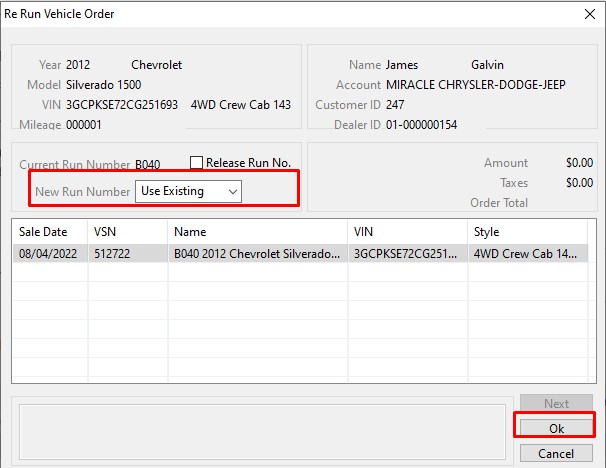
Run Number from the list box
Click 'OK' to Save
Note: You may not select Run Numbers that have already been Checked In. It may be necessary to Release a reserved Run Number from another Dealer before you can use it.
The Re Run order may be performed on:
- Checked In (CI) Vehicles
- Re Run (RR) Vehicles
- Roll Over (RO) Vehicles
- No Show (SH) Vehicle
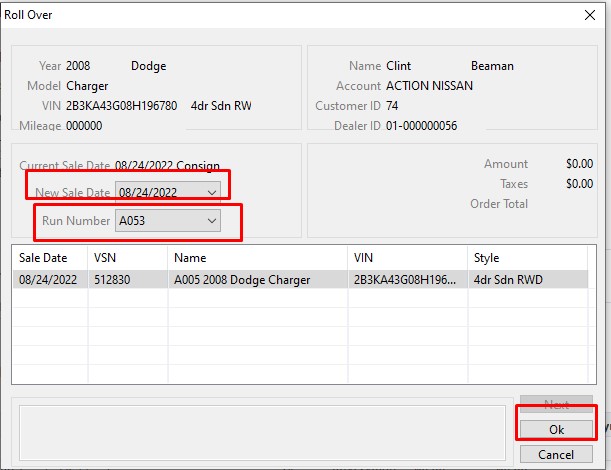
Roll Over Order
The Roll Over order changes the Run Number and the Sale Date.
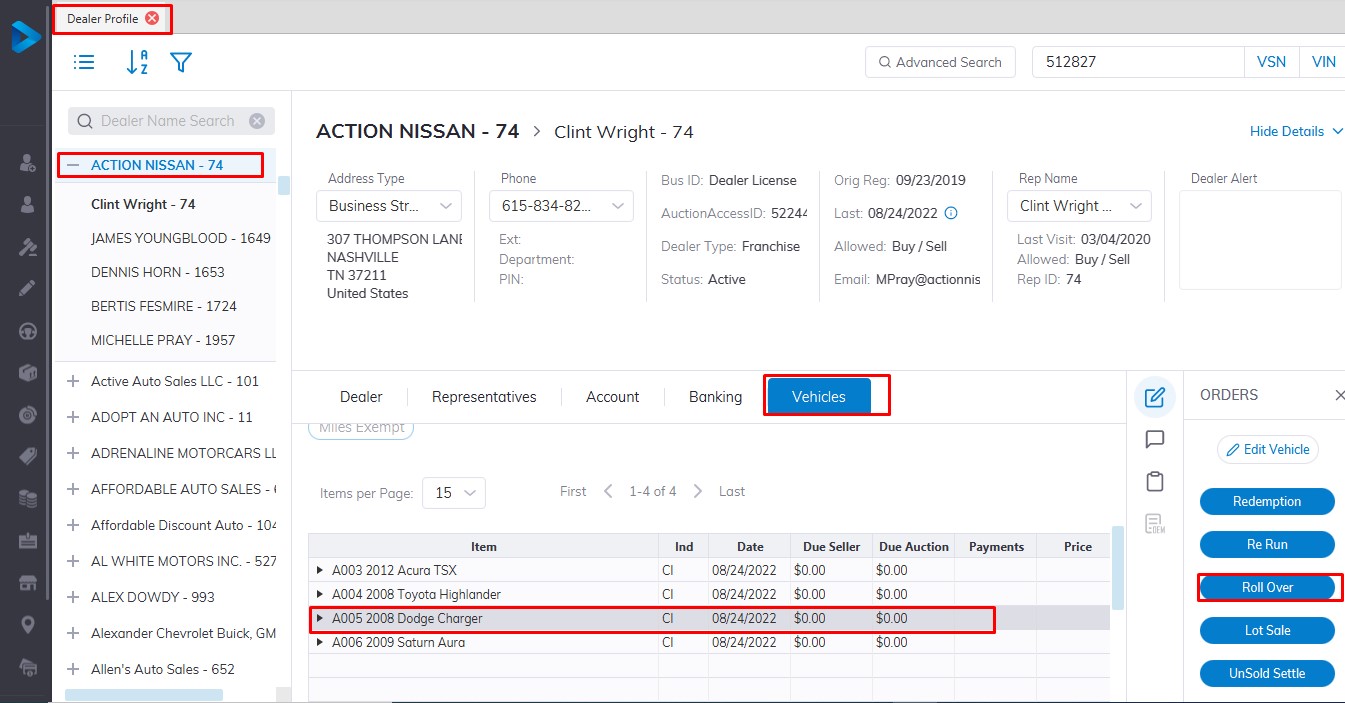
From the Dealer Profile select
- The Dealer
- Select the 'Vehicle Tab'
- Then select the Vehicle in the grid.
- Then the Roll Over order button
Input
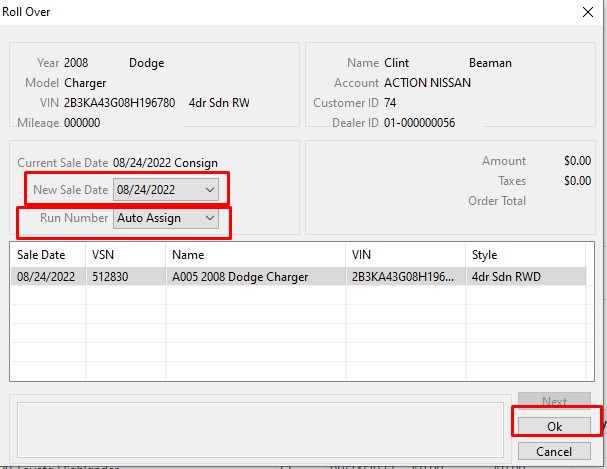
Run Number or accept 'Auto Assign' and Sale Date from the list box
Click 'OK' to Save
You may not select Run Numbers that have already been Checked In. It may be necessary to Release a reserved Run Number from another Dealer before you can use it. Here we select Run Number A053.
The Roll Over order may be performed on:
- Re Run (RR) Vehicles
- No Show (SH) Vehicles
- No Sale (NS) Vehicles
- If Down (ID) Vehicles
- Turn Down (TD) Vehicles
Stock In Order
Stock In Order - places a vehicle into Inventory (fleet - lease) vs. directly in a Sale (consignment).
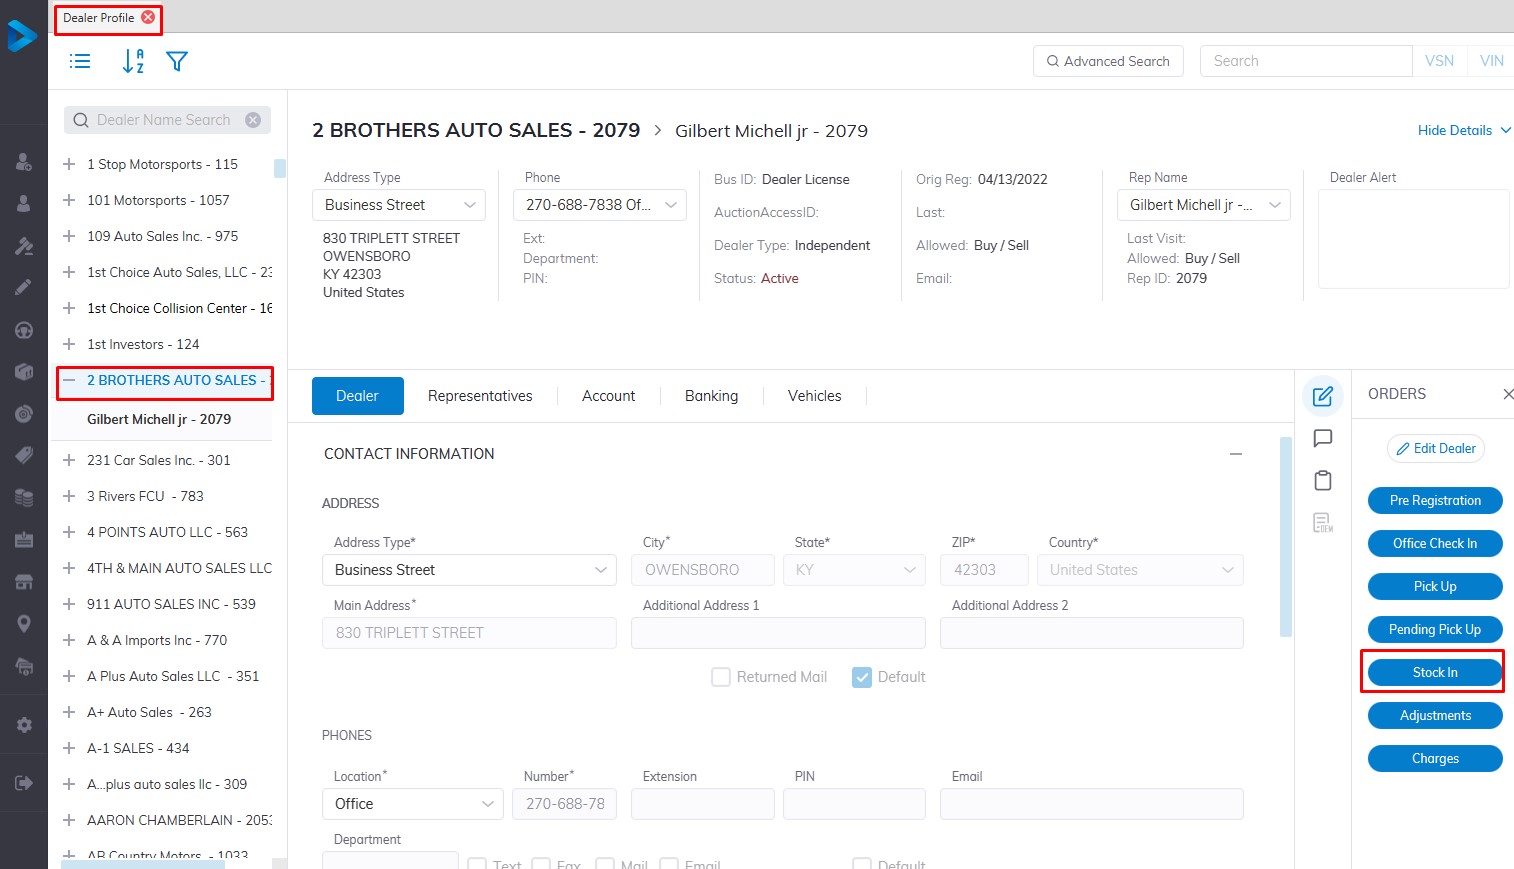
- Select Dealer Profile Application
- Then select the Dealer, you want to Stock In a vehicle.
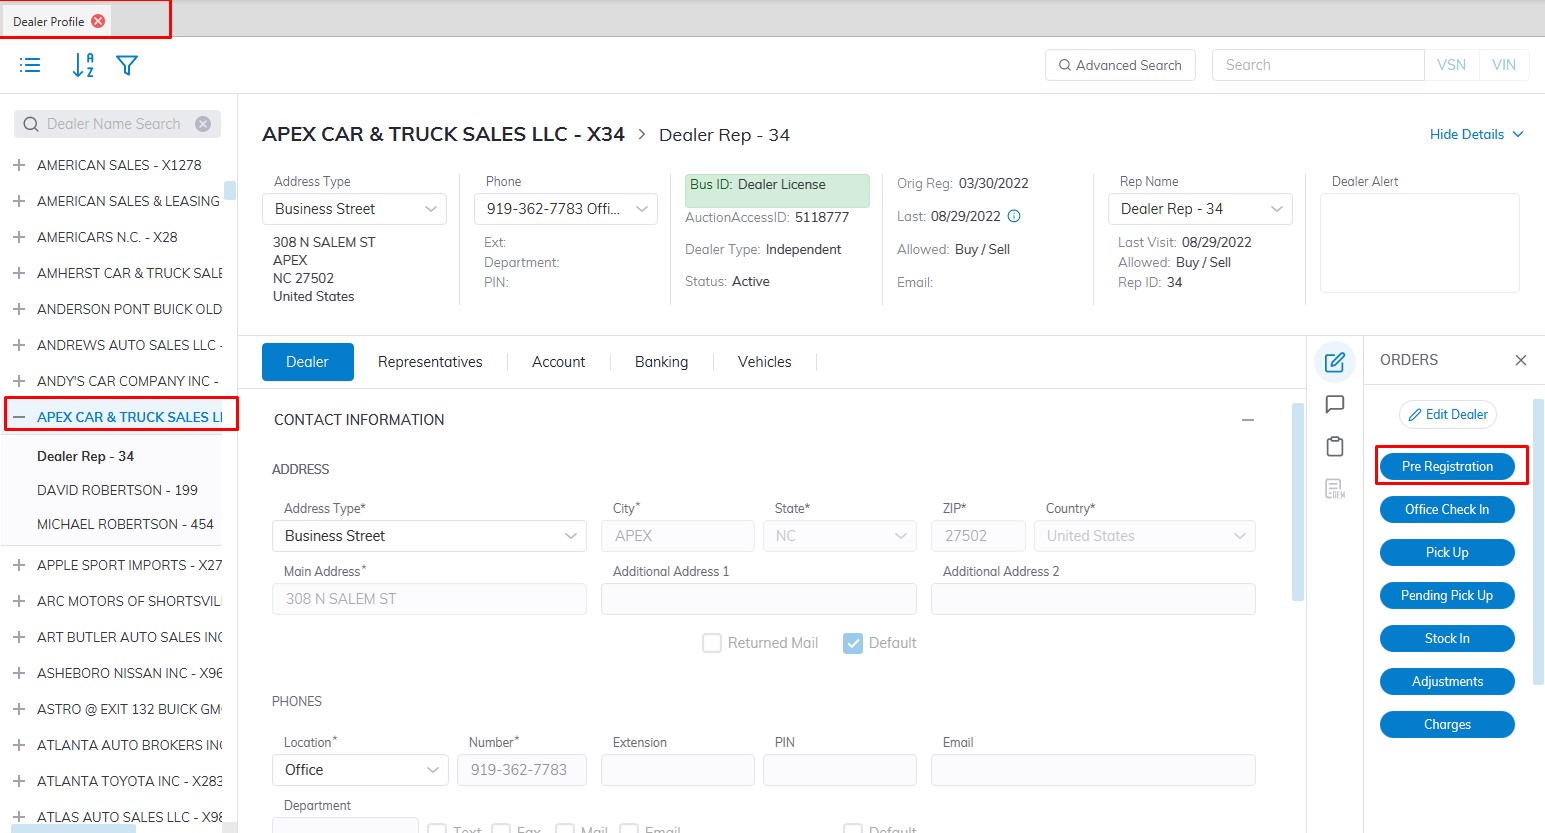
- Select the 'Stock In' order button under the Order column on the right side
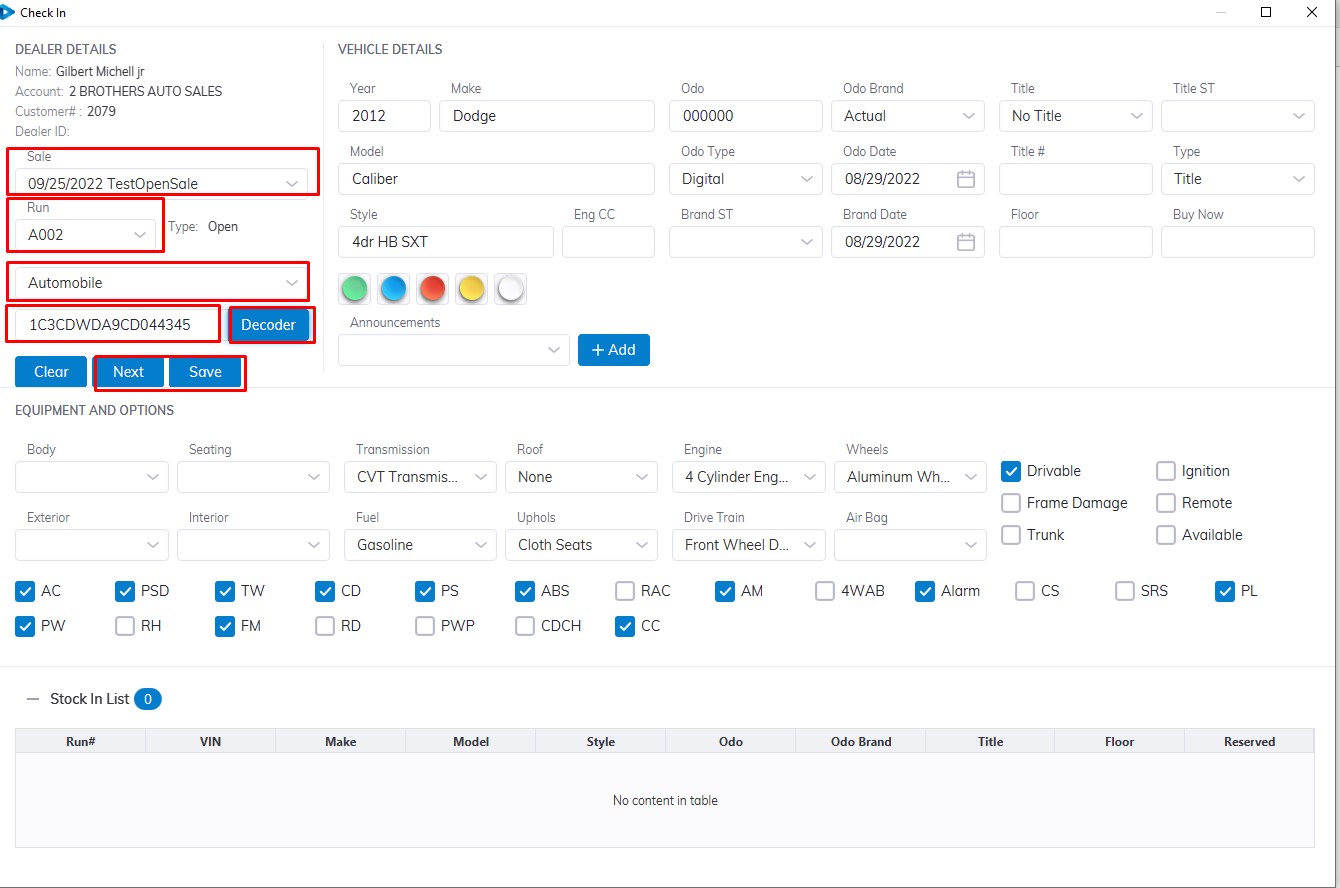
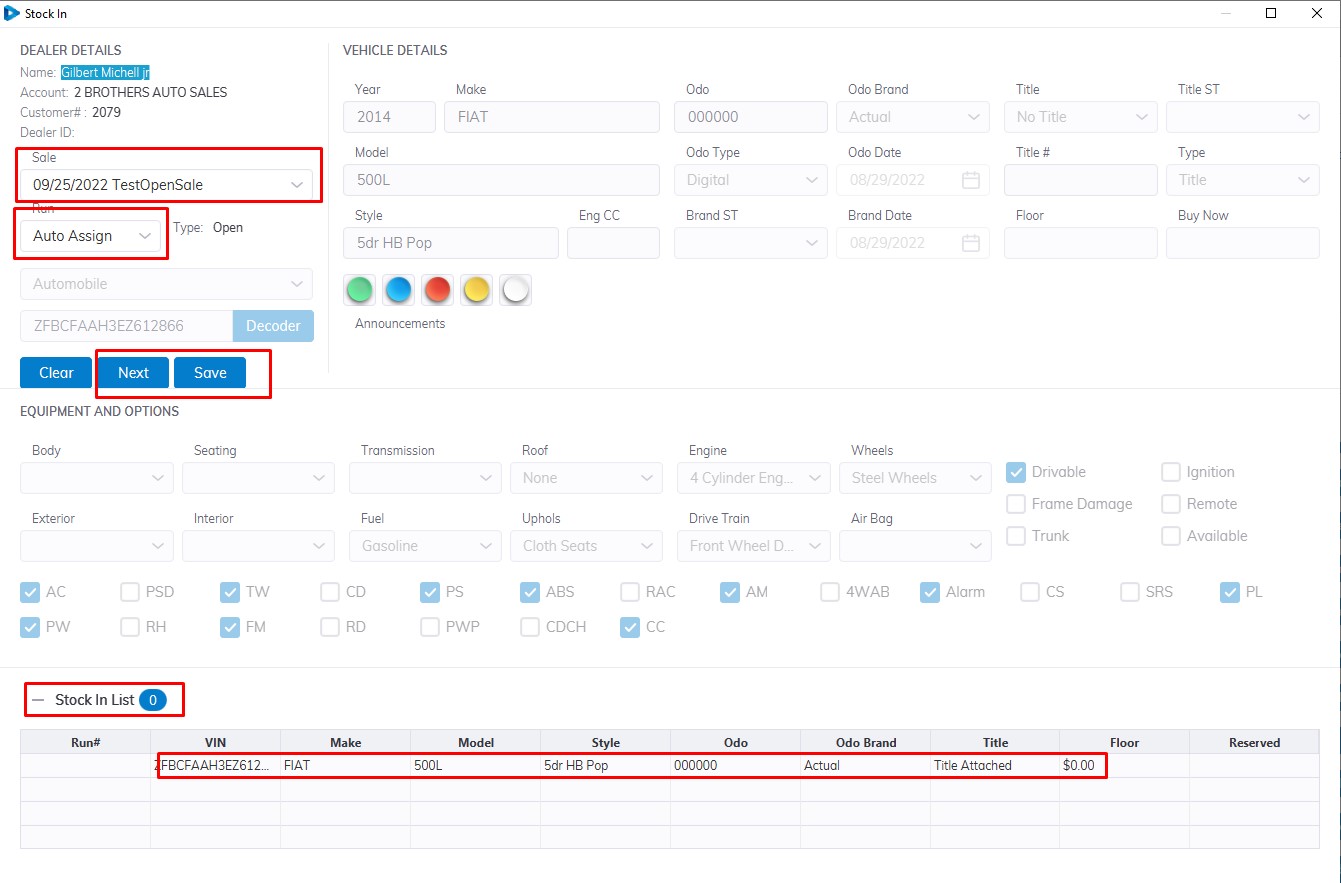
- This will launch the stock in the form
Reminder: Whenever you go into Dealer Profile, select the dealer you wish to work with!
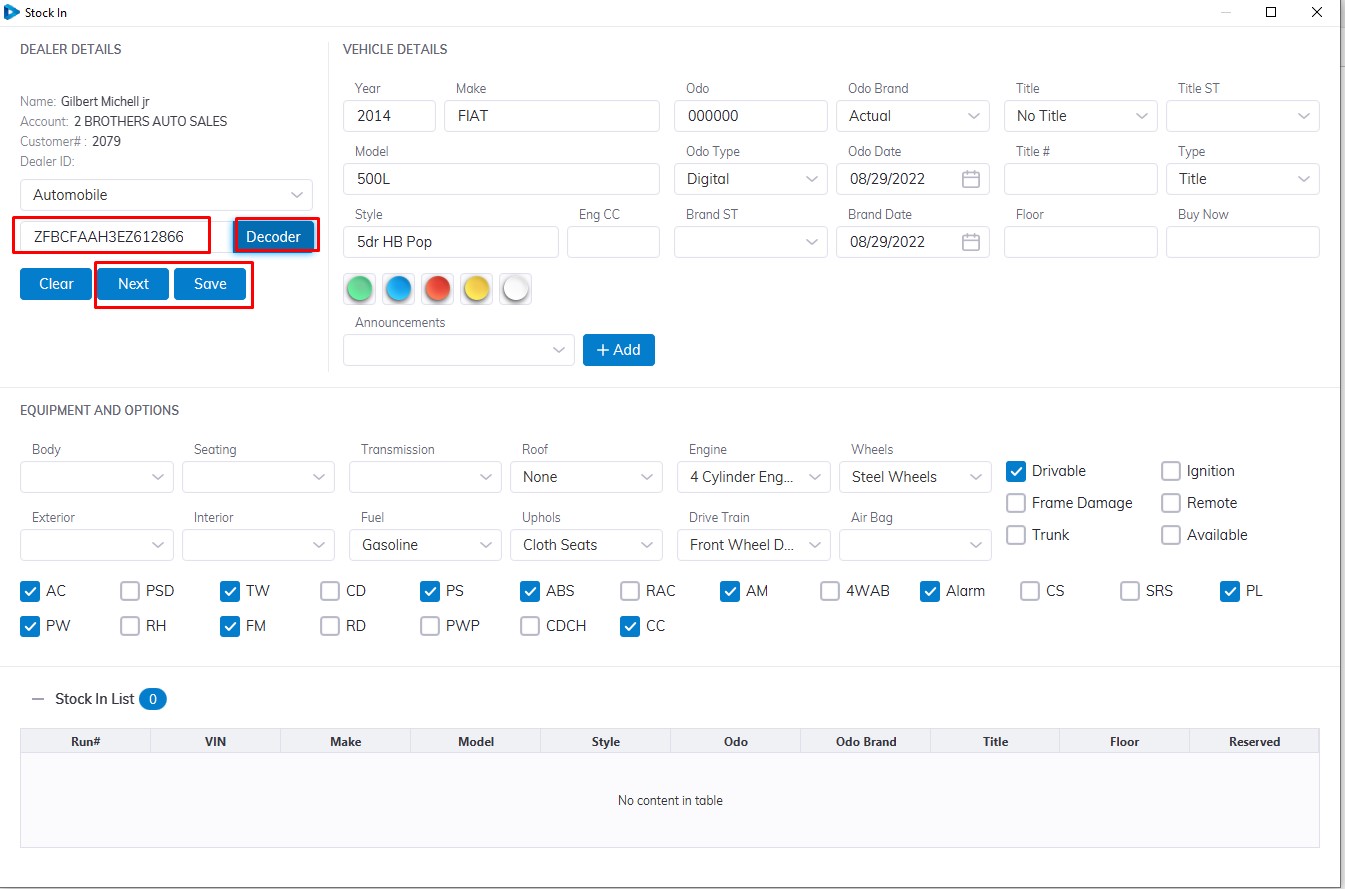
Input
- VIN (vehicle identification number)
- Vehicle Type ( Automobile is the default you can select from the Dropdown)
Please note that the VIN must contain 17 digits.
Select the Decoder button to decode the vehicle trim level and style
Check if vehicle information is correct then select the 'Save' button to Complete
In the case of multiple vehicles for the same Dealer, you can select the 'Next' button to enter another vehicle for Stock In

Note: The Sale Date and Run Number are absent since this vehicle is not heading to a sale.
After Stock In the vehicle will be added to the Dealers Inventory Tab under the Vehicle Tab and is assigned a VSN number or Stock number
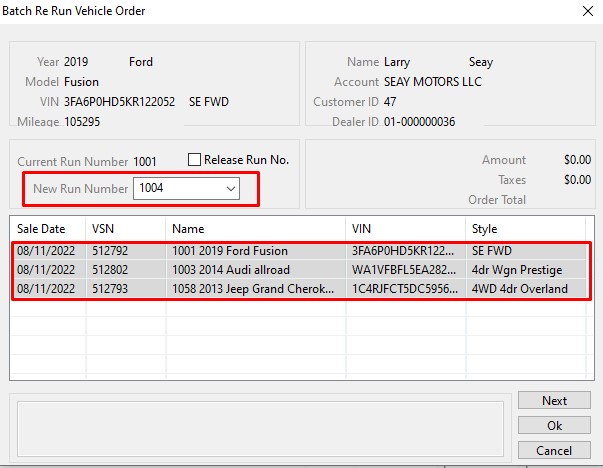
Batch Re Run Order
The Batch Re Run order allows a user to move multiple cars from one 'set of run numbers' to 'another set of run numbers' all in a single action (no need to move one vehicle at a time). This is especially useful if a seller pulls a block of vehicles from the front of the lane.
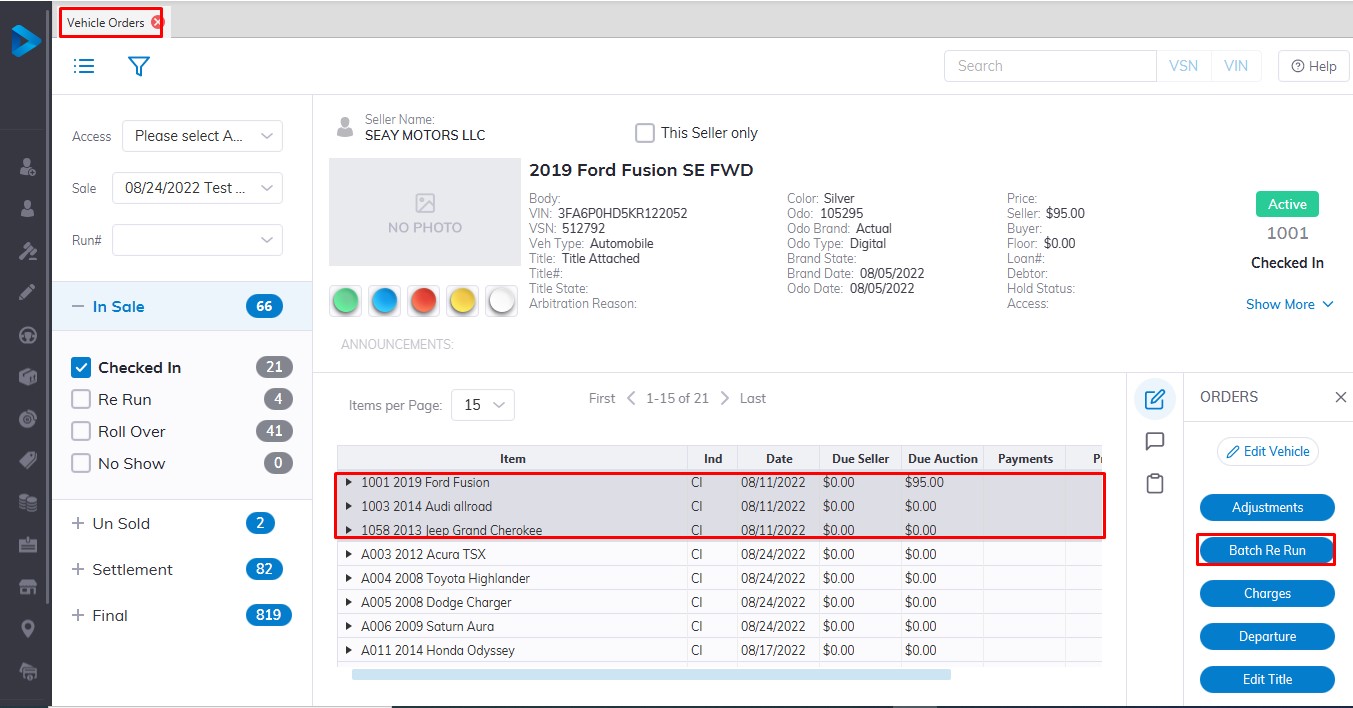
NOTE: Sales Stickers will not automatically print when you use the 'Batch Re Run' order.
Before doing the 'Batch Re Run' order you MUST clear a pathway for the incoming run numbers. This requires you to select the check box in the Batch Re Run form:
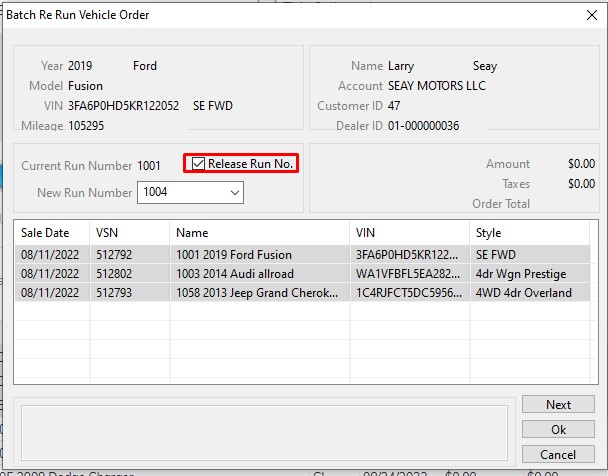
Click 'OK' to move all the Run Numbers at once.
Here we select 1004 as the first number in the series of run numbers as the starting point.
Check In Order
Office Check-In - order places a vehicle into a Sale (consignment) vs. In Stock (fleet/lease).
Reminder: Whenever you go into Dealer Profile, select the dealer you wish to work with!

- Select Dealer Profile Application
- Then select the Dealer, you want to Check-In a vehicle.
- Select the 'Check In' order button under the Order column on the right side
- This will launch the Check-In form for you to complete.
Please note that the VIN must contain 17 digits.
Input the
- VIN
Then select
- Sale Date
- Vehicle Type ( Automobile is the default you can select from the Dropdown)
- Run Number (If there are no pre-registered run numbers for this Dealer, the system will attempt to 'Auto Assign' the next available one unless you manually select an alternative.)
- Select the Decoder button to decode the vehicle trim level and style.
- Check if vehicle information is correct then select the 'Save' button to Complete the Check-In form.
- In the case of multiple vehicles for the same Dealer, you can select the 'Next' button to enter another vehicle for Check In
Or you can Check-In from the Inventory Tab under the Vehicle Tab for vehicles that were already Stock In.
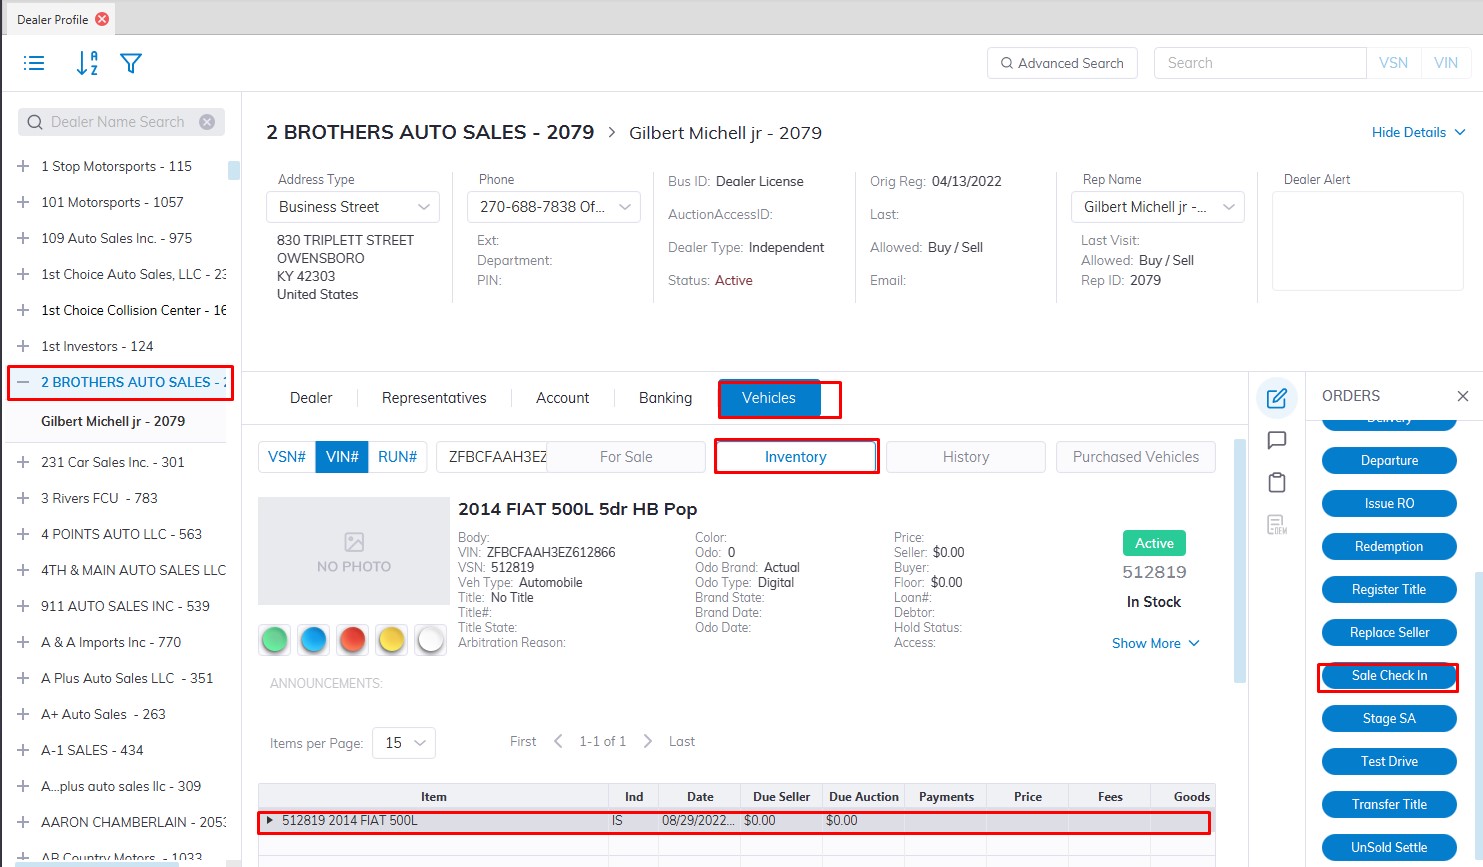
- Select the Vehicle Tab then Inventory Tab
- Select the vehicle you wish to Check-In for Sale.
- Select the Sale Check-In button on the right under Orders
- This will launch the Check-In form for you to complete.
Then select
- Sale Date
- Run Number (If there are no pre-registered run numbers for this Dealer, the system will attempt to 'Auto Assign' the next available unless you manually select an alternative.)
- Check if vehicle information is correct then select the 'Save' button to Complete the Check-In form.
- In the case of multiple vehicles for the same Dealer, you can select the 'Next' button to enter another vehicle for Check In
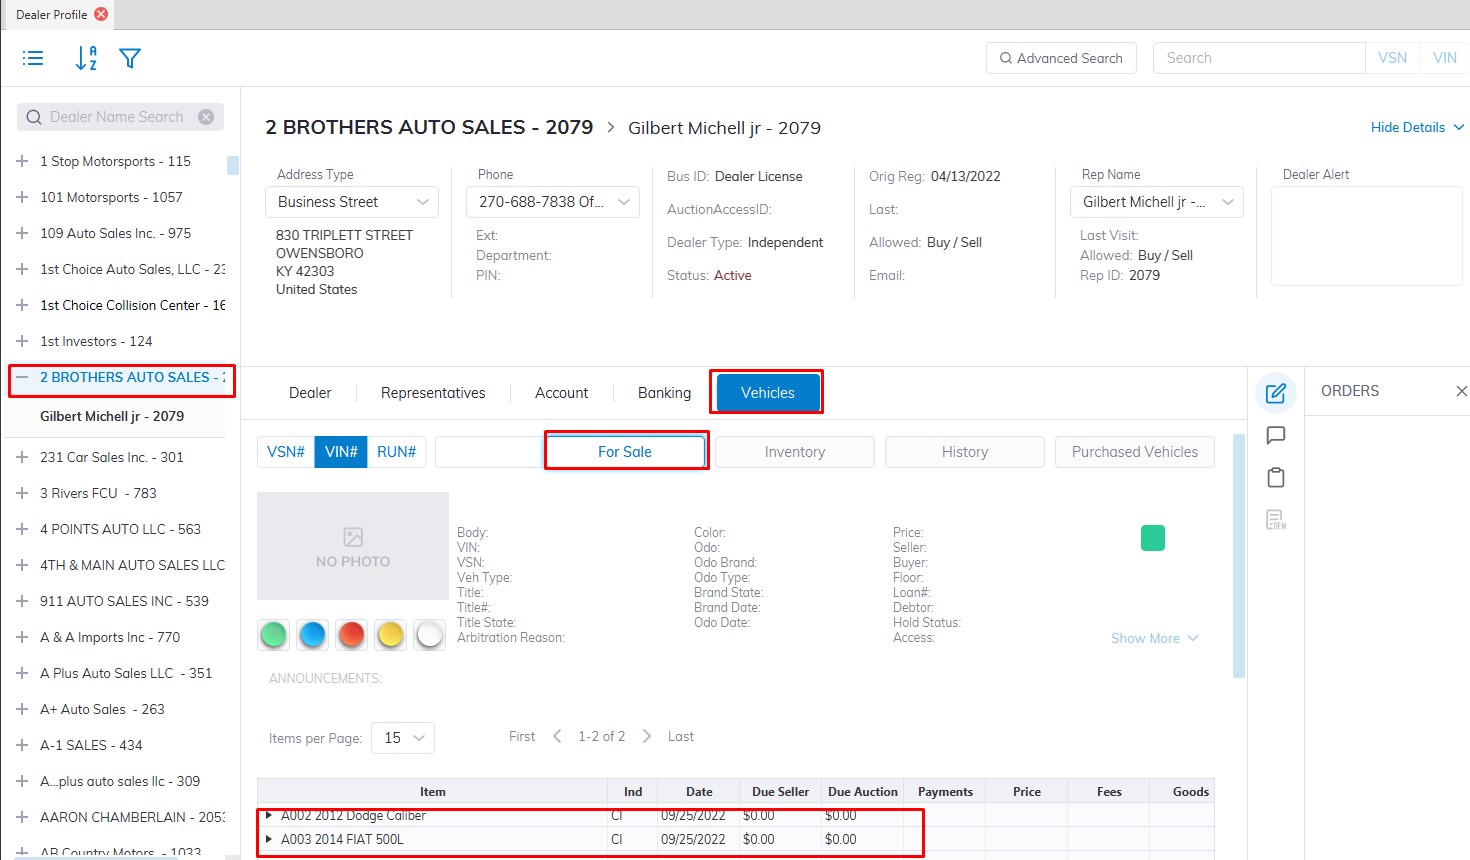
After Check In the vehicle will be added to the Dealers For Sale Tab under the Vehicle Tab.
Edit Vehicle
Vehicles may be Edited from the Dealer Profile, Vehicle Block, or Vehicle Management applications.
Note: You may also double-click on the vehicle in the grid of the Dealer Profile or Vehicle Orders application to bring up the 'Edit Vehicle' form.
From Dealer Profile
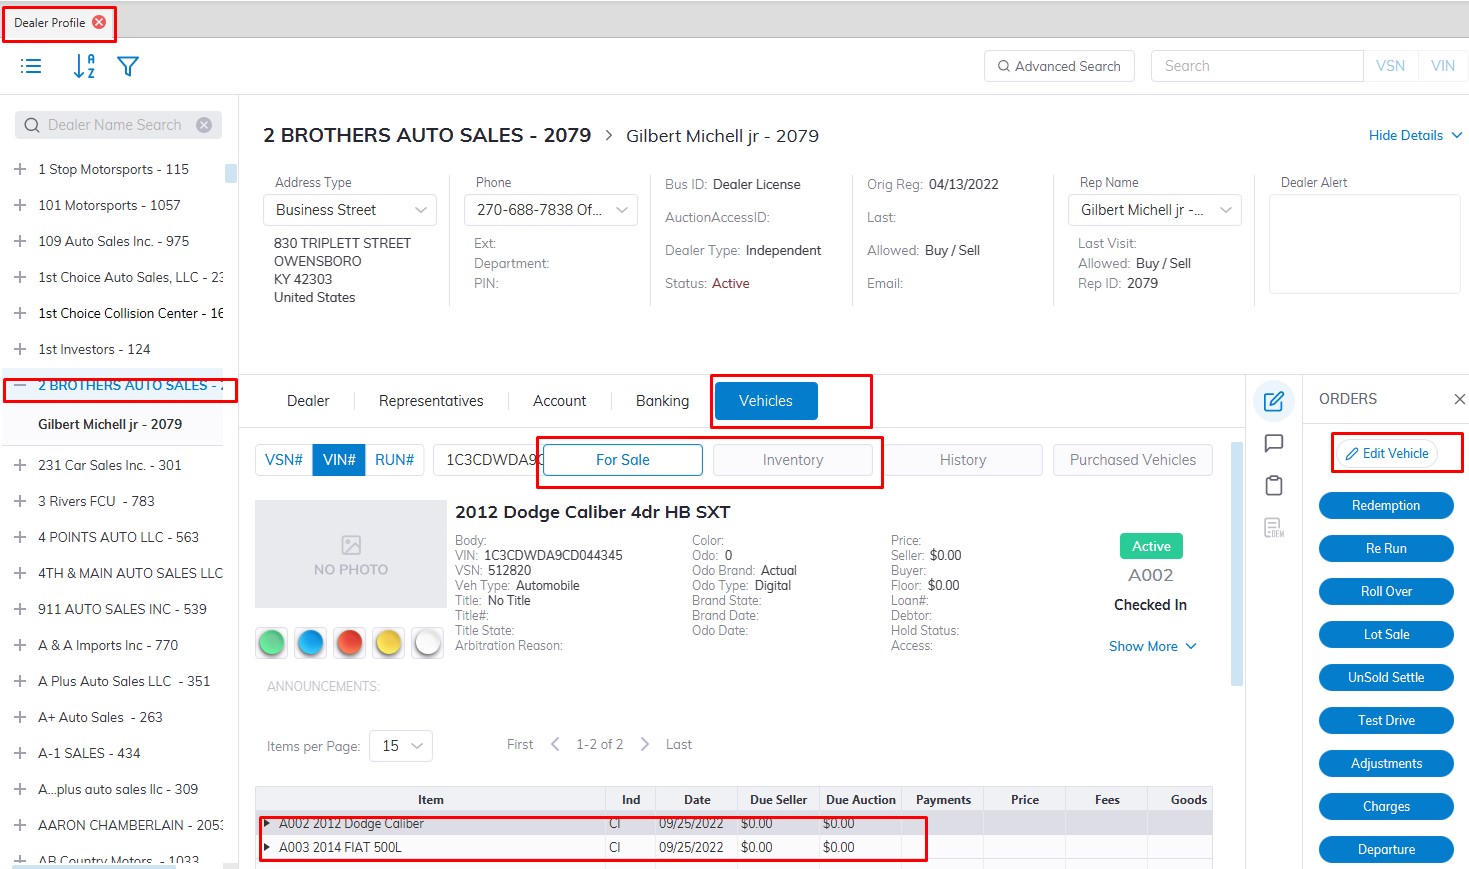
- Select the Dealer Profile Application
- Select the Dealer where the Vehicle you wish to Edit.
- Select Vehicle Tab.
- Then Select any vehicle in the Subsection For Sale or Inventory in the grid.
- Select the 'Edit Vehicle' button from the 'Orders' menu on the right side to launch the form.
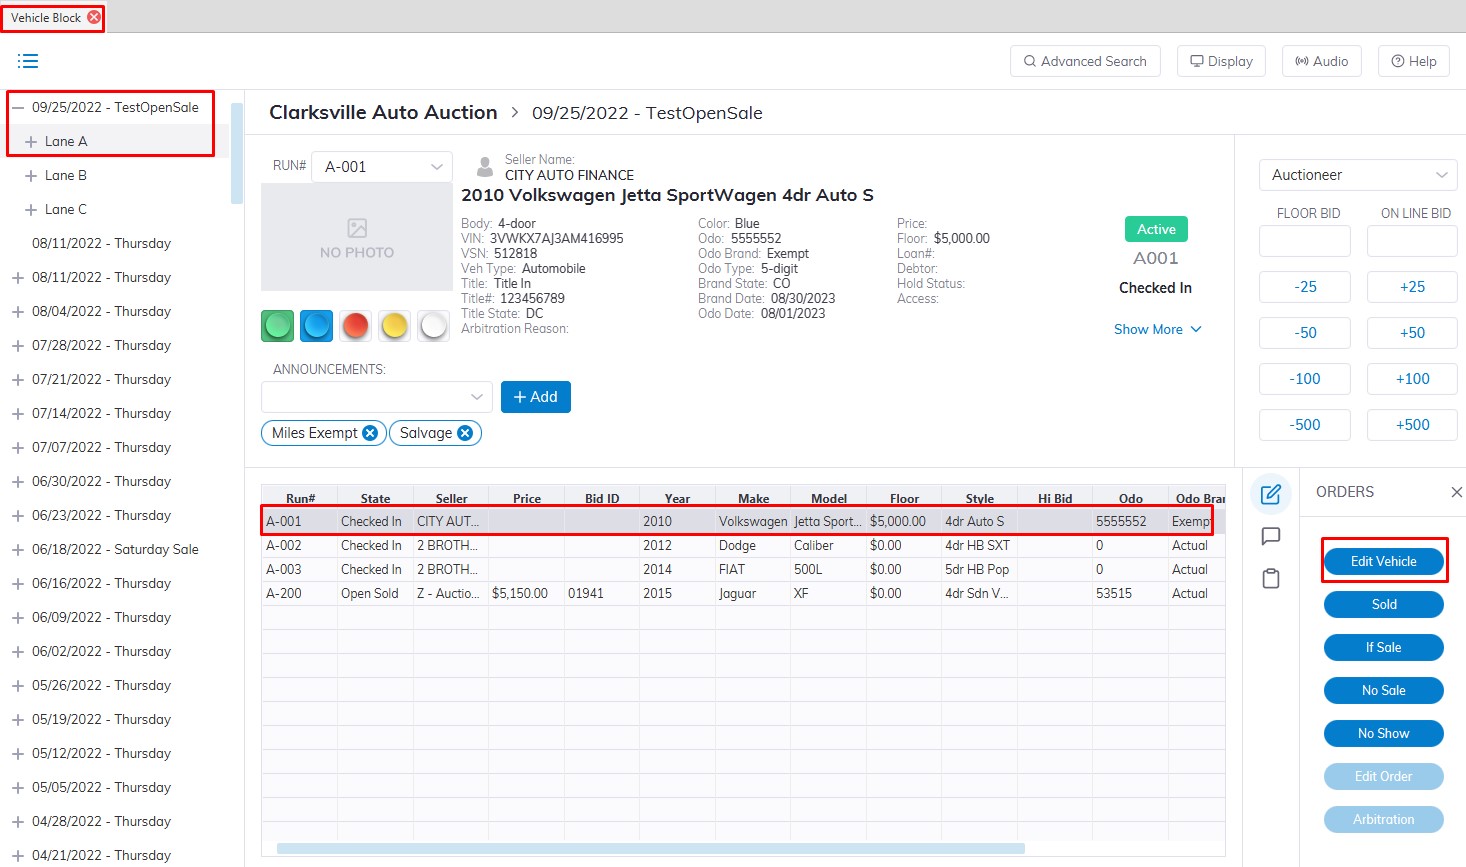
From Vehicle Block Application
- Select the Vehicle Block Application
- Select the 'Sale Date' and 'Lane' where the Vehicle you wish to Edit is Checked In.
- Select the Vehicle in the grid.
- Select the 'Edit Vehicle' button from the 'Orders' menu on the right side to launch the form.
From Vehicle Management Application
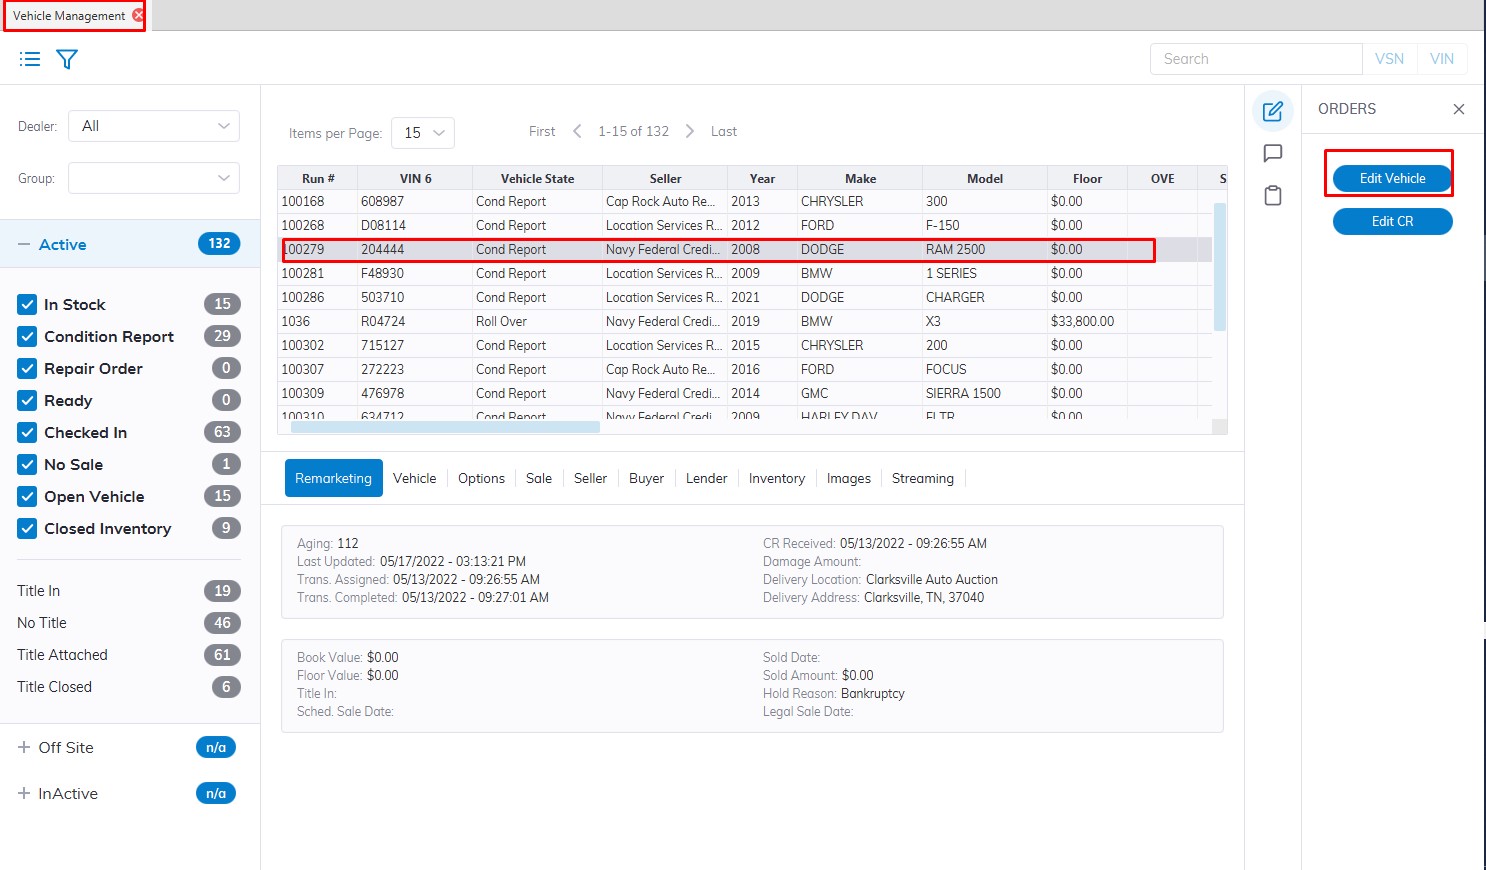
- Select the Vehicle Management Application
- Search and Select the Vehicle in the grid.
- Select the 'Edit Vehicle' button from the 'Orders' menu on the right side to launch the form.
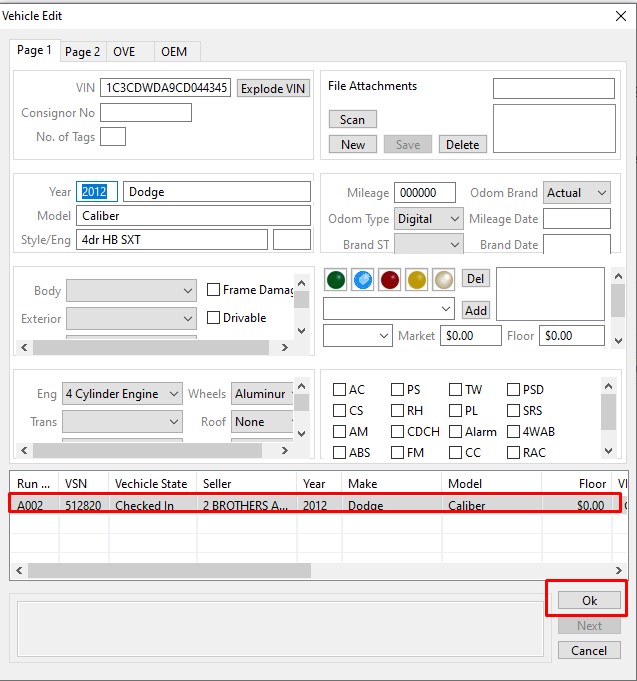
Edit vehicle form allows you to edit Basic vehicle information:
- VIN - use the 'Explode VIN' button to re-explode VIN (style input may be required)
- File attachments may be added to a vehicle (click the 'new' button, name the file and click 'save')
- Year
- Make
- Model
- Style
- Consignor Stock Number (used for tracking purposes)
- Odometer Reading
- Unit of Measure (default it English)
- Odometer Brand State
- Odometer Brand (actual, exceeds, rollback, broken, not actual, unknown, repaired, replaced, or exempt)
- Mileage Date (today's date)
- Brand Date (date of branding - today's date)
- Page 2
Options and Announcements can be Edited
- Body
- Exterior Color
- Interior Color
- Seating
- Frame Damage
- Drivable
- Ignition Keys
- Trunk Keys
- Remote Keys
- Lights (Green, Blue, Red, Yellow, and White)
- Grade
- Market Value
- Floor Amount
- Announcements (Add on the 'fly' or select from the list)
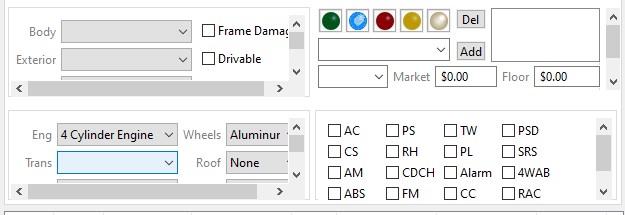
Click the 'Add' button
Use *P after any announcement to make it permanent to the VIN for future use. Any two-digit number before any announcement will code the announcement as 'Internal Only' and will not appear on any paperwork.
Note: If a user adds an announcement 'on the fly it will not be kept in the database for future use in other announcements.
- Engine
- Wheels
- Transmission
- Roof
- Fuel
- Upholstery
- Drive Train
- Body
- Exterior
- Interior
- Seating
- Air Conditioning
- Power Steering
- Tilt Wheel
- Power Seat Driver
- Cassette
- Power Lock
- Supplemental Restraint
- AM Radio
- CD Changer
- Alarm
- 4 Wheel Anti-Lock Brakes
- Anti-Lock Brakes
- FM Radio
- Cruise Control
- Rear Air Conditioning
- CD Player
- Power Windows
Also, we can edit Page 2
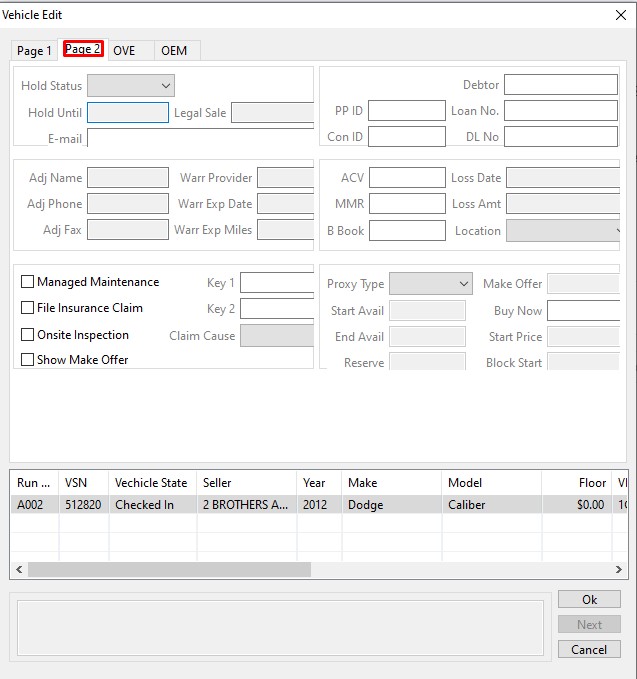
Repossession and Lender Information is used to keep track of the contact and account information from the bank or finance company that repossessed the vehicle.
Auto IMS settings (shaded attributes controlled only by Auto IMS)
Here you can Edit:
- Hold Status
- Hold Until
- Legal Sale Date
- Email contact
- Debtor Name, Loan Number, and Driver License Number
- Adjusters' Name, Phone, and Fax
- Warranty Provider, Exp Date, and Exp Miles
- ACV (actual cash value), MMR (Manheim market report), Blackbook
- Loss Date, Amount, and Location
- Managed Maintenance, File Insurance claims, Request On-Site Inspection and Show Make Offer
- Key Code 1, Key Code 2, Claim Cause
Auction Pipeline Settings:
- Simulcast Proxy Type, Proxy Start Date, End Proxy Date
- Make Offer Amount, Buy Now Amount, Start Price, Block Start
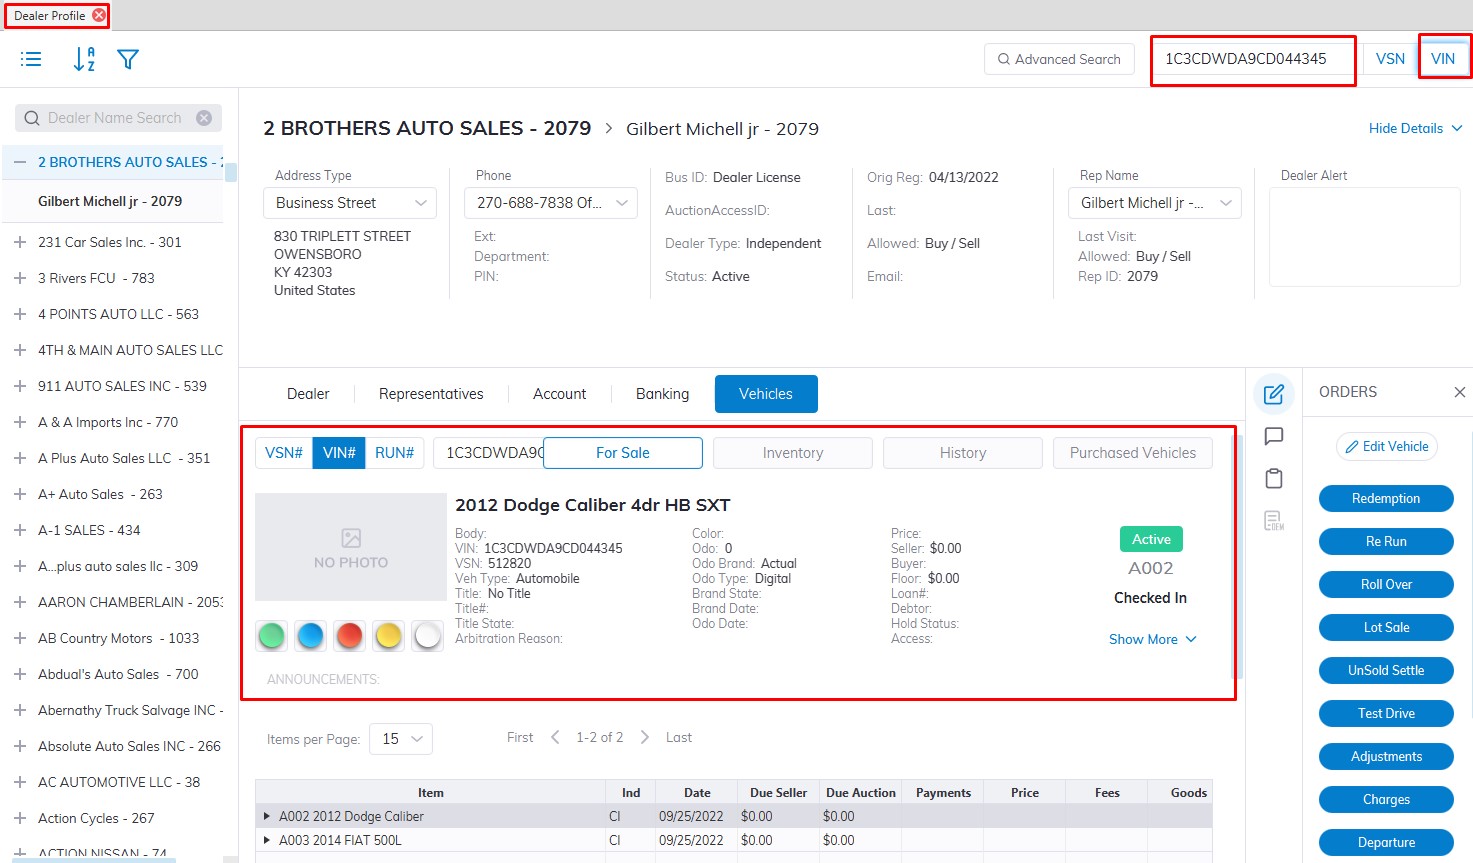
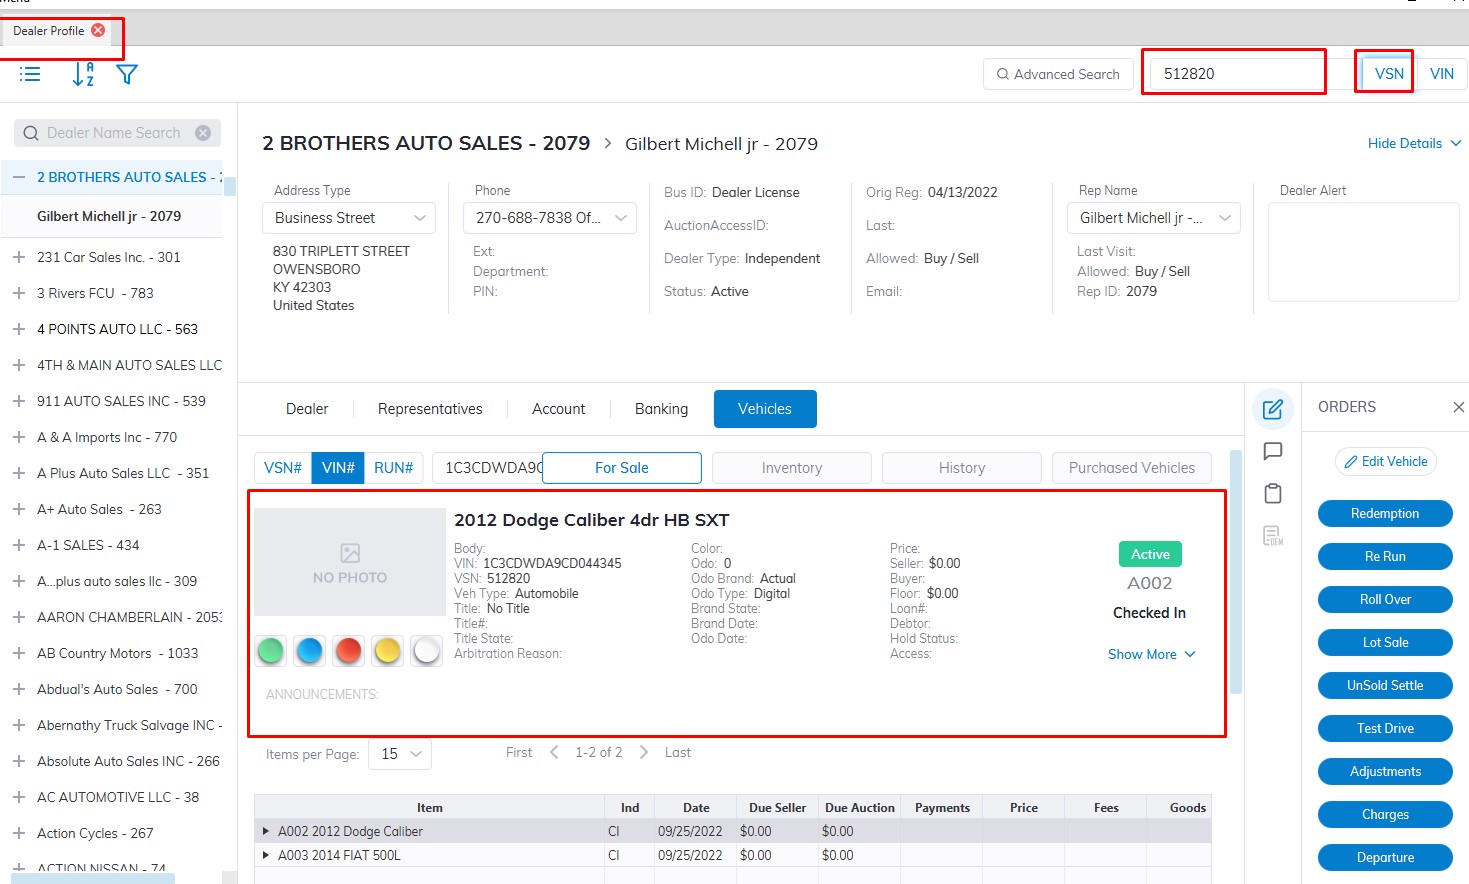
Vehicle Search
- To search for a vehicle open the Dealer Profile Application.
- Once there enter the VIN or VSN in the search box at the top right-hand corner.
- Click VIN if there are 17 characters or VSN if this is 6 digits
VIN Search
VSN Search
No Sale
To No Sale a vehicle we need to open the Vehicle Block Application.
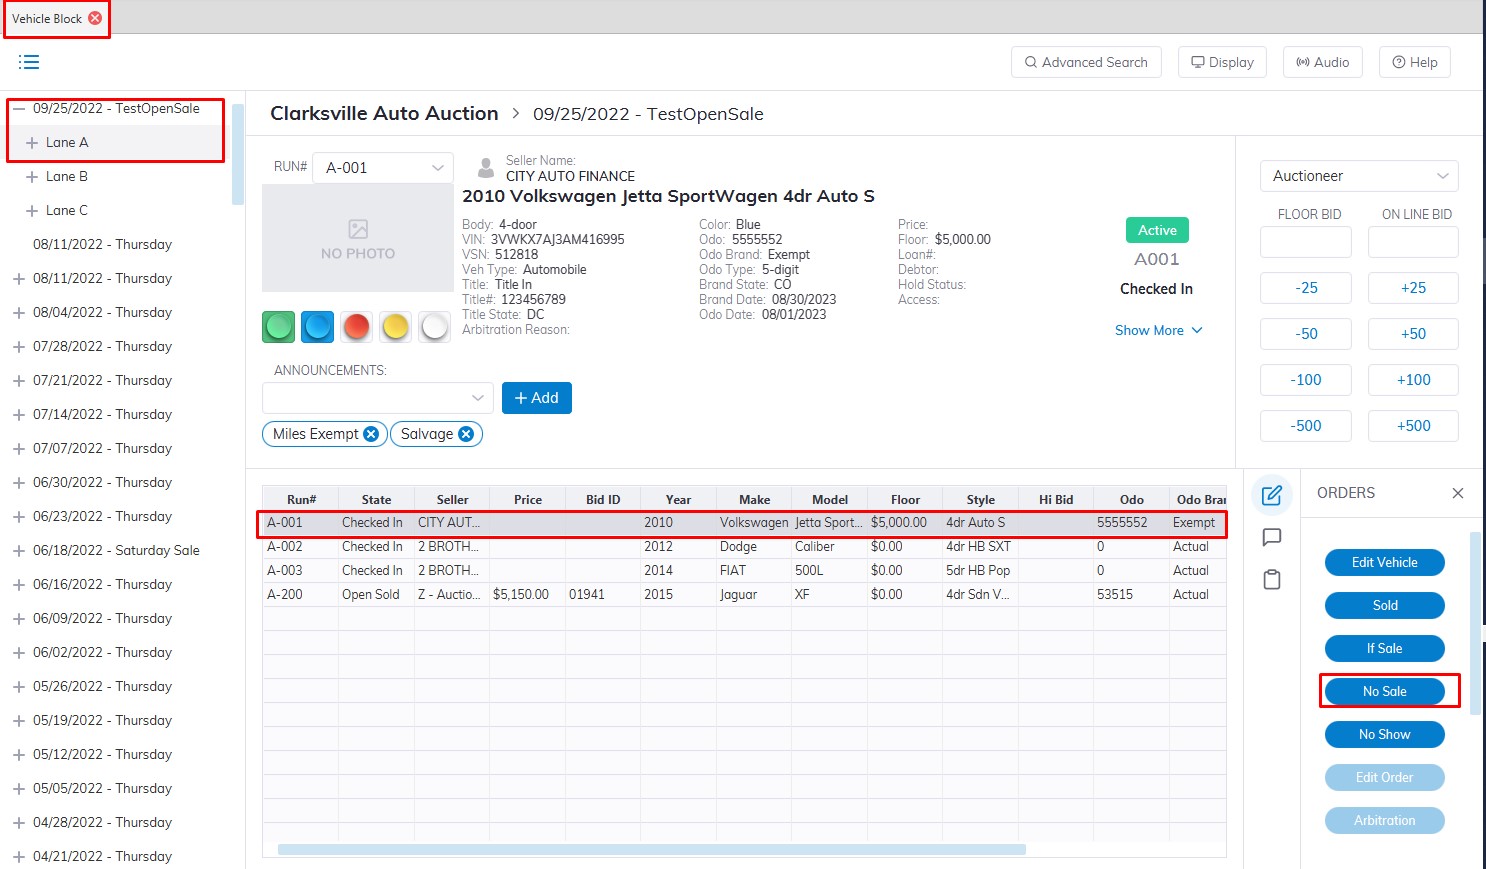
- Select the 'Sale Date'
- Then select which 'Lane' the vehicle is assigned to.
- Select the Vehicle in the grid
- Click the 'No Sale' button with the mouse or press F7 on the keyboard button to launch the 'No Sale' form.
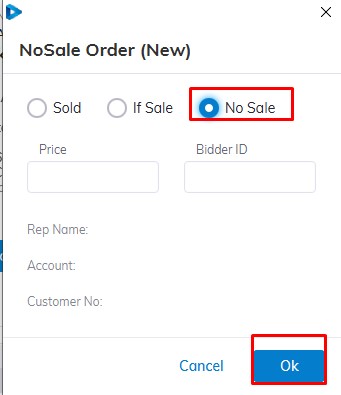
click 'OK' or simply hit the enter key to complete the order
Replace Buyer
Replace Orders
Sometimes you may discover a deal has the wrong Buyer. You may do a 'Replace Buyer' order.
This order may be done from the Dealer Profile or Vehicle Orders application and may be done at any point in the deal. For this guide, we will focus on the Dealer Profile.
Note: Replacing the Buyer or Seller has no impact on the calculation of fees or charges.
Replace Buyer Order
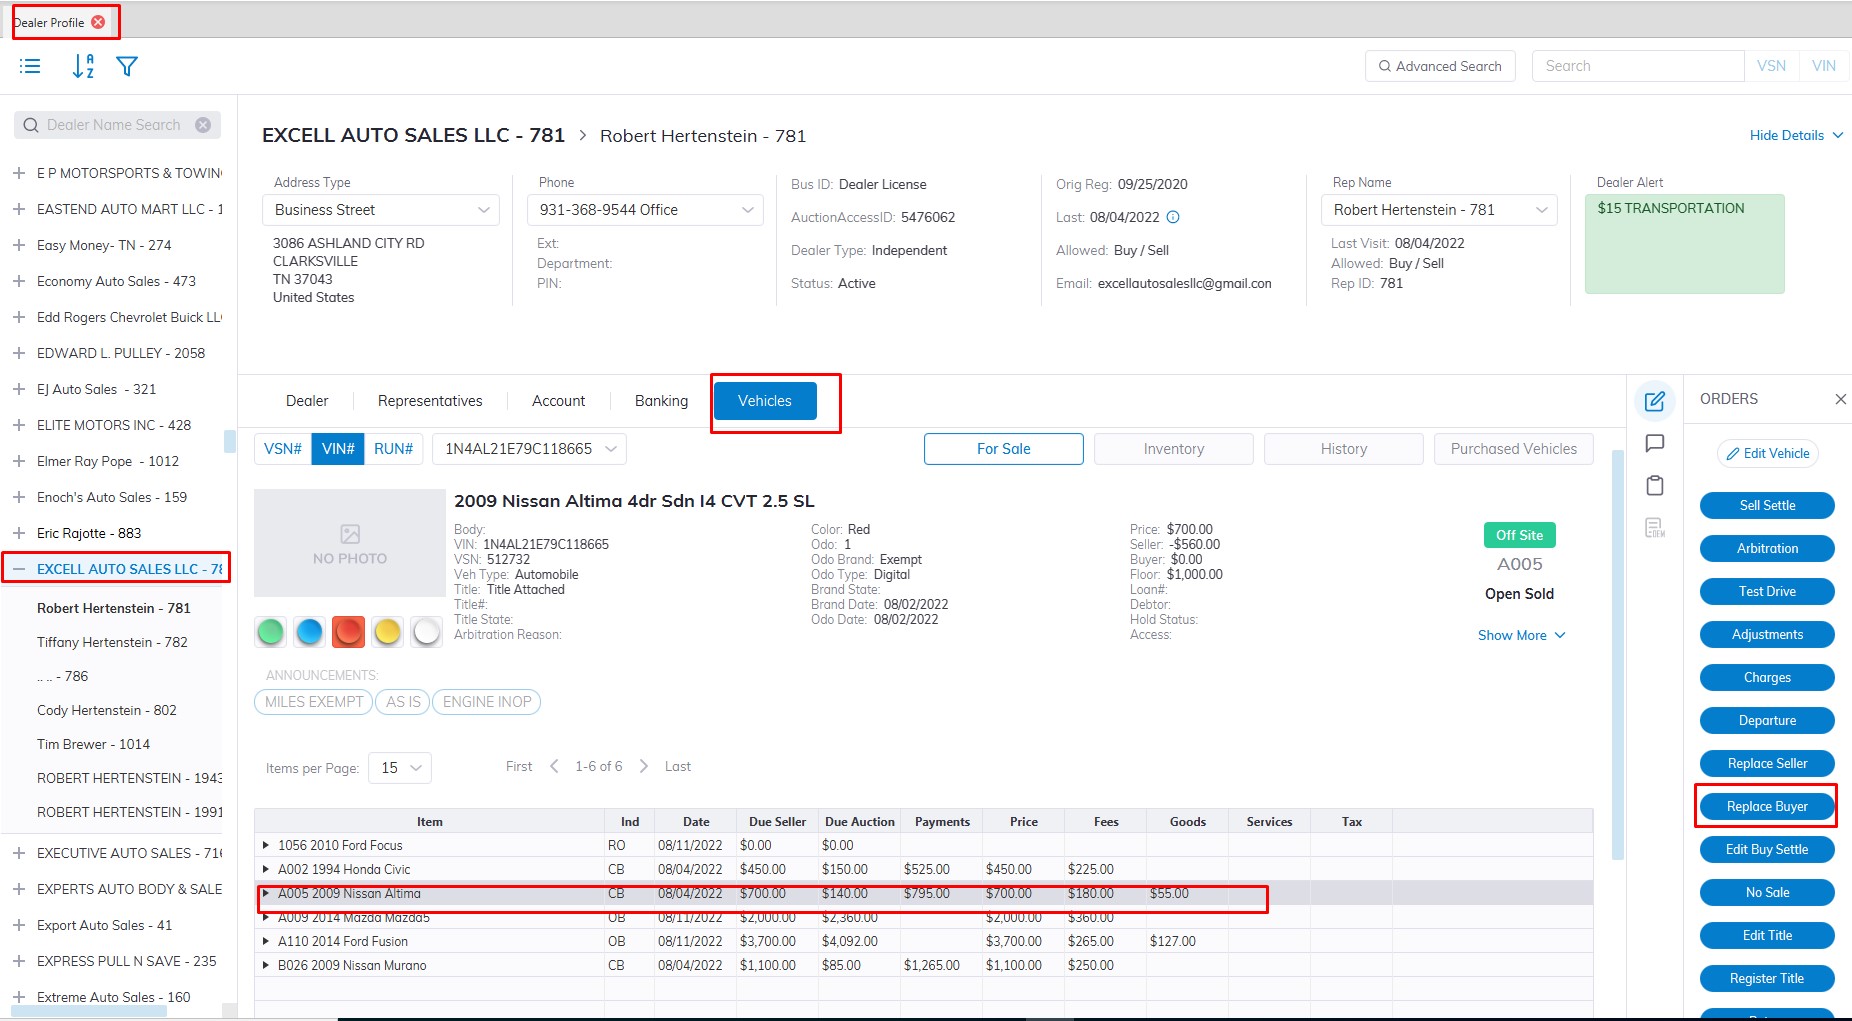
- Launch Dealer Profile Application.
- Select the Dealer where the vehicle you wish to replace the Buyer.
- Select the Vehicle Tab.
- Select the Vehicle with the wrong buyer from the Grid
- Select the 'Replace Buyer' order button from the Order menu on the right
- The form will launch before that you will see the following reminder
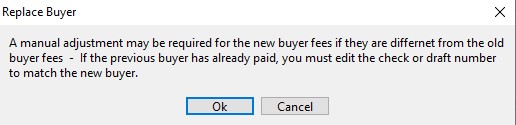
- Click "OK" to proceed after reading.
- Select the correct Buyer from the drop-down listing (includes only checked-in buyers)

- Click "OK" to Complete and execute the Order.
Replace Seller
Replace Orders
Sometimes you may discover a deal has the wrong Seller. If to the wrong Seller, do a 'Replace Seller' order.
This order may be done from the Dealer Profile or Vehicle Orders application and may be done at any point in the deal. For this guide, we will focus on the Dealer Profile.
Note: Replacing the Buyer or Seller has no impact on the calculation of fees or charges.
Replace Seller Order
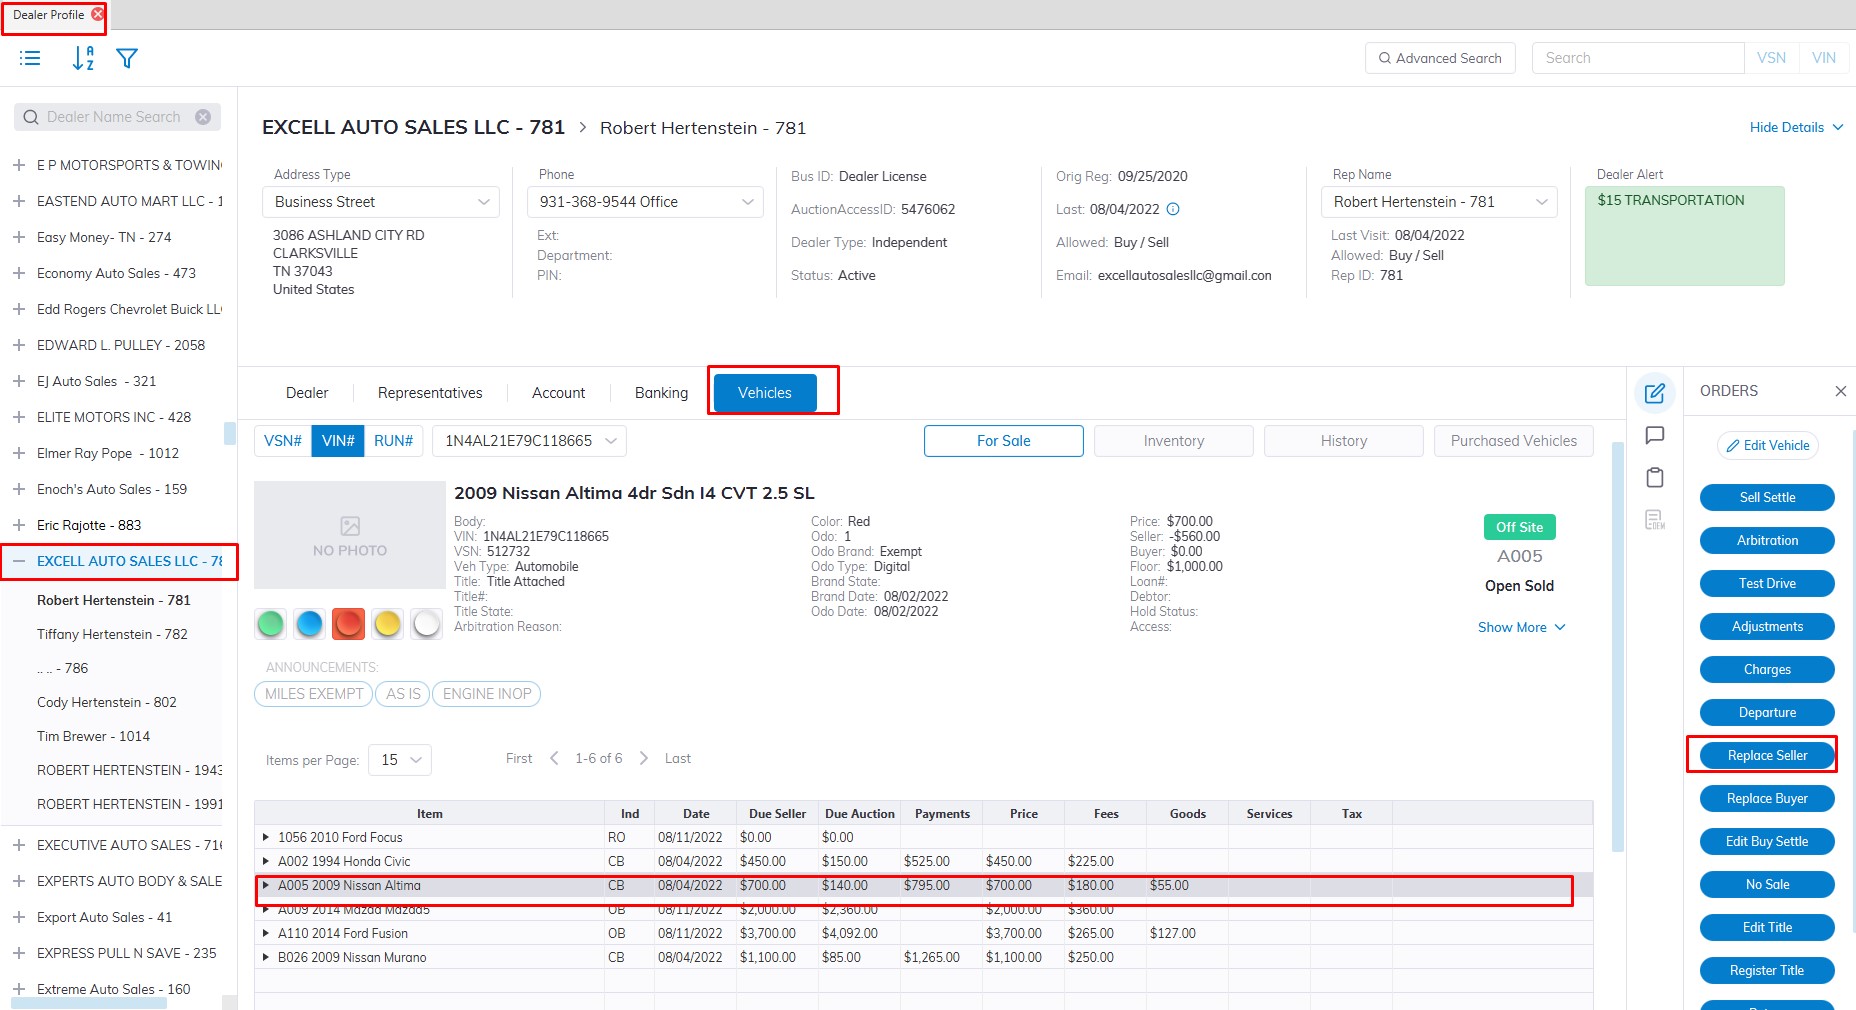
- Launch Dealer Profile Application.
- Select the Dealer where the vehicle you wish to replace Buyer.
- Select the Vehicle Tab.
- Select the Vehicle with the wrong Seller from the Grid
- Select the 'Replace Seller' order button from the Order menu on the right
- The form will launch
- Select the correct Seller from the drop-down listing (includes only Active Sellers)
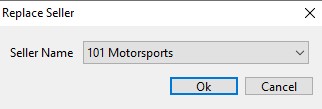
- Click "OK" to Complete and execute the Order.
If Accept
The 'If Accept' order is used to finalize an If Sale. The 'If Accept' is launched from the Dealer Profile or Vehicle Orders application.
- Select Dealer Profile Application.
- Search vehicle VSN or VIN or Scroll to the Seller Name.
- Select the Vehicles tab if you search by Seller Name to find the vehicle.
- Once the IF Sale Vehicle is found and Highlighted
- Select the 'IF Accept' button from the Order menu to launch the form.
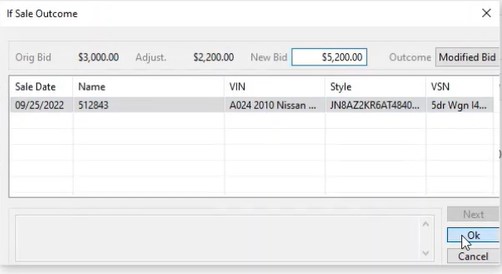
- You can change the bid amount here in the "New bid" field in this example the $5200.
-
If the Deal falls apart input $0.00 in the "New Bid" field.
- Click the "OK" Button to complete.
Note: Do not use this order unless you are ready to Sell or 'If' Down the vehicle.
IF Sale

- The IF Sale Order is done on the Vehicle Block Application.
- Select the Sale Date and Lane where the vehicle is located.
- Select the vehicle
- Click the 'If Sale' order button with the mouse or press F6 on the keyboard to launch the 'If Sale' form.
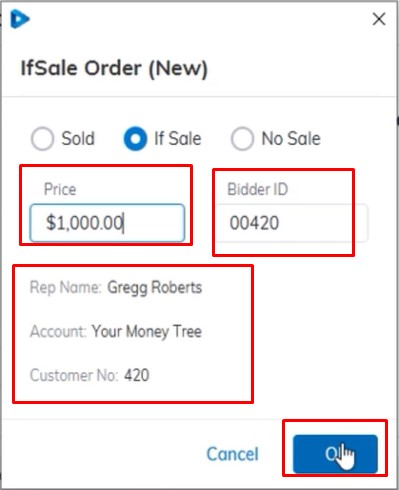
- Input the Bid in the Price filed and the Bidder ID of the buyer
- Check the summary to make sure the info is correct then Click 'OK' to complete.
After the order is completed the Buyer Invoice will print and the cursor will advance to the next Run Number automatically.
Note: The form will not accept a Bid ID that has not been previously registered for the Sale Date
An 'If Sale' does not create any A/R (accounts receivable) or A/P (accounts payable) for the Buyer or the Seller
An 'If Sale' order is completed when a price has been agreed upon. Use the ' If Accept ' order to close an If deal.
Pre-registration
Pre Registration - used to reserve or un-reserve run numbers as well as to set 'Protects' for Year, Make, Model, Lights, Floor amount, and Announcements.
- This will launch the Pre-Registration form.
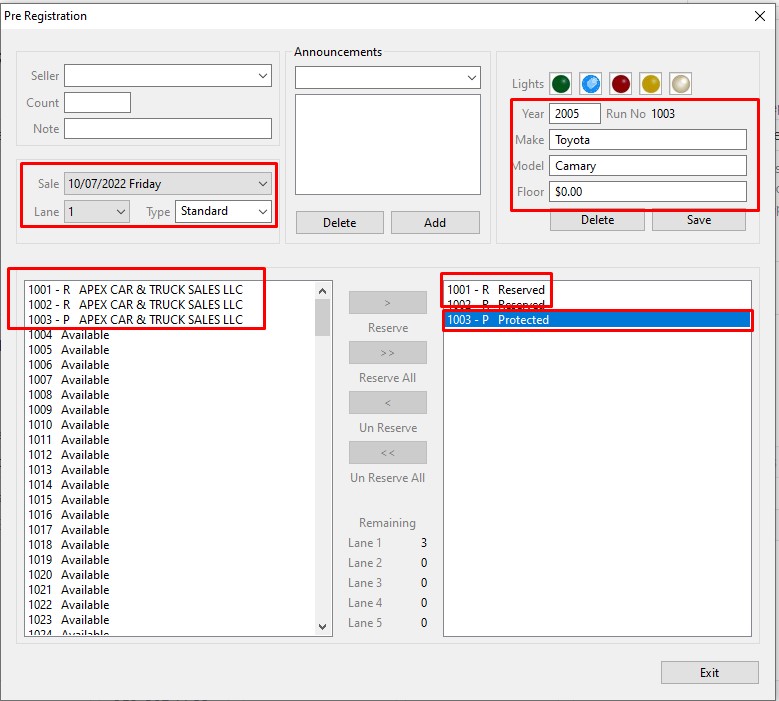
Select 'Sale Date' and 'Lane'
The table above the left side shows:
-
- Dealers' name (Checked In vehicles)
- Available Run Numbers
- Reserved Run Numbers for Dealers
- Protected Run Numbers for Dealers
- Dealers' name (Checked In vehicles)
Using the controls in the center of the form you may 'Reserve' or 'Un Reserve' one or multiple Run Numbers at a time. The form provides a 'global view' of the Lane. You may double-click on any Dealer listed on the left if you wish to change their reserved number status. This avoids the need to go back out to the Dealer Profile and then back into the Pre-Registration order.
The table above on the right shows:
-
- Protected Run Numbers
- Reserved Run Numbers
- Protected Run Numbers
Protected Run Numbers store; Year, Make (both required) as well as Model, Floor amount, Lights, and Announcements. After entering the protected information click 'Save' to mark the Reserved run number [R] as a Protected run number [P].
Note: You must first reserve a run number before it can be protected.
Arb and Arb Accept
Arbitration Order
The Arbitration order is used to set a vehicle to the 'Arbitration' state. This is done to prevent other orders until the Arbitration process is complete. The Arbitration order does not resolve an Arbitration one way or the other, this is only done using the 'Arb Accept' order (see below).
Arbitration Orders may be done for the following Vehicles:
Open Vehicle (OV)
Closed Buyer (CB)
Closed Seller (CS)
Closed Vehicle (CV)
Order can be done from the Dealer Profile or Vehicle Orders application
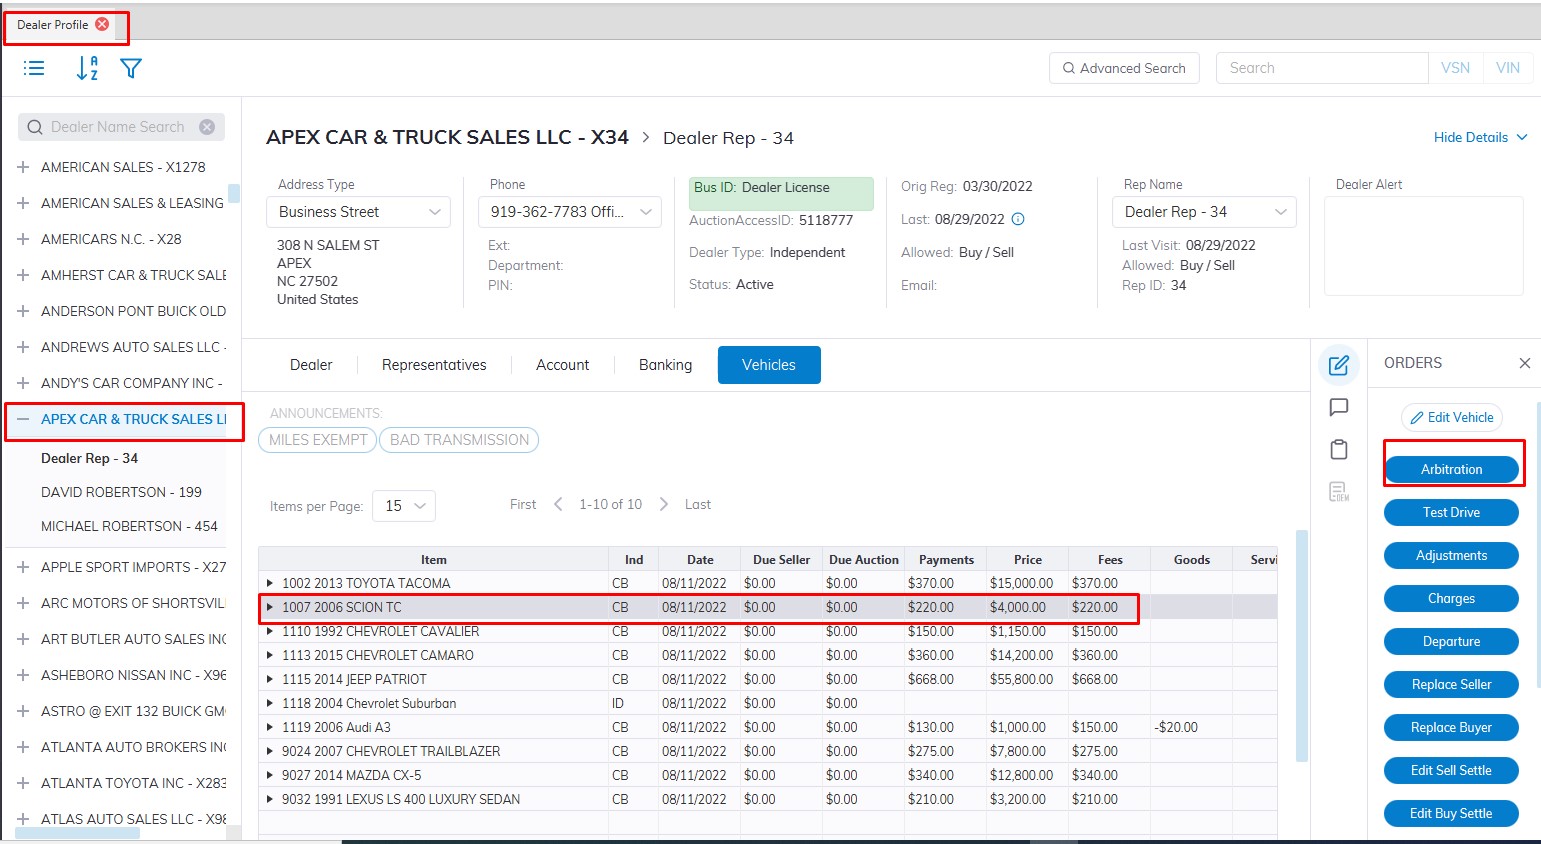
Select
- The Vehicle in the grid
- The Arbitration order from the right side "Order" Column.
- This will launch the form
Note: The 'Arbitration' order is done from the Buyer side.
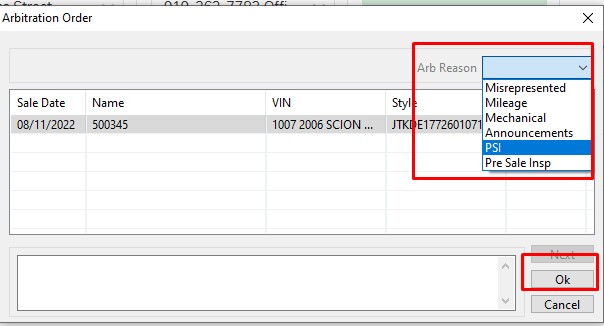
- Select the reason code and click 'OK' to complete.
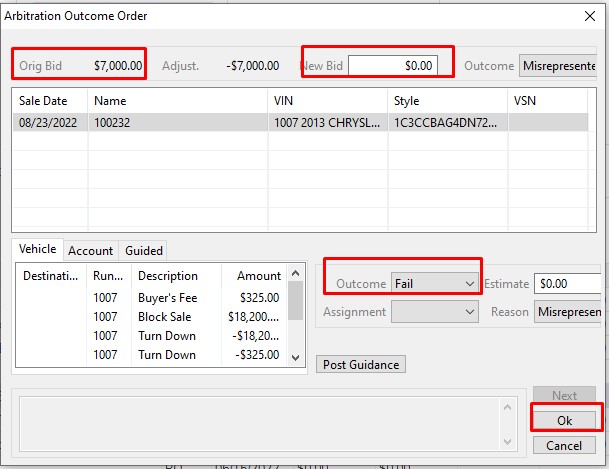
Arb Accept Order
Once the vehicle has been to Arbitration and the Auction has determined the outcome; an 'Arb Accept' order must be done to input the agreed-upon price.
Note: The 'Arb Accept' order is done from the Buyer side.
from the Dealer Profile or Vehicle Orders application
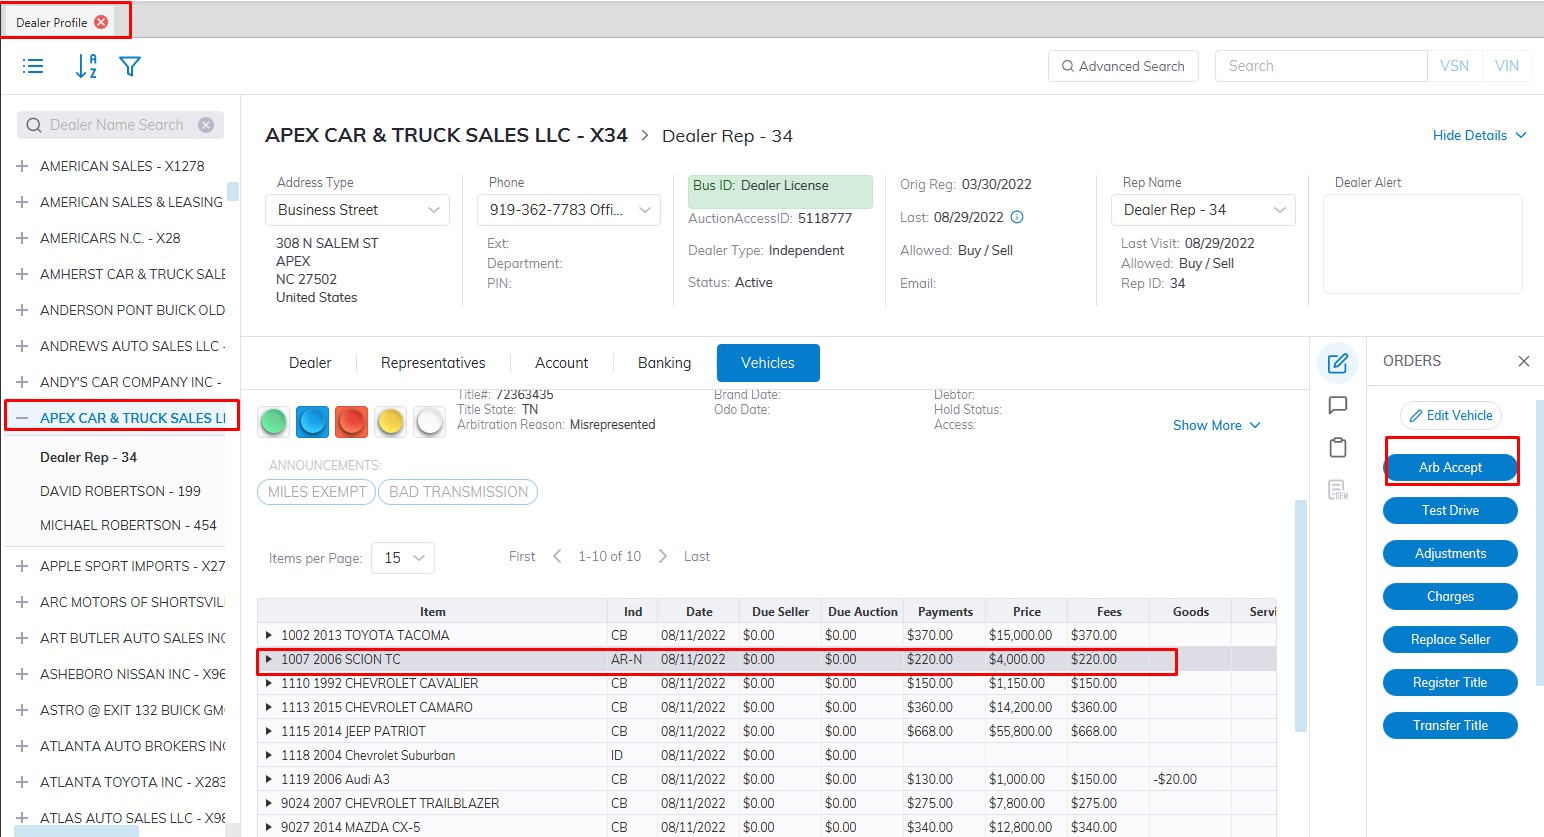
Select
- The Vehicle in the grid
- The Arb Accept order
- This will launch the form
Arb Accept orders have two outcomes:
- Price > $0.00 (this results in a 'Sold' [OS] state.
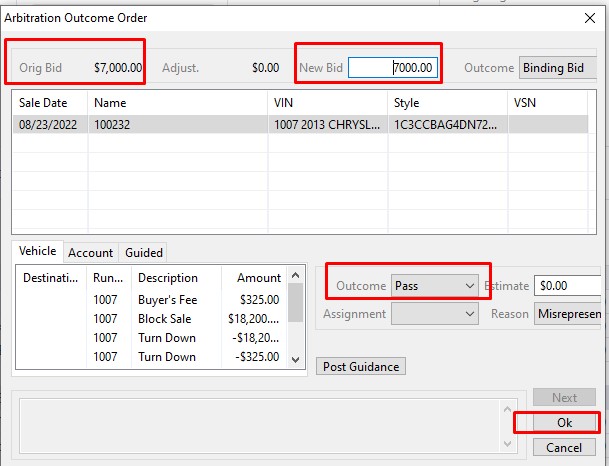
2. Price = $0.00 (this results in a 'Turn Down' [TD] state.
- Since charges may remain on the Buy Side of the vehicle you will be prompted to guide those charges to the Account during the Arb Accept order.
- Follow the normal Guidance procedures outlined here.
The chart below can be used to identify if a Vehicle or an Account will contain the adjustment resulting from the 'Arb Accept' order.
|
Saves (arb accept > $0.00) |
Saves (arb accept > $0.00) |
Turn Downs (arb accept = $0.00) |
Turn Downs (arb accept = $0.00) |
|
|
* State * |
* adjustments * |
* State * |
* adjustments * |
|
|
Open Bought / Open Sold |
OB/OS | Vehicle / Rep Account | TD | Vehicle / Vehicle |
|
Open Bought / Closed Sold |
OB/CS | Vehicle / Rep Account | TD | Vehicle / Vehicle |
|
Closed Bought / Open Sold |
CB/OS | Rep Account / Vehicle | TD | Rep Account / Vehicle |
|
Closed Bought / Closed Sold |
CB/CS | Rep Account / Rep Account | TD | Rep Account / Vehicle |
|
In Active |
CB/CS | Rep Account / Rep Account | TD | Rep Account / Vehicle |
Buyer Invoice-Vehicle Statement-Order Statement
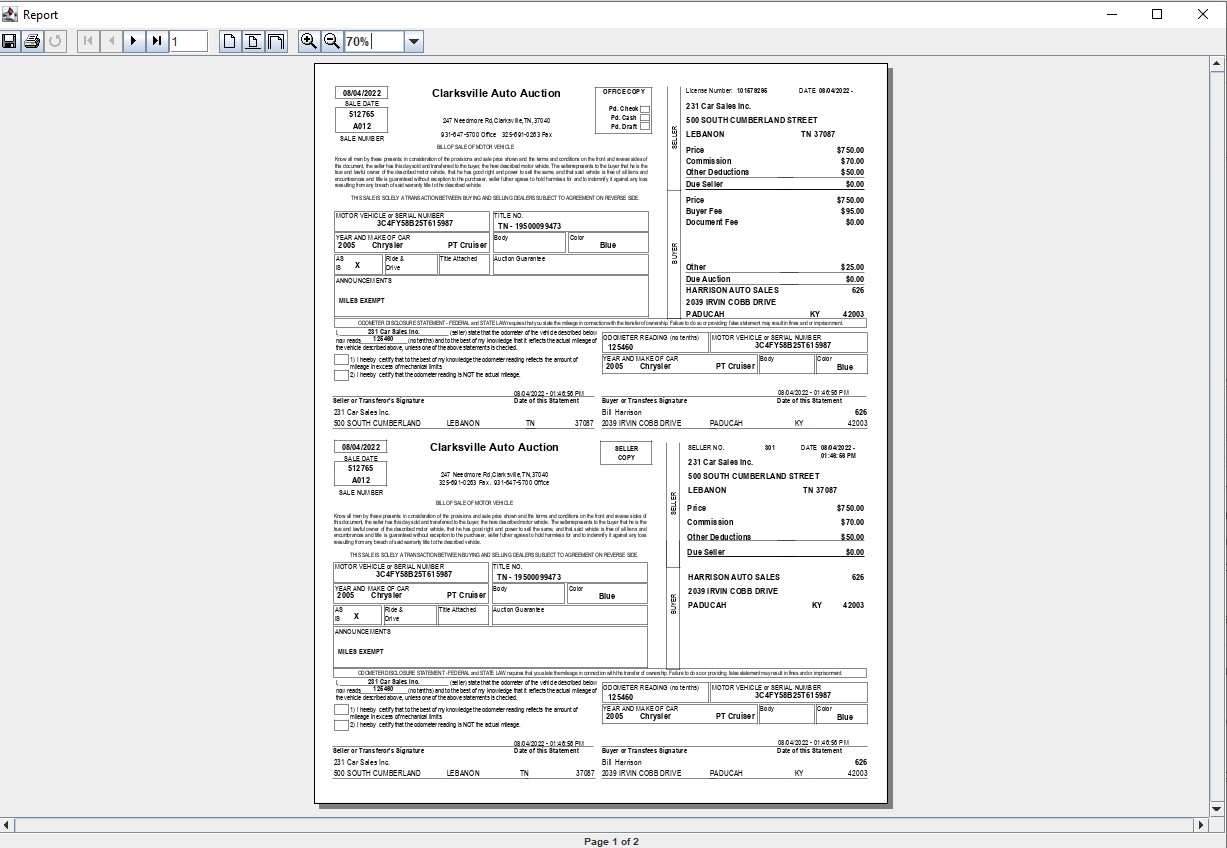
Buyer Invoice
The Buyer Invoice prints automatically when a vehicle is sold from the Vehicle Block application. It may also be re-printed from the Dealer Profile or Vehicle Orders application. Each Buyer Invoice is unique for the Auction.
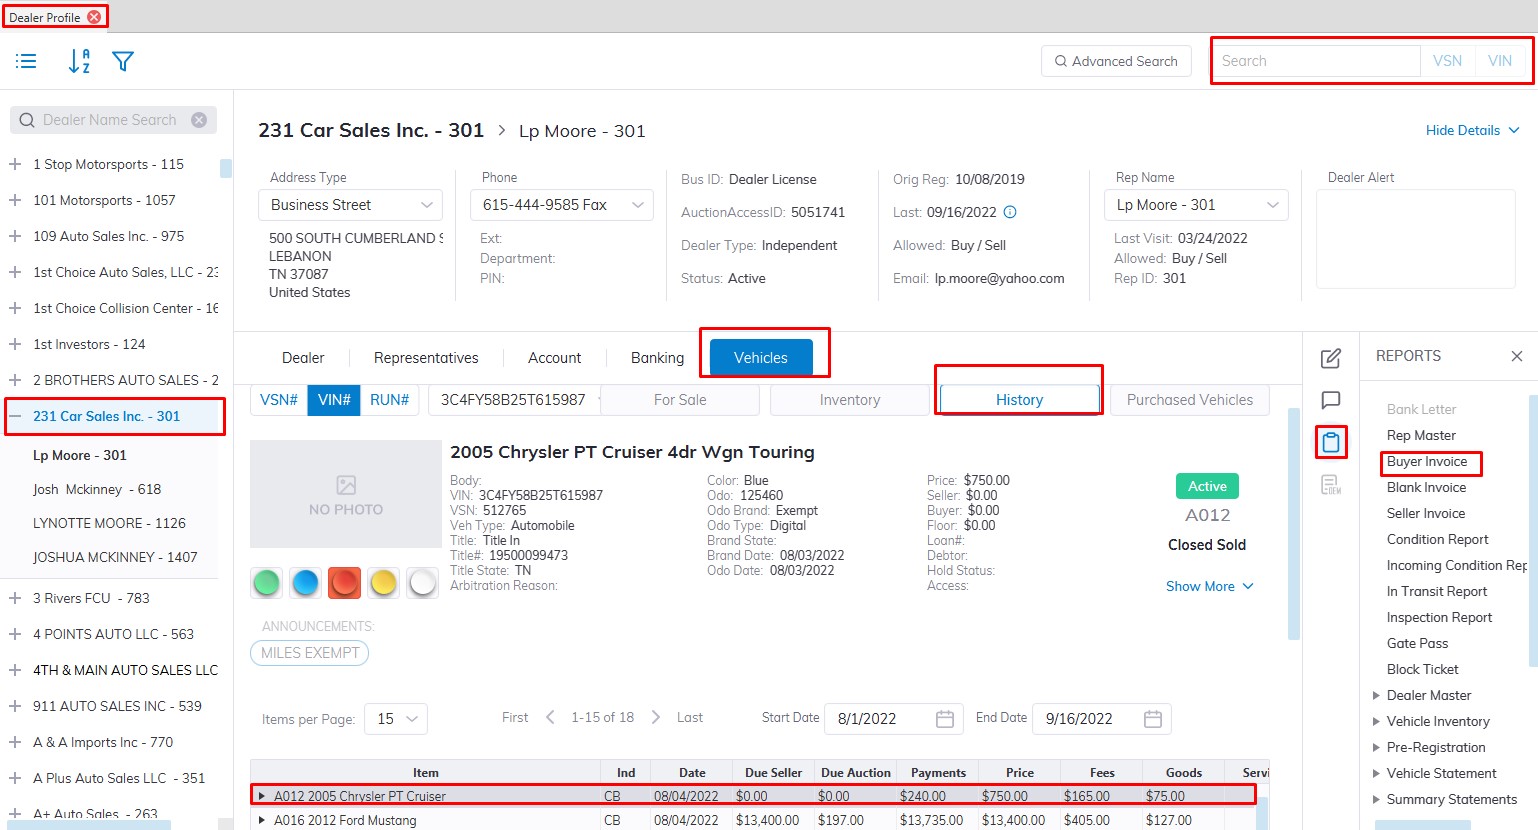
- Select the Dealer Profile application
- You can search for them using the VSN or IF you know the Dealer's Name
- Select the Dealer
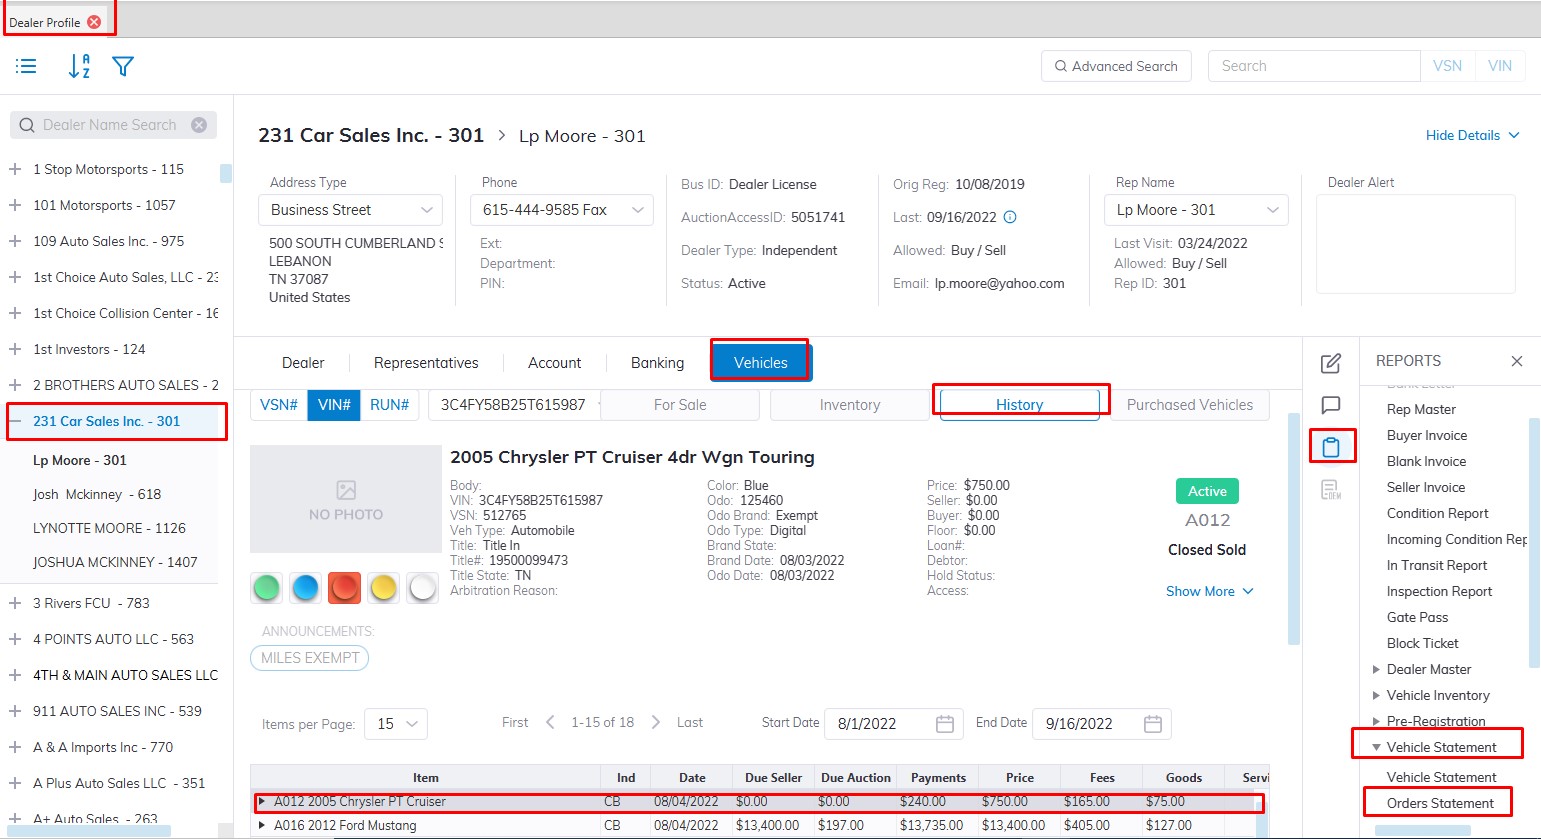
- Select the 'Vehicle Tab' then Sub Tab the 'History Tab' (All Sold vehicles are located here)
- Find the vehicle in the grid
- Select the Reports menu
- Then Select the Buyer Invoice from the Reports menu
Note: You must select a vehicle from the 'Vehicles' tab of the Dealer Profile application to run the report
Vehicle Statement
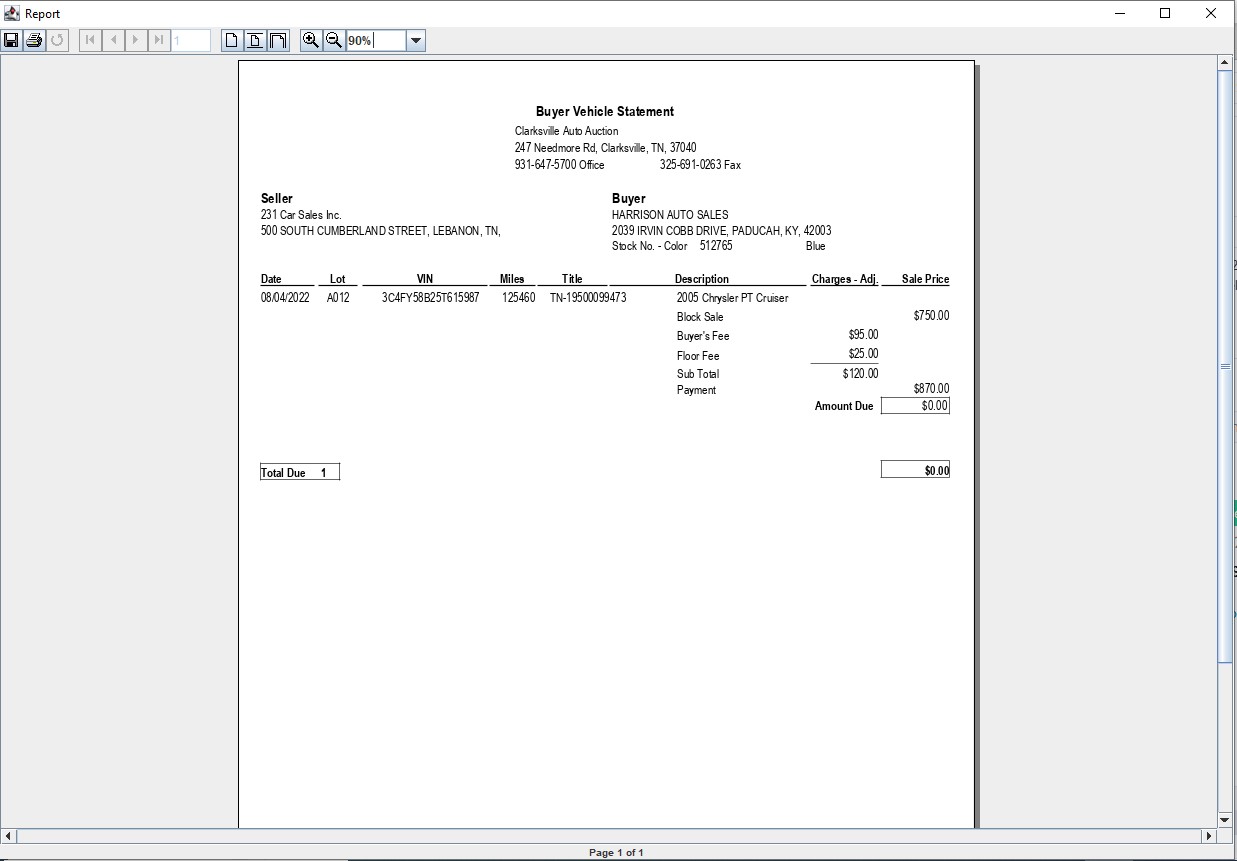
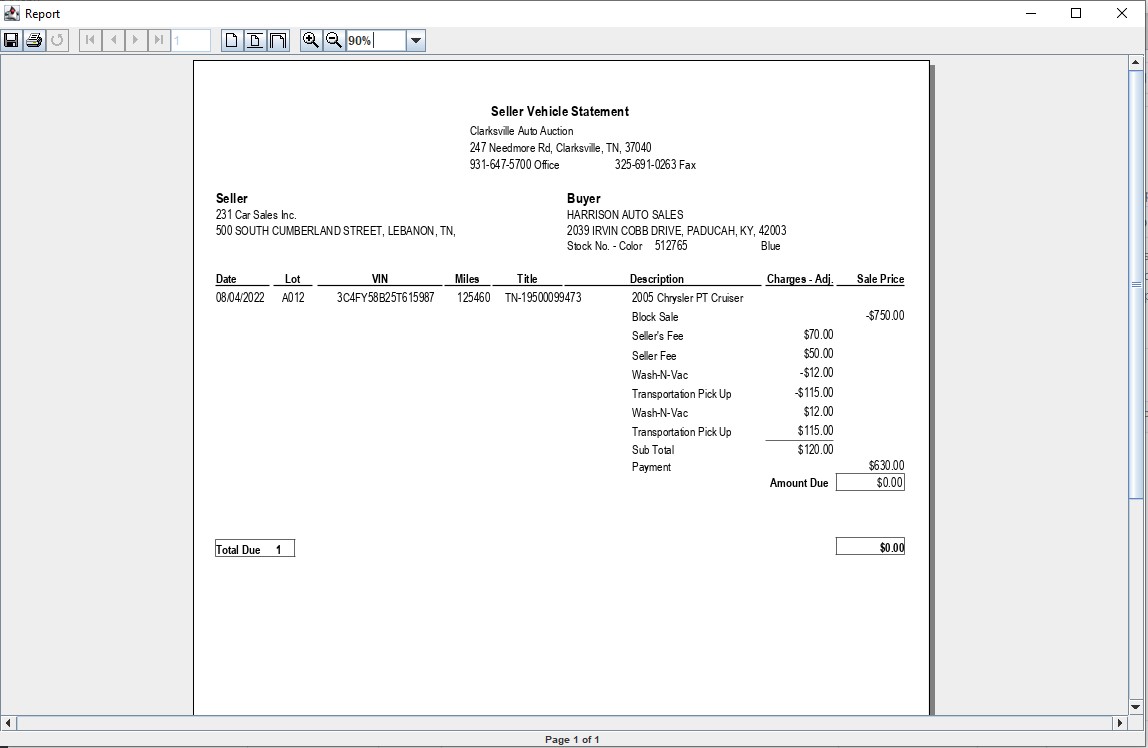
The Vehicle Statement is a detailed report of the fees, payments, adjustments, prices, and payment s (if any) for any selected vehicle.
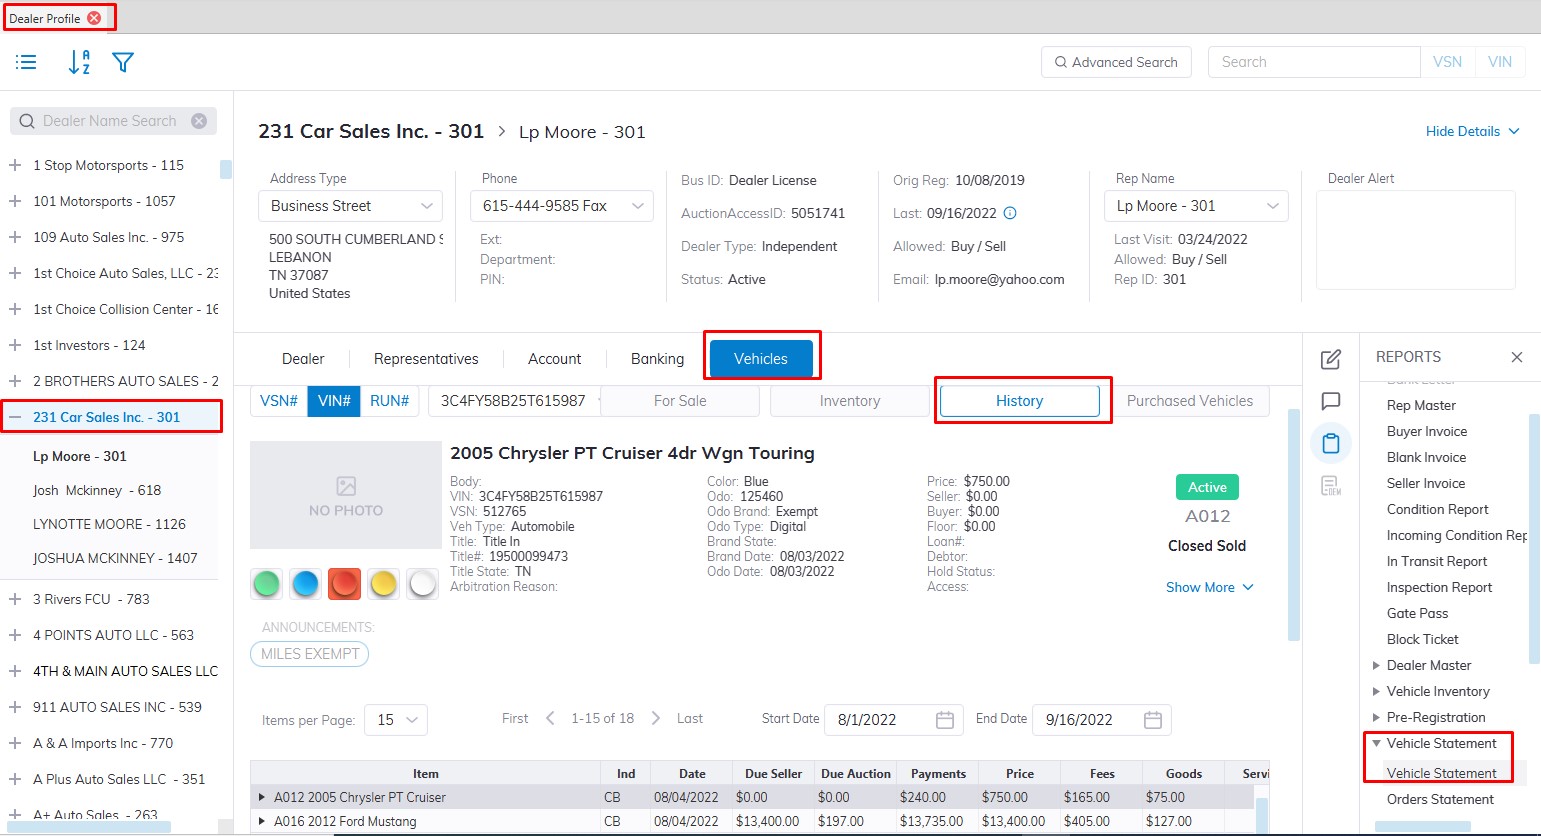
- Select the Dealer Profile application
- You can search for them using the VSN or IF you know the Dealer's Name
- Select the Dealer
- Select the 'Vehicle Tab' then Sub Tab the 'History Tab' (All Sold vehicles are located here)
- Find the vehicle in the grid
- Select the Reports menu
- Then Select the Vehicle Statement report to the Launch wizard

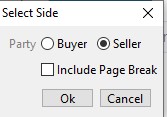
- Here you can choose Buyer Statement or Seller Statement.
- Click 'OK' when done to create and print the report
Note: You must first select a vehicle in the 'Vehicle', 'Inventory' or 'History' tab
Buyer Vehicle Statement
Seller Vehicle Statement
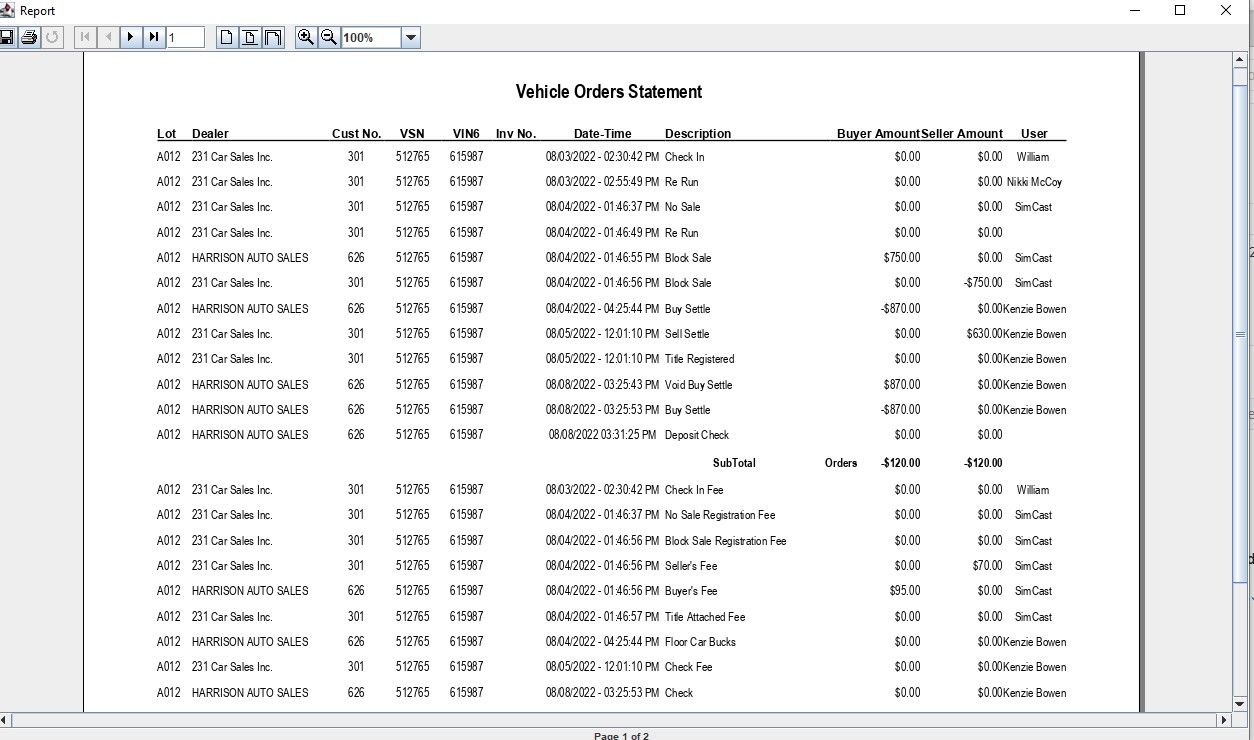
Order Statement
The Order Statement is a report listing what appears in the Grid of the Dealer Profile. Rather than viewing Orders, Charges, or Adjustments on screen, it is now possible to obtain the same information in report form.
- Select the Dealer Profile application
- You can search for them using the VSN or IF you know the Dealer's Name
- Select the Dealer
- Select the 'Vehicle Tab' then Sub Tab the 'History Tab' (All Sold vehicles are located here)
- Find the vehicle in the grid
- Select the Reports menu
- Then Select the "Vehicle Statement" then 'Order Statement' report under it to Launch wizard
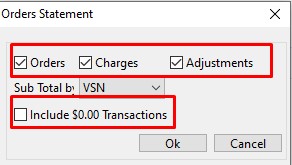
- You may choose to 'Include $0.00 Transactions since most orders have no amount associated with them. You may also sub-total by VSN or Description.
- Choose the checkboxes if you want to see 'Orders', 'Charges', and 'Adjustments' in the report
- Click 'OK' when done to create and print the report.
Edit, Hold and Delete Pickup
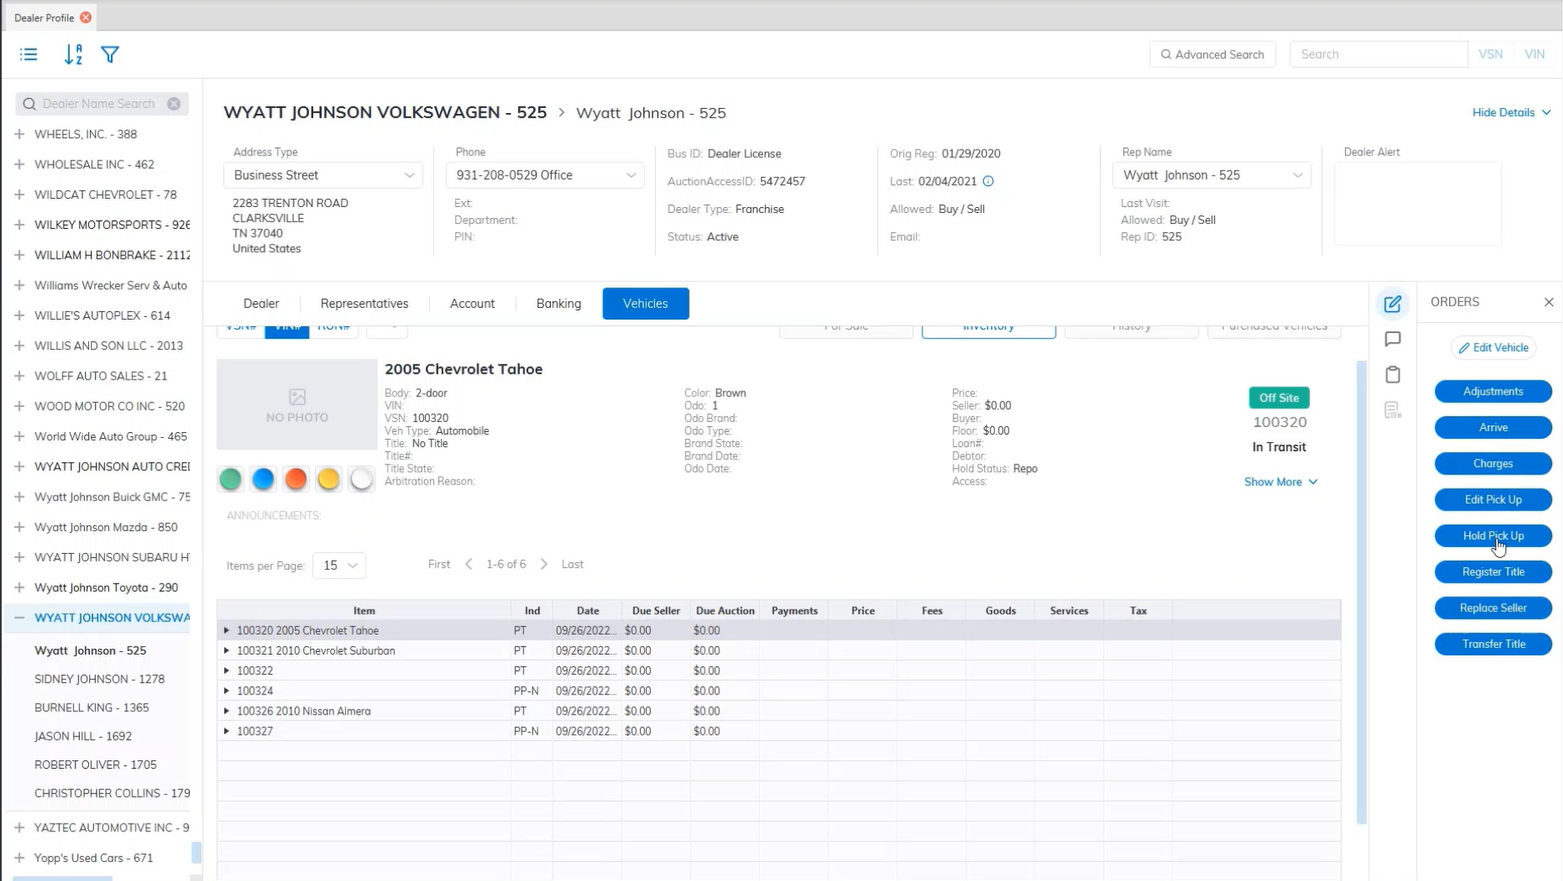
Hold Pick Up
- Select Transporation and Service or Dealer Profile Application
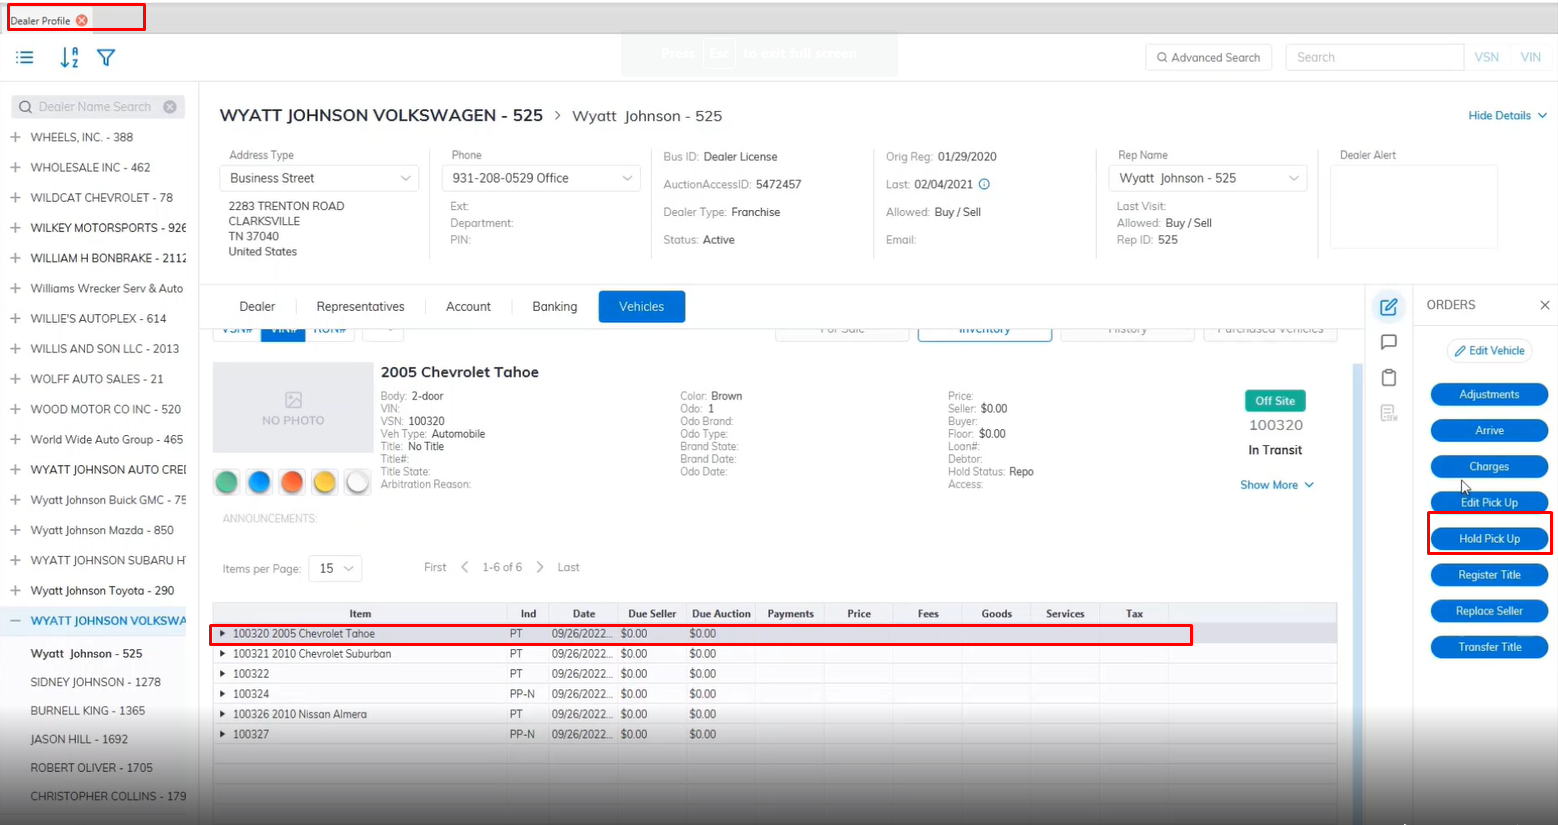
- Select the Vehicle
- Then select the 'Hold Pick Up' order under the Orders menu on the right.
- This will launch the Hold Pick Up form.
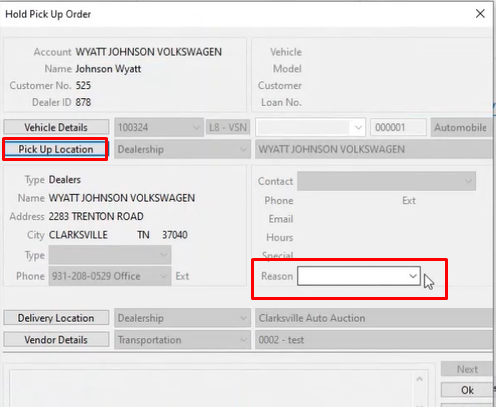
- Select the Reason code
- Click 'OK' to close the form
Hold orders can only be issued for Pick Up orders in transit (PT). If you issue a Hold order you will be asked for a Reason code.
Edit Pick Up
- Select Transporation and Service or Dealer Profile Application
- Select the Vehicle
- Then select the 'Edit Pick Up' order under the Orders menu on the right.
- This will launch the Edit Pick-Up form.

- Here you choose the Pick Up Location information
- Here you choose the Delivery Location information
- Click 'OK' to save and close the form
Delete Pick Up
- Select Transporation and Service or Dealer Profile Application
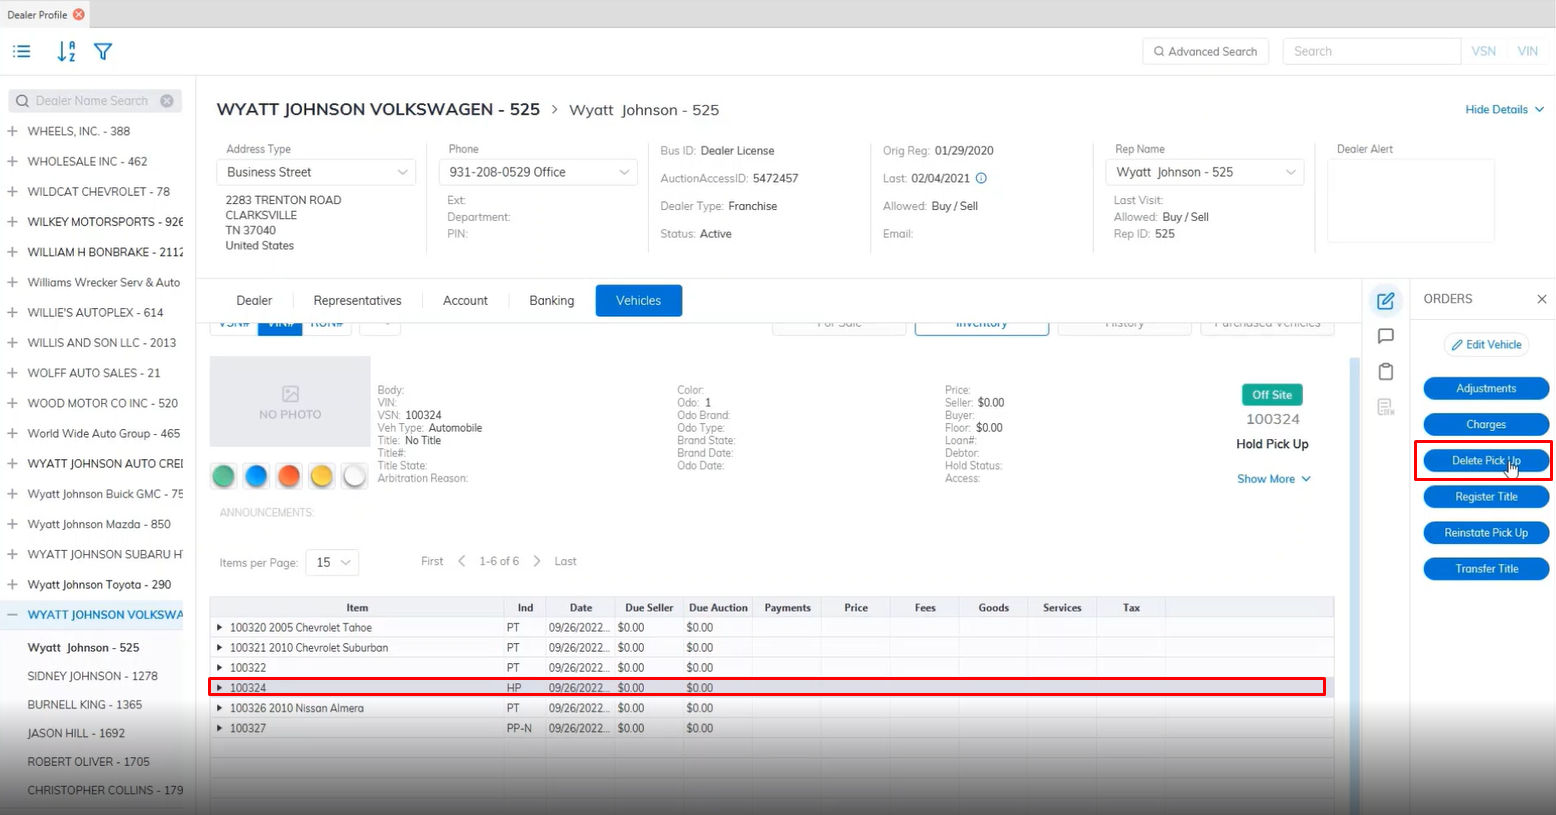
- Select the Vehicle
- Then select the 'Delete Pick Up' order under the Orders menu on the right.
- This will launch the Delete Pick Up form.
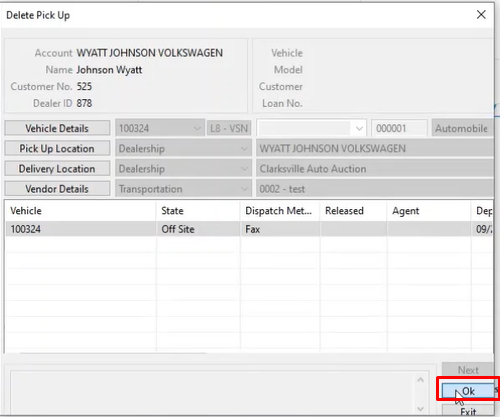
- Click 'OK' to close the form and Delete the Pickup.
Remove Order
The Remove Order can be executed from the Account Settle, Buy Settle it Sell Settle Order.
- Locate the vehicle you like to work with in this example using the Dealer Profile application.
- Select the vehicle under the vehicles tabs, then select Sell settle or Buy Settle.
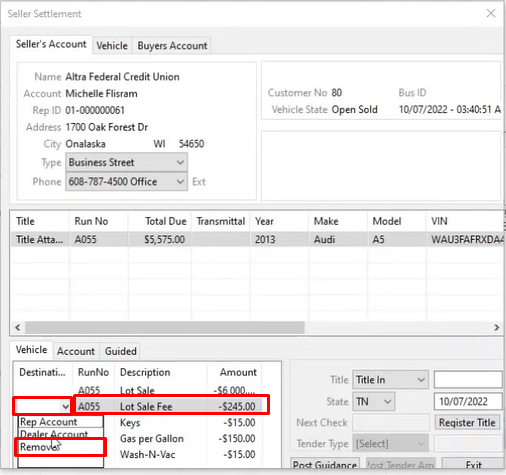
- When the Buy Settle or Sell Settle wizard launches select the fee you which to remove.
- Under the Destination Column select the drop-down and choose the option Remove then click the Post Guidance button.
- Then you can finish up the Sell Settle or Buy Settle.
- The same can be done from the Account Settle wizard launch
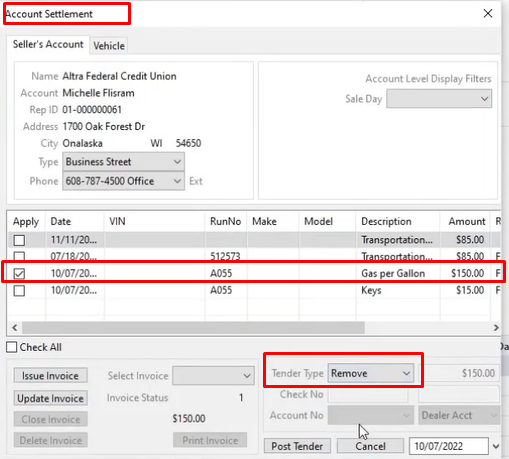
- Select the fee you want to remove
- Click the drop-down at the Tender type field and select Remove
- Click the Post Tender button when finished to remove the fee.
Vehicle Settle (Buy Settle and Sell Settle Orders)
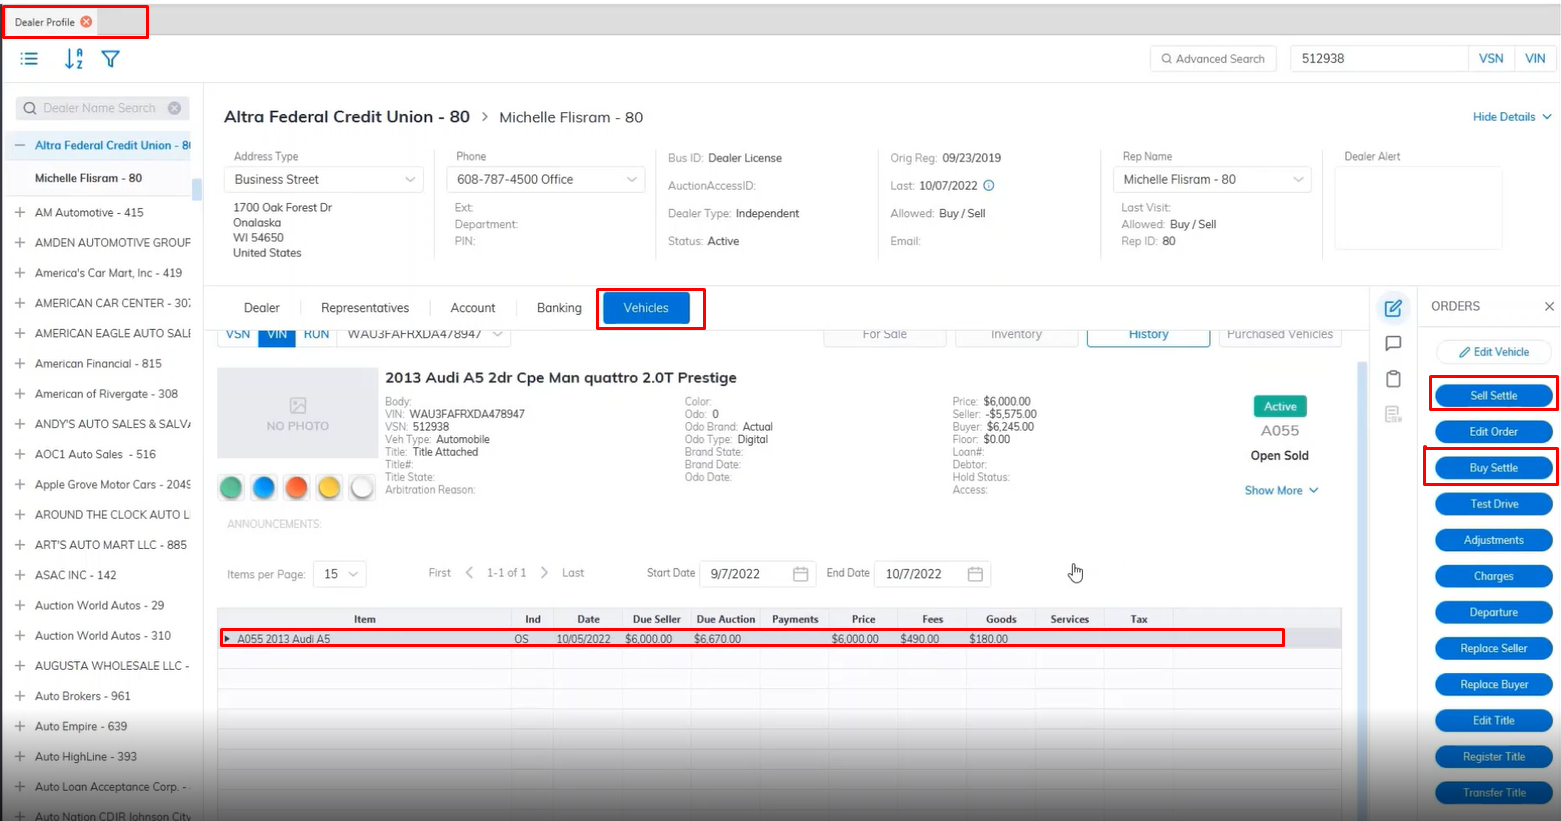
Buyer Settle
- Buy Settle is done from the Dealer Profile and Vehicle Orders application.
- Search for the vehicle using VSN or VIN., and select the buyer side.
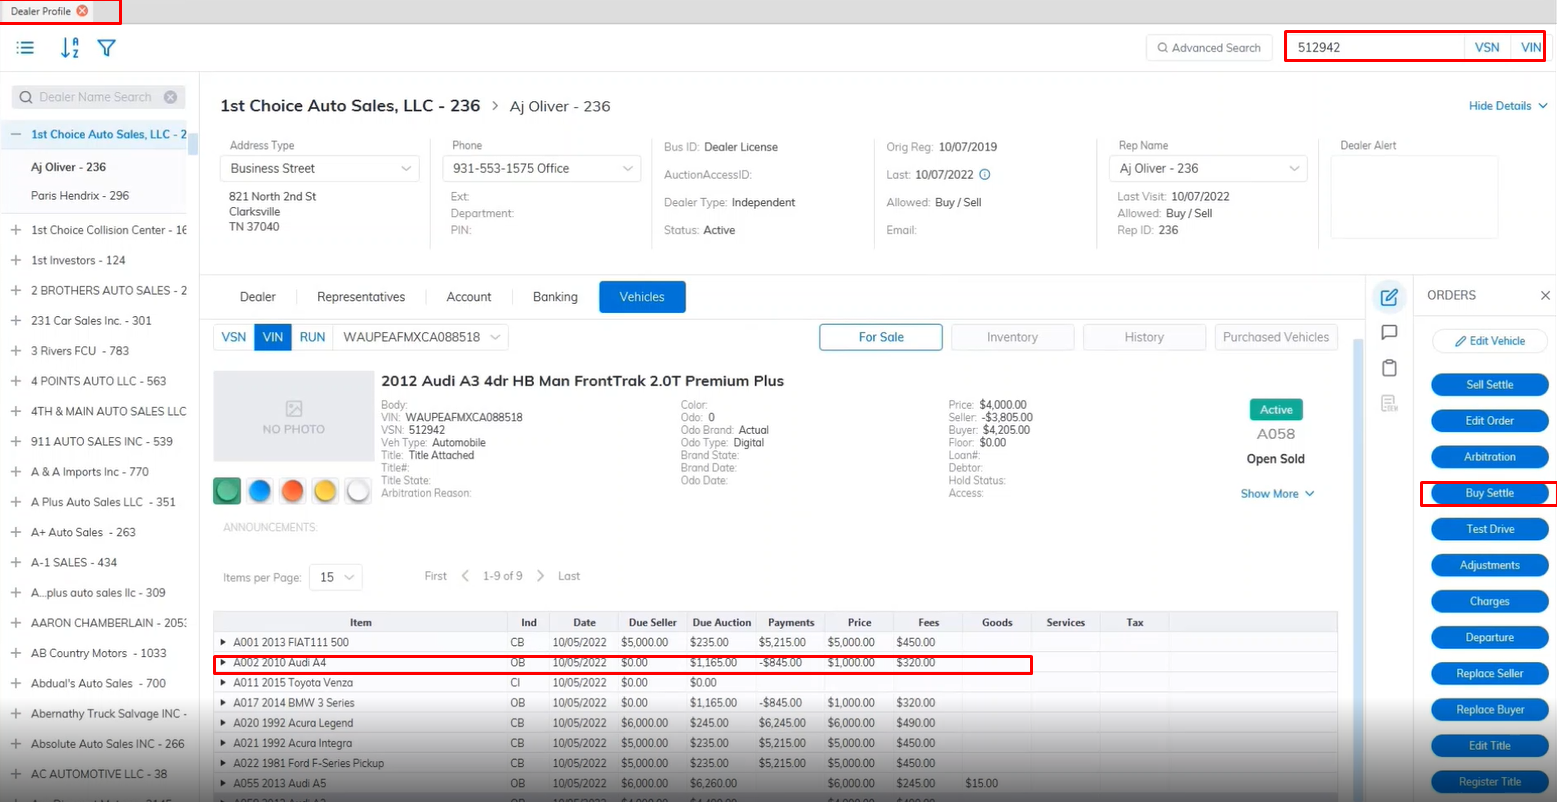
- Select the vehicle and select the 'Buy settle' Order from the right.
- This will launch the Buy Settle form
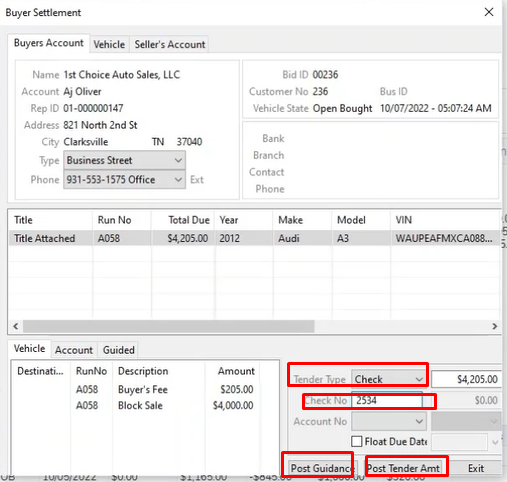
- Select your Tender type from the drop-down
- if you choose Check then enter the check number in the 'Check No' field.
- Select the Post Guidance button to guide the necessary charges.
- Select the Post Tender button to complete the buy settle.
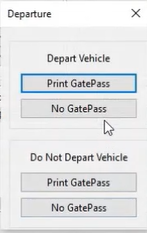
- Here you will be prompted Option1: Depart the vehicle and Print a GatePass or not Print GatePassOption2: Do Not Depart the vehicle and print GatePass or not print GatePass
Seller Settle
- Sell Settle is done from the Dealer Profile and Vehicle Orders application.
- Search for the vehicle using VSN or VIN., and select the buyer side.

- Select the vehicle and select the 'Sell settle' Order from the right.
- This will launch the Sell Settle form
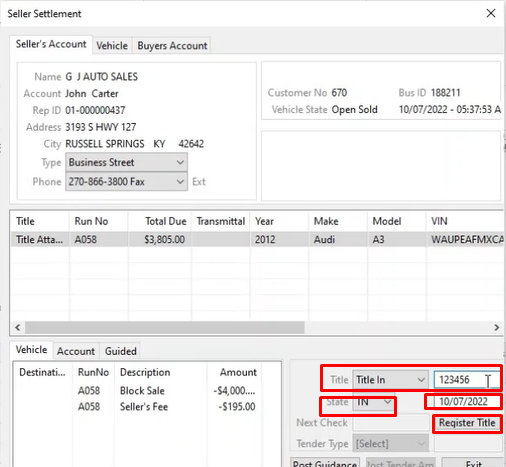
- If the Title is not registered update the Title here and Register it. Enter the Title Number, State, and Date
- Click the Register Title Button when done to Register the Title.
- Once done you will be able to Select the Tender Type from the drop-down. you Select Check the next check No will automatically be filled into the Next Check field by the System.
- Select the Post Tender button to complete the Sell Settle.
After performing a Buy Settle and Sell Settle the vehicle will be placed in the History Tab as it is now an Inactive vehicle deal is closed on both sides.
Refund Settlement
Refund Settlements are used to write Checks to a Buyer who has Credit on their Account. Refund checks may be written for 'Credits' resulting from the following transactions:
Buy Settle with an Over-payment
No Sale order when the buyer's check has been deposited
Note: Refund checks may not be issued for any other reason than those listed above. You may not issue a negative Adjustment to a buyer's account and then write a Refund check for the balance.
- Open the Buyer account of the vehicle you wish to execute the Refund Settlement on.
- Select the 'Refund Settlement' order from the Account Tab of the Dealer Profile and click to launch the form.
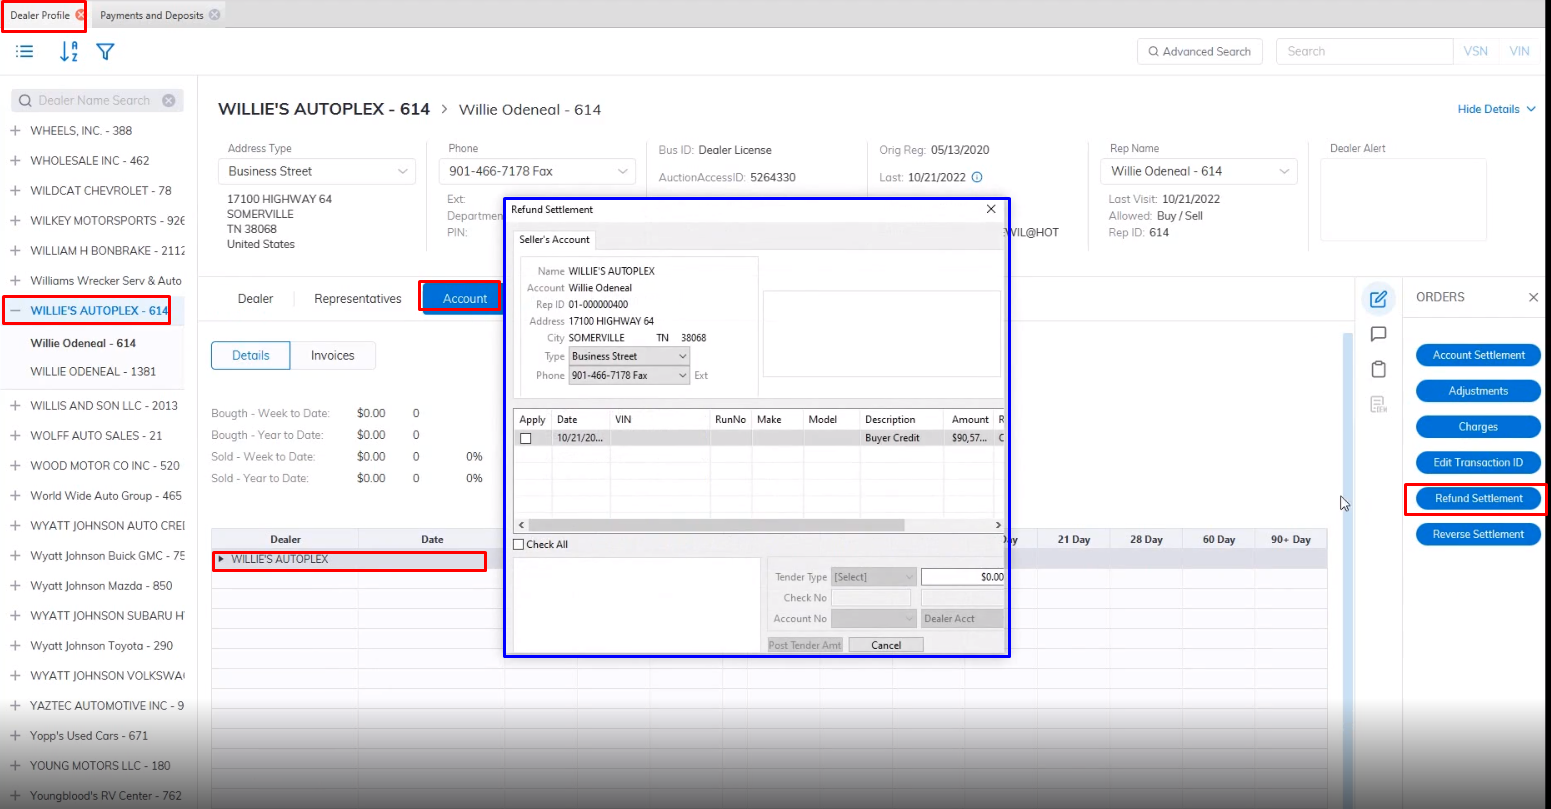
- Select the Check of the Refund
- Select the Tender you will use to make the payment. If you choose the Check option the system will auto-generate the next Check No.
- Click the Post Tender button when done to complete.
Once you have completed the 'Refund Settlement' order it will appear in the 'Orders' node in the Account Tab of the Dealer Profile along with the check number if a check was used.