Representative FAQ
1. Adding Rep 2. Edit Rep 3. Rep Permission 4. Rep fees by Vehicle Type 5. Rep Orders 6. Quick Register Reps 7. Rep Check In 8. Badges
- Add New Rep
- Edit Rep
- Rep Permissions
- Rep Fees by Vehicle Type
- Rep Orders
- Quick Register Reps
- Rep Check In
- Badges
Add New Rep
Add Representative
Select Dealer Profile Application>> Select the Dealer>>Select Representative Tab
On the right-hand side Click the 'Add Rep' order button to launch the form.
The 'Add Rep' form is identical to the 'Edit Rep' form except that the 'Status' is set to 'Active'
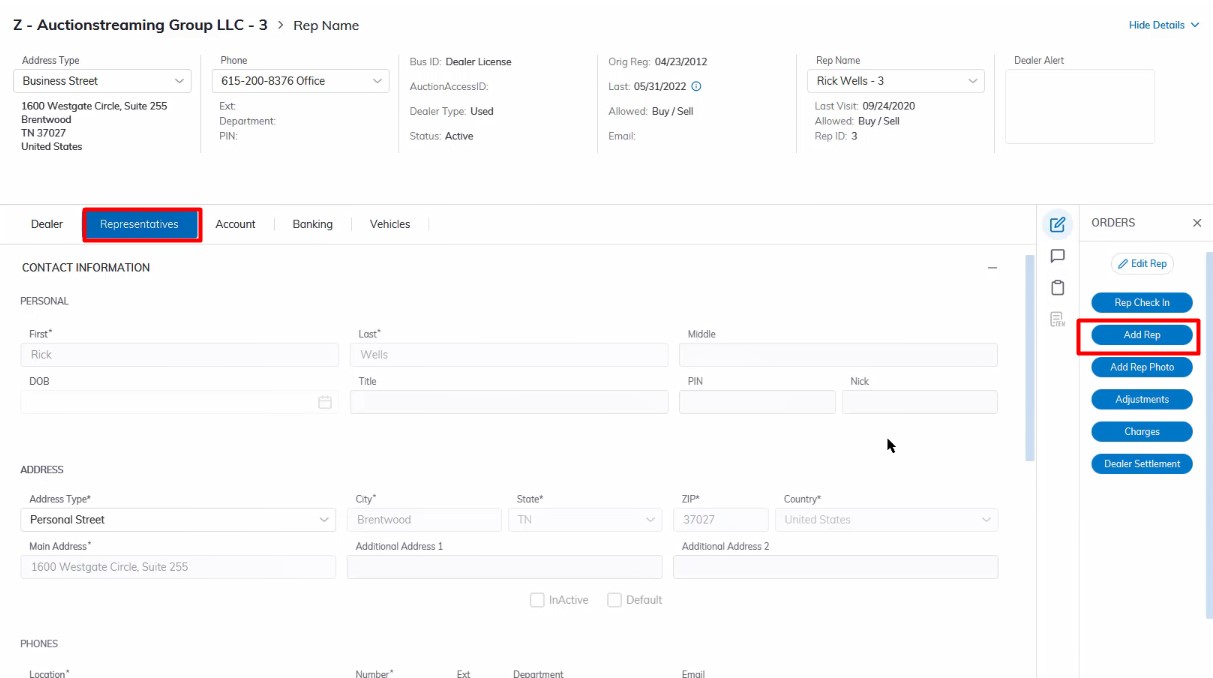
Add
- Name
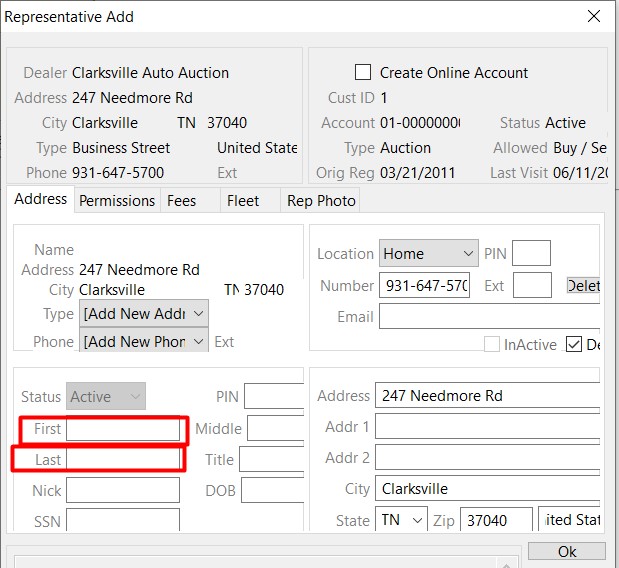
Only the First and Last names are required, all other fields will populate with information from the Dealer as default. If the default information is not correct you may change it before clicking 'OK' to save and create a new Rep.
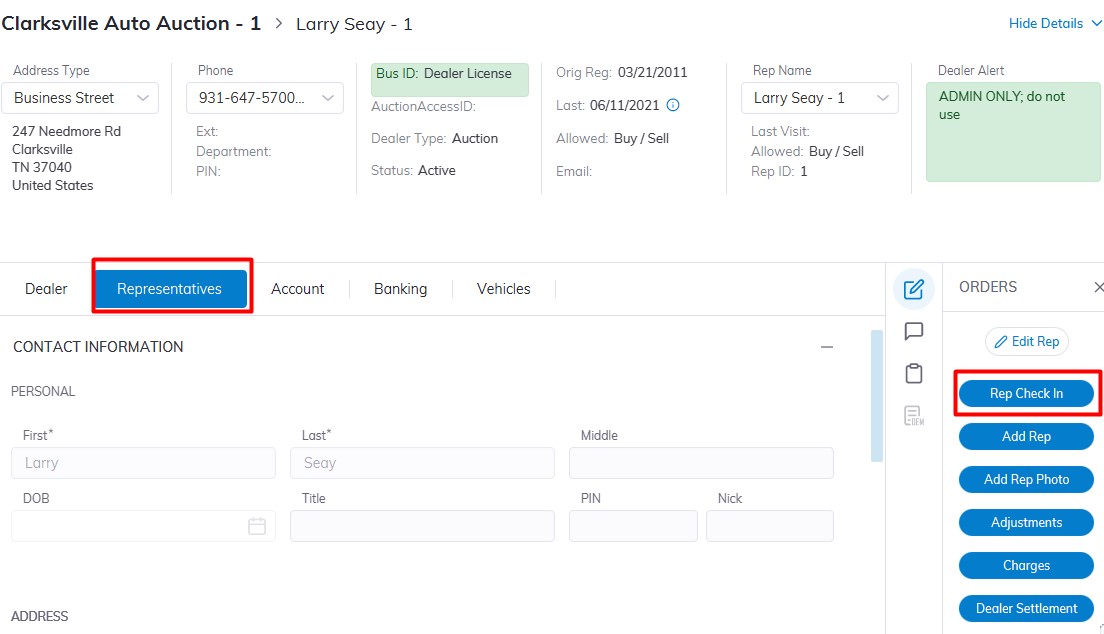
Rep Checkin
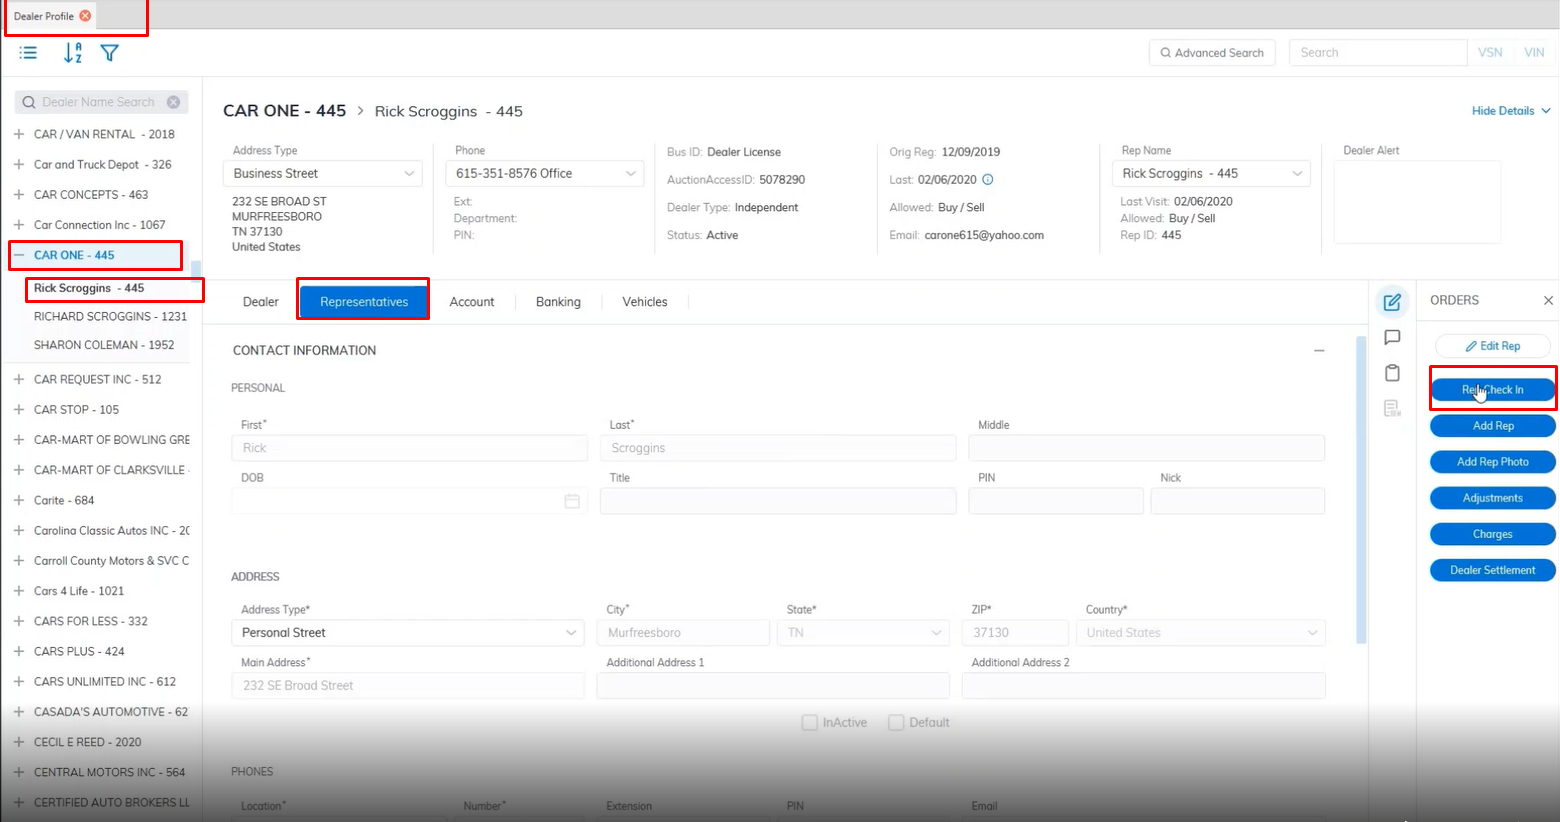
Select Dealer Profile Application>> Select the Dealer>>Select Representative Tab
On the right-hand side Click the 'Rep Check In' order button to launch the form.
Checkin
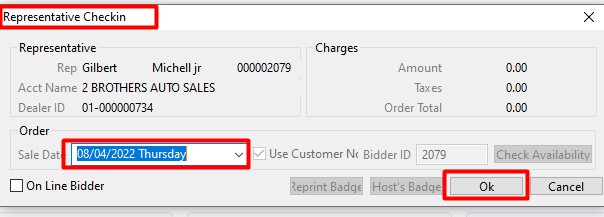
Verify the Rep Name and Dealer Name to ensure you have the right person
Select the Date of the Sale you which to check the Rep into then Click 'OK' when complete.
A bidder Badge will automatically be printed and shown on the screen
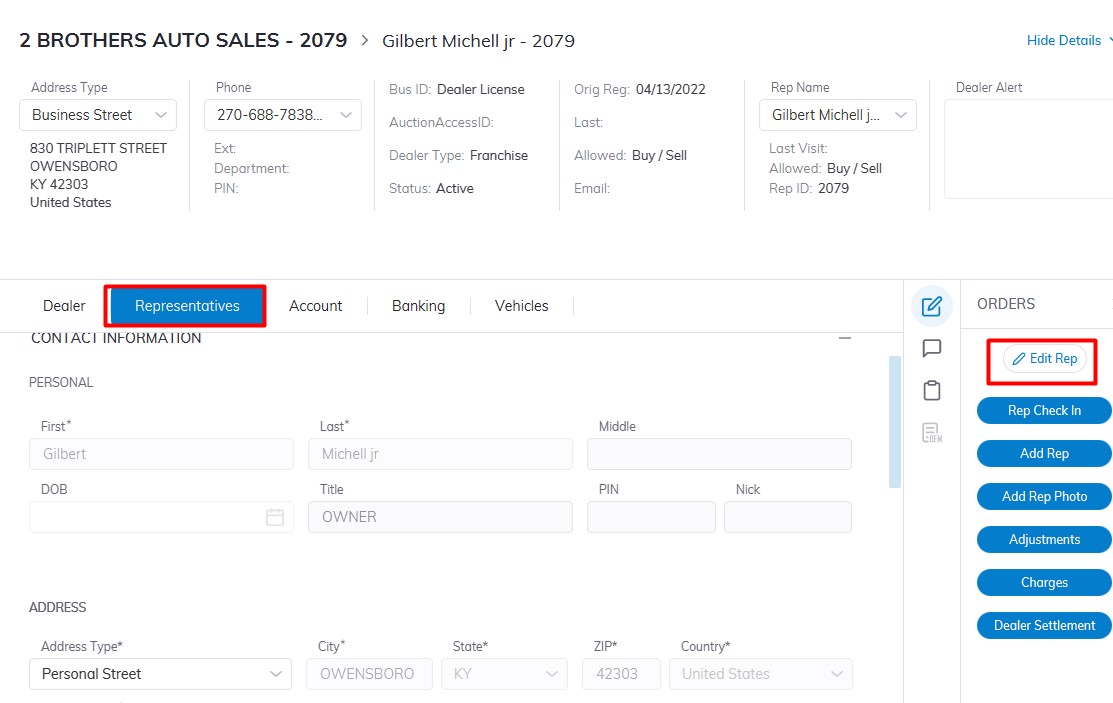
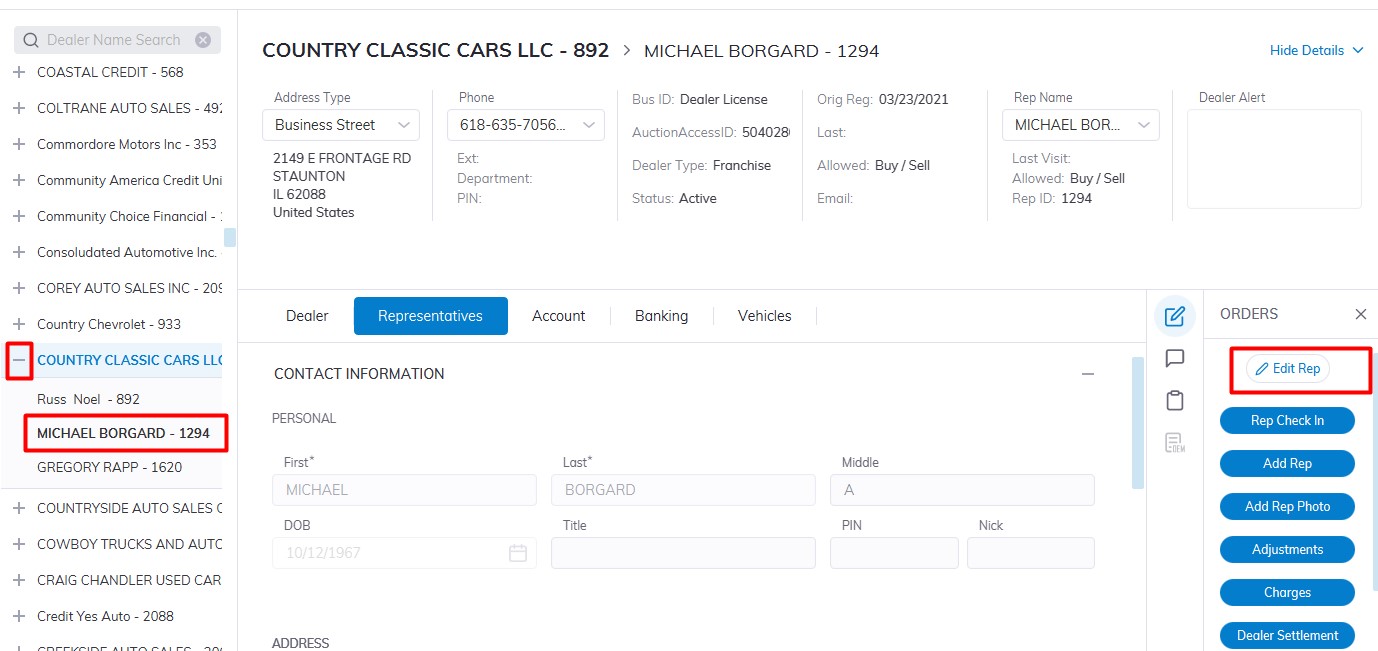
Edit Rep
Edit Representative
Select Dealer Profile Application>> Select the Dealer>>Select Representative Tab
On the right-hand side Click the 'Edit Rep' order button to edit Reps' Information.
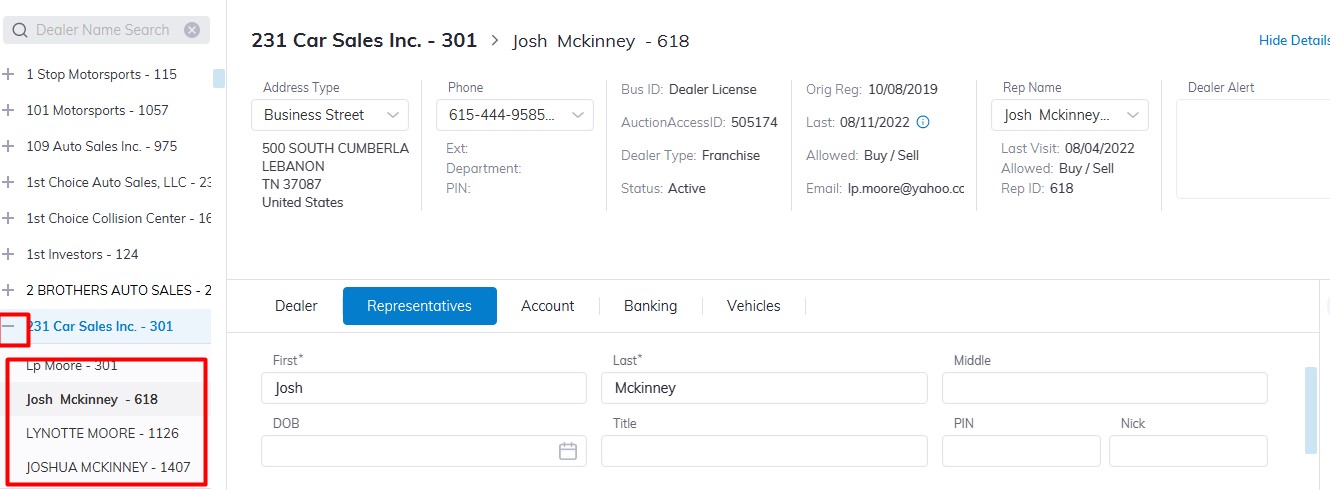
If the Dealer has more than one Rep you can choose the Rep you which to CheckIn or Edit by Clicking the plus sign beside the dealer name in the Left pane to expand then selecting and highlighting the Representative you want.
There are 5 tabs of information you can edit; Contact Information, Permissions, Account, Fees, and Fleet
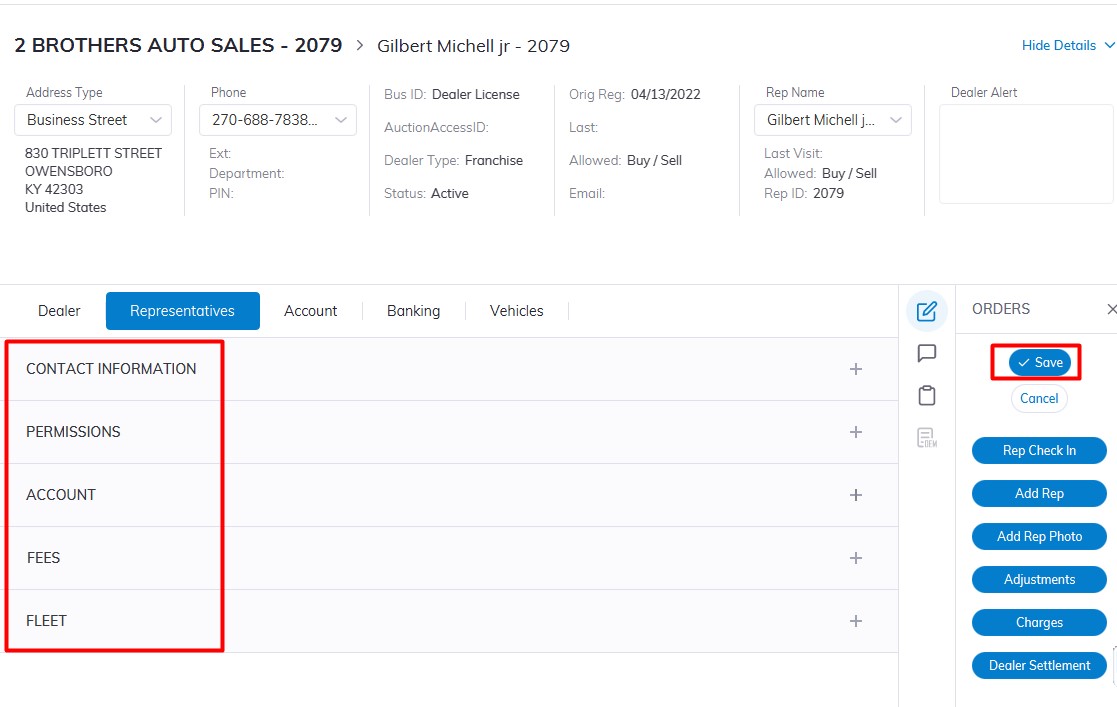
Click ‘Save’ when you have completed making and verifying the changes.
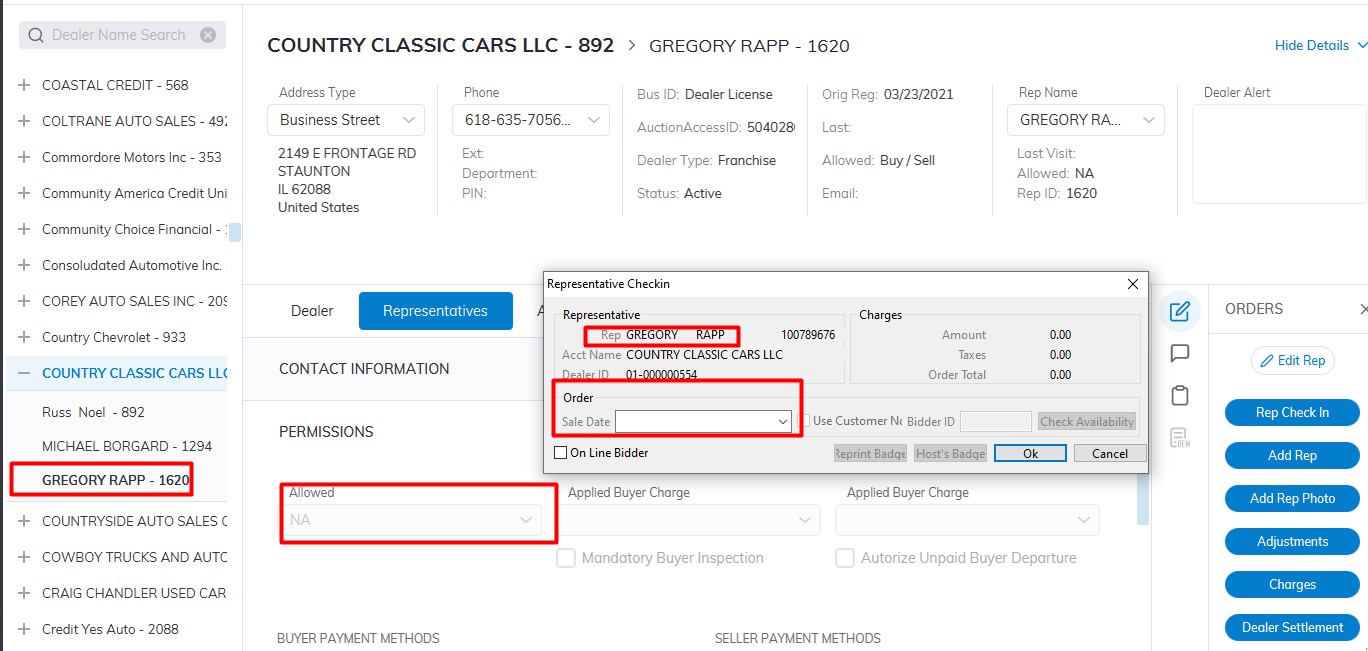
Rep Permissions
Rep Permissions
Select Dealer Profile Application>> Select the Dealer>>Select Representative Tab
In the left-hand pane Expand the Dealer by Clicking the + then Select the Rep you which to edit
On the right-hand side Click the 'Edit Rep' order button
Scroll and click on the Permissions Tab to expand to edit Reps' Information.
Allowed filed
- NA - No Buying and No Selling. The Dealer and its Reps will not be able to Register Vehicles for Sale or Check-in as a Buyer for any Sale.
- Buy - Buying Only. The Dealer and its Reps may obtain a Bid badge through Rep Check In, although they will not be able to Register Vehicles for Sale.
- Sell - Selling Only. The Dealer and its Reps may Register Vehicles for Sale, although they will not be able to Check-in as a Buyer.
- Buy / Sell - Buying and Selling. The Dealer and its Reps may Register Vehicles for Sale as well as Check in as a Buyer.
- Pre Reg - Pre Registration is used to indicate the Dealer Registration is incomplete and permission for Buying and Selling is not granted.
- Marketing - Marketing is used to indicate the Dealer Registration is for Marketing purposes only and permission for Buying and Selling is not granted.
- Exclude Mailing: Setting the 'Exclude Mailing' value to true (clicking the check box) will exclude this dealer from being included in the Mailing Label report.
Note: By selecting 'NA' you will set the Representative to 'In Active' status and they will not be able to Buy or Sell or Check-In for a Sale.
In the permissions section you can Input the following Payment Method for Buying and Selling:
Payment Methods
Select Payment Type for use in Seller Settlement.
Cash, Check, Draft and Wire
Select Payment Type for use in Buyer Settlement.
Cash, Check, Credit,
Debit, Wire, P/M Order,
Draft, Floor Plan, TeleCheck,
Travelers Check, Cashier
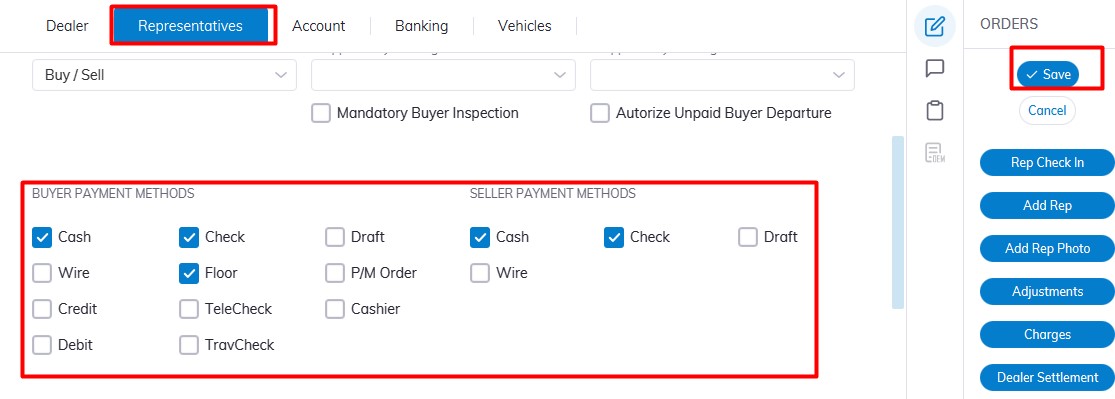
Click 'Save' to Save.
Setting Permission
Payment Method
Rep Fees by Vehicle Type
Rep Fees by Vehicle Type
Select Dealer Profile Application>> Select the Dealer>>Select Representative Tab
In the left-hand pane Expand the Dealer by Clicking the + then Select the Rep you which to edit
On the right-hand side Click the 'Edit Rep' order button Scroll to the fees Sections
There are five different Vehicle Types and each of the fees mentioned below are applied to each type.
- Automobiles
- RV's
- Marine
- Power Sports
- Salvage
Select (outlined in red)
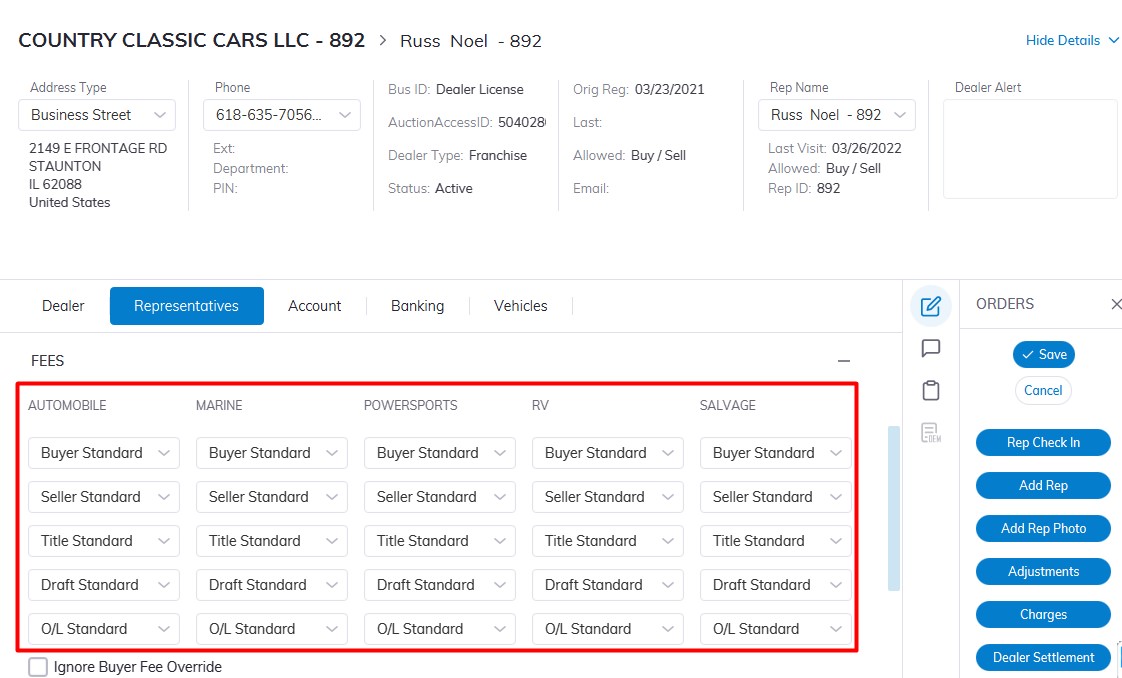
- Buyer Fees
- Seller Fees
- Title Fees
- Draft Fees
Select (outlined in blue)
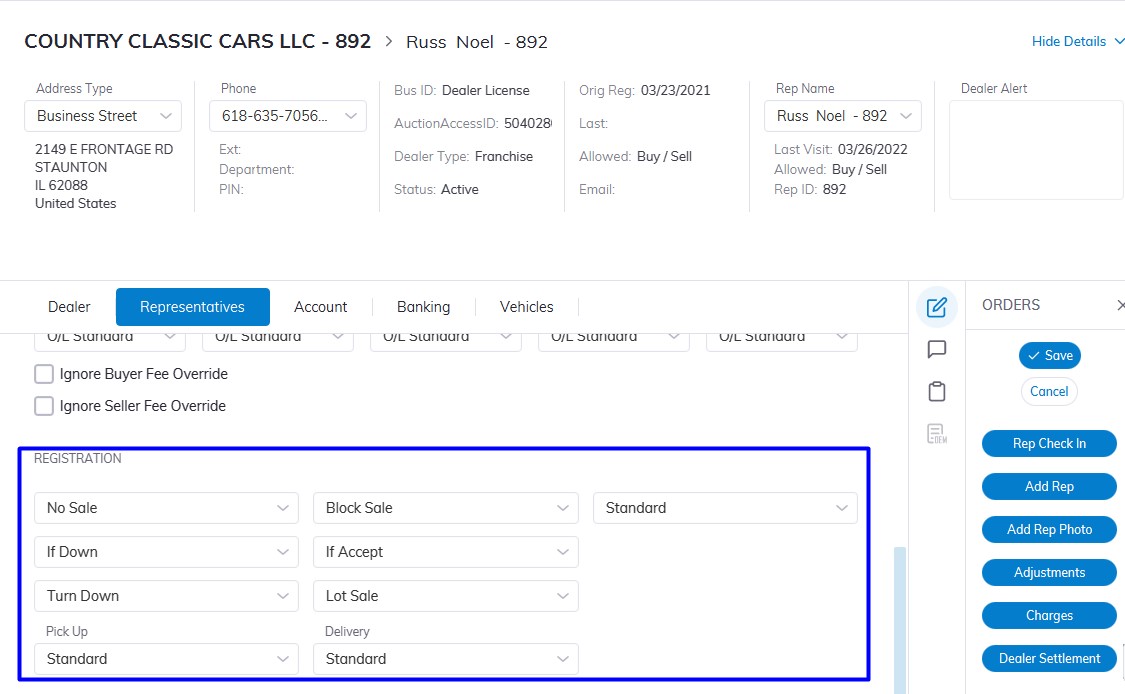
- No Sale Fee
- If Down (If Sale)
- Turn Down (Arbitration
- Pick Fee
- Delivery Fee
- Vehicle Registration Fee
The Fee may be viewed or modified in the Fee Structure application.
Note: Fees are specific by both individual Representatives and the Vehicle Type.
Rep Orders
Representative Orders
Select Dealer Profile Application>> Select the Dealer>>Select Representative Tab
Make sure to select the Rep you want to execute the order on.
On the right-hand side under the 'ORDERS' column, all allowed Rep Orders are listed.
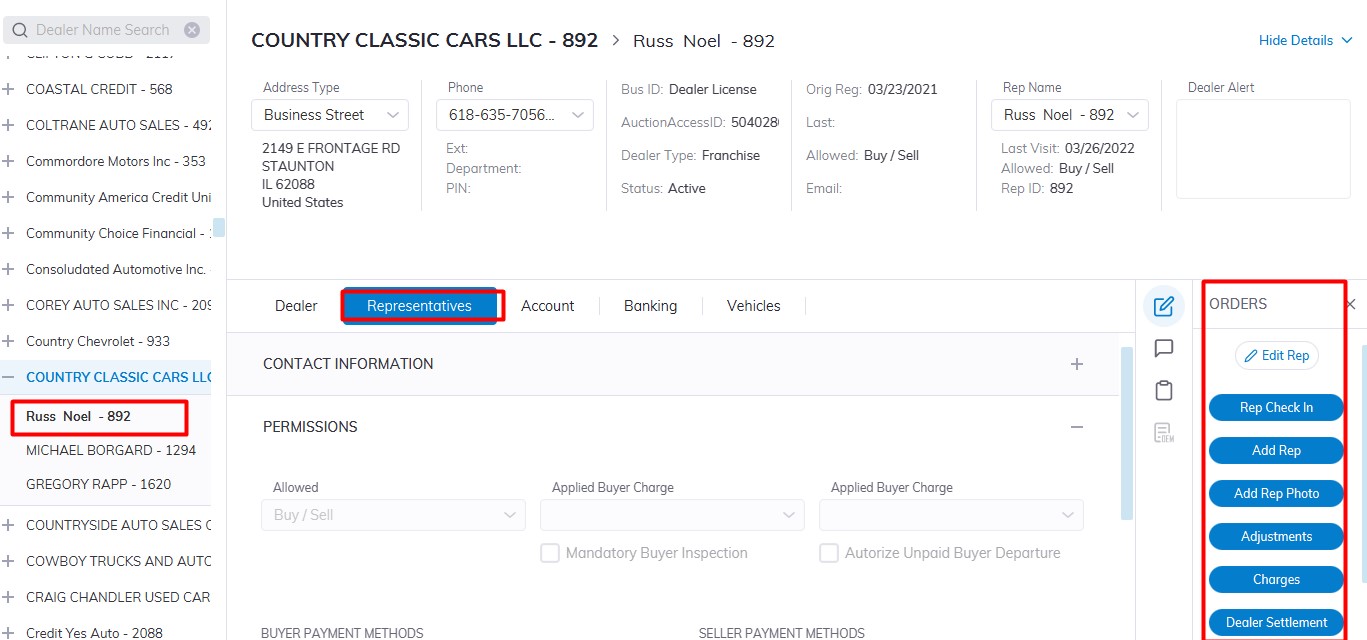
- Rep (buyer) Check In
- Edit Rep
- Add Rep
- Add Rep Photo
- Adjustments
- Charges
- Dealer Settlement
Click the 'specific order button to launch the form.
Quick Register Reps
- Quick Register is done from the Dealer Profile Application.
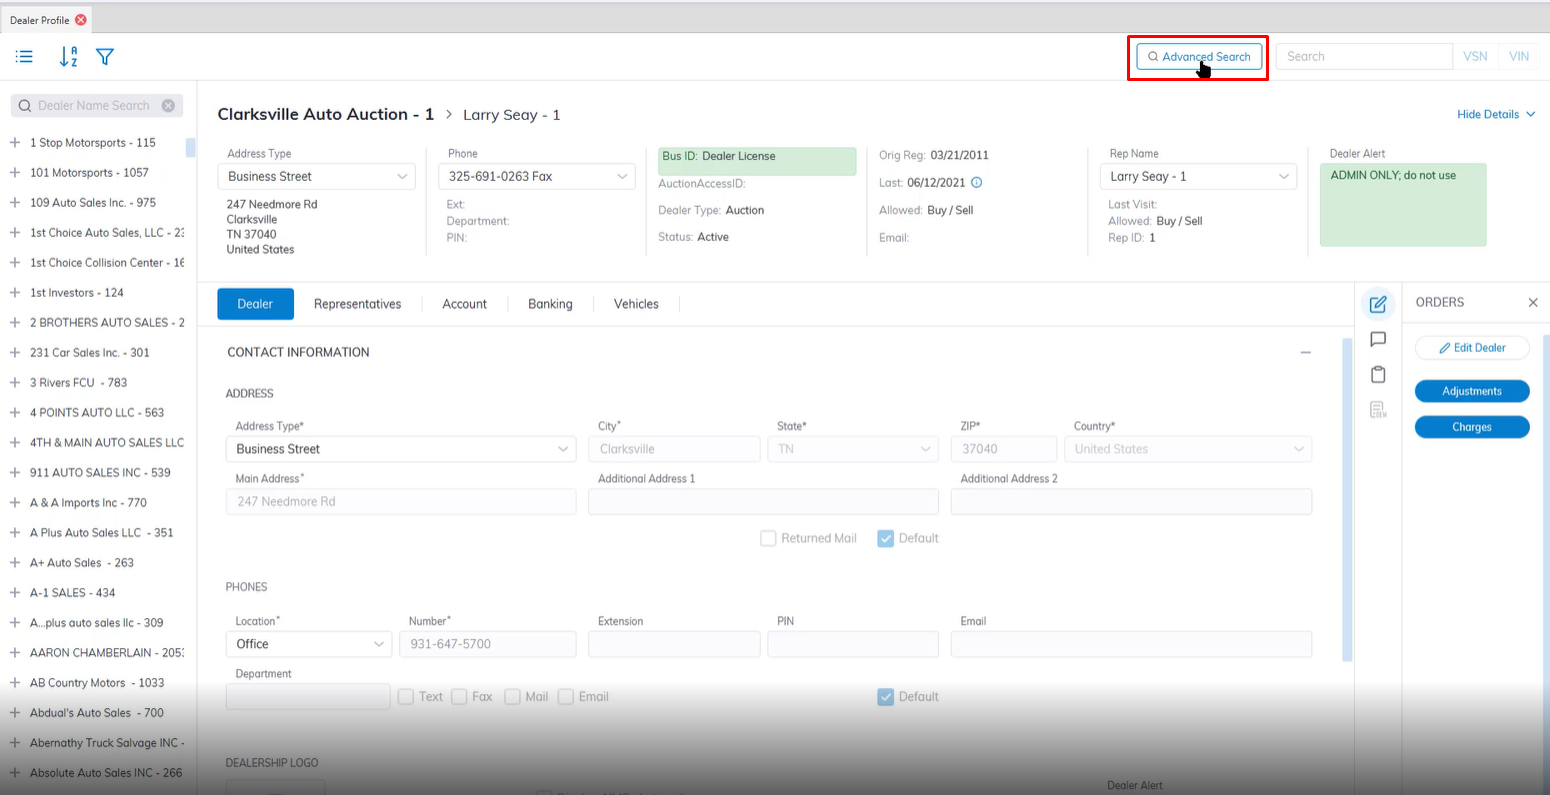
- Launch the Advanced search application in the top right corner next to the VIN/VSN search box.
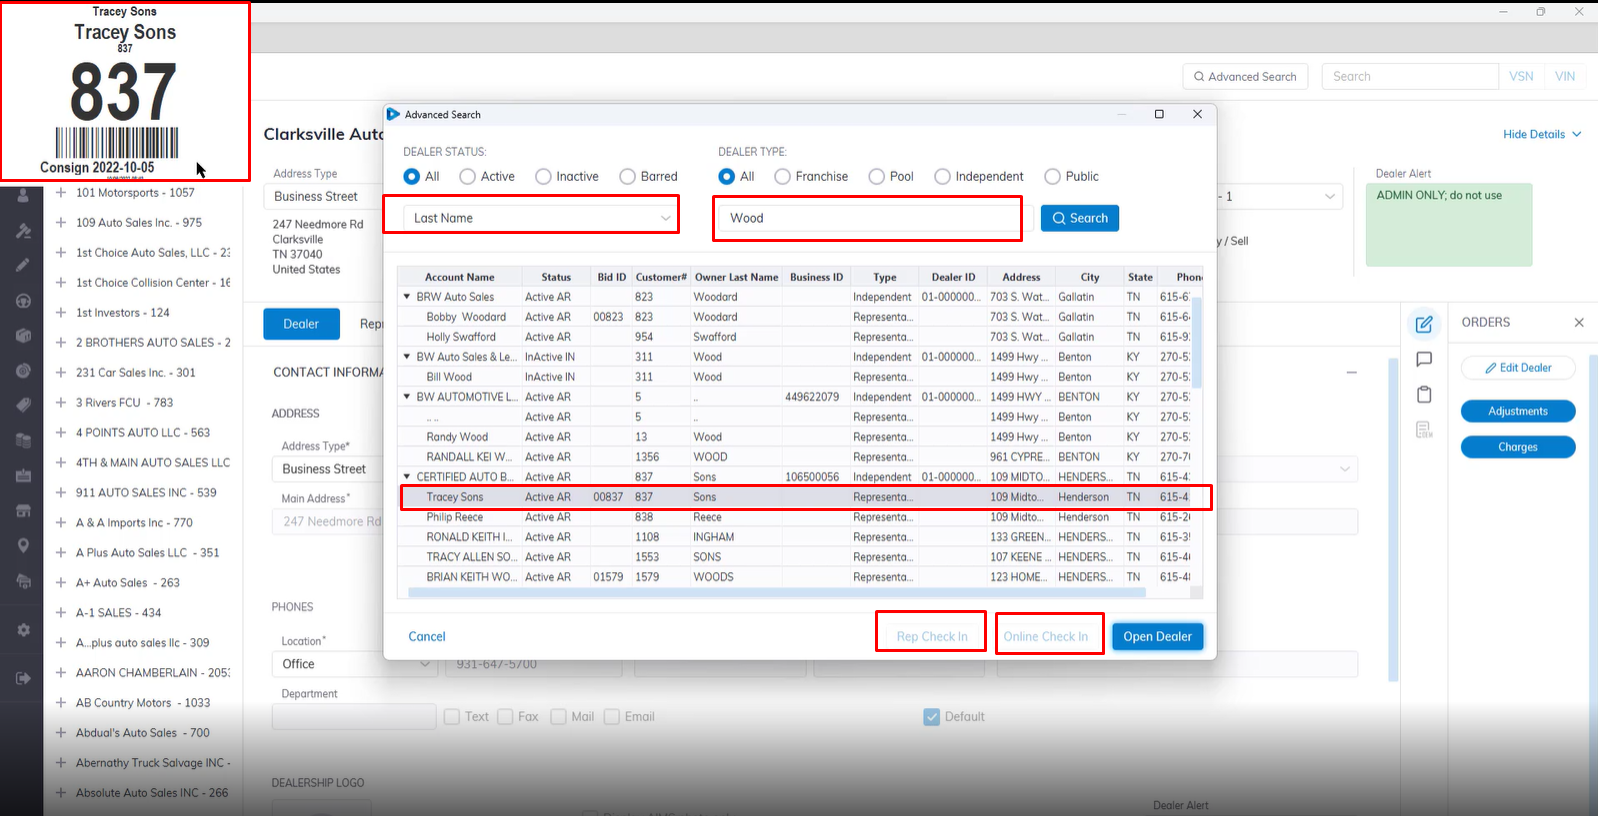
- Once the Advanced Search box pops up you Search using a number of filters.
- You can Select 'All' or filter by Dealer Status or Dealer Type.
- You can further filter by Last Name of Dealer, Account Name, Customer Name, Business Id, Rep ID etc.
- In this example we used Last Name: Wood this populate all the Representative with Wood as their last Name.
- Select the Rep you want to check in then click the Rep Check in or Online Check In button.
- The System will automatically print the badge ID once selected without you having to open each individual dealer account.
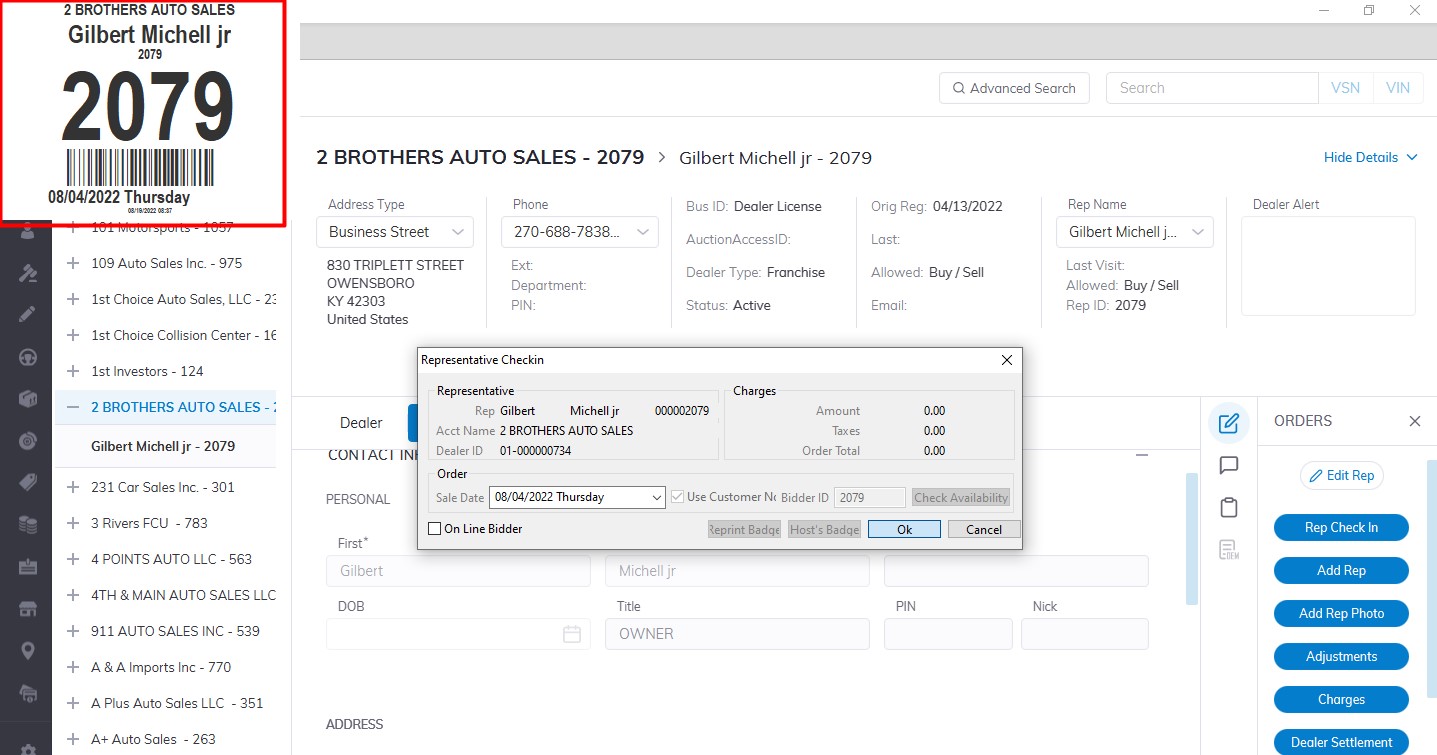
Rep Check In
Note: Make sure you are on the correct dealer.
The 'Rep Check In' Order is used to assign a Bidder ID for a buying Rep and to print a Bidder badge.
- Select Dealer Profile Application>> Select the Dealer>>Select Representative Tab
- Select the Rep
- Select 'Rep Check In' Order
- This will launch the 'Representative Checkin' form - see below
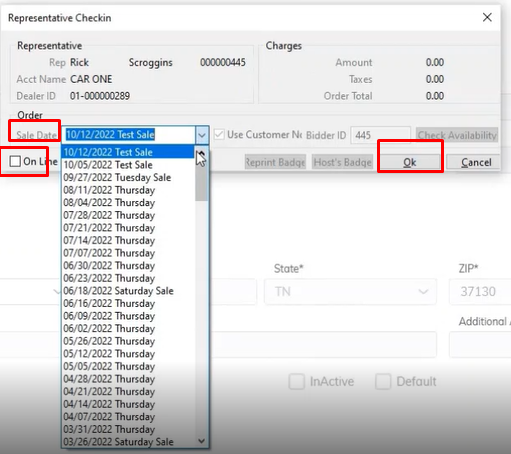
- Select the Sale Date you want the Rep to participate in
- Click 'OK' to complete the bid badge, which will automatically print at the left corner of your screen.
Badges
Note: Make sure you are on the correct dealer.
The 'Rep Check In' Order is used to assign a Bidder ID for a buying Rep and to print a Bidder badge.
You may reprint a bid badge the same way the original bid badge is printed in the Dealer Profile Application.
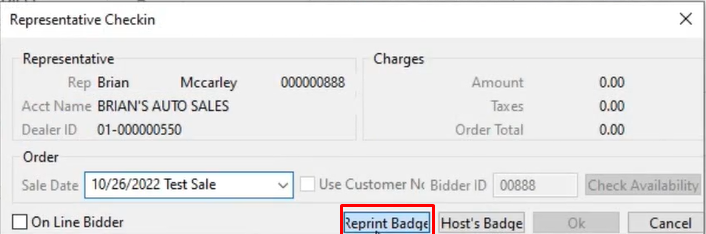
Re-printing a bid badge may also be done from a different application than the original printing ' Rep Check In ' order. This allows the Auction to guard against printing multiple bid badges with the same bidder id. Since reprints are done from the Sale Profile application protecting against numerous copies of a bidder badge is easy. As only authorized persons with user permission can print and register the original buyer in the Dealer Profile application. While other staff can be permitted only to reprint what was already generated upon request from the Sale Profile Application.
To print a Guest Badge:
Select
- Click the Rep Check In order
- Sale Date
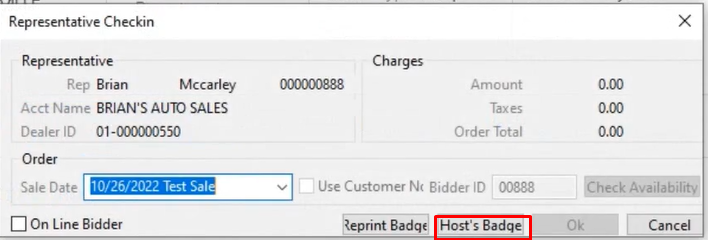
- Click on Host's Badge to launch the Guest/Driver Check-in form - see below
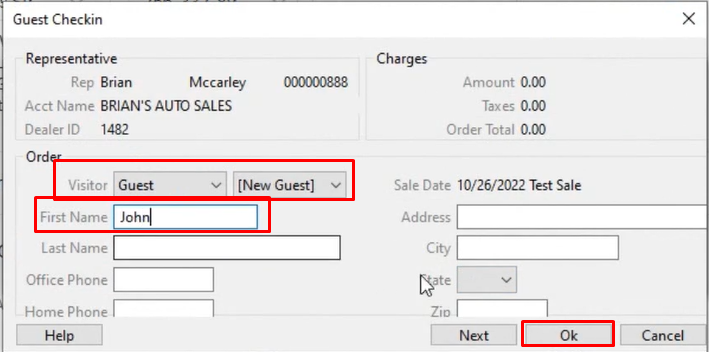
- Fill out the guest name and click 'OK'
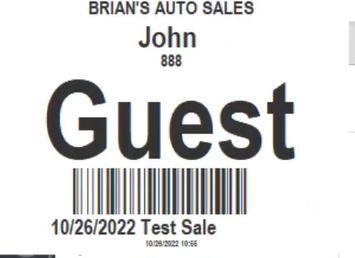
- The guest badge will automatically print
To print a Driver Badge:
Select
- Click the Rep Check In order
- Sale Date
- Click on Host's Badge to launch the Guest/Driver Check-in form - see below
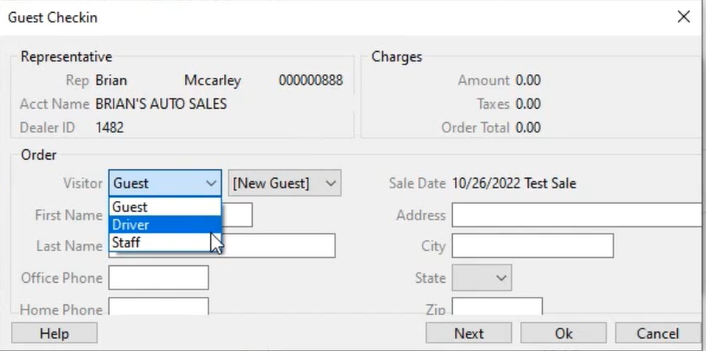
- Here you can choose the type of visitor in this example we choose Driver.
- Fill out the guest name and click 'OK'
- Driver Badge will automatically print.